Showing posts with label candles. Show all posts

Thursday, October 18, 2012

DIY: Upcycled Dollar Store Candles

Libby Dibby has a great upcycle tutorial for Dollar Store candles.  We love the idea of taking something that is already usable, but making it so that it fits our home and decor - or even fits a holiday, party or wedding theme!

Check out their blog for more DIY!  This one couldn't be more simple!  We like instructions that are so easy they take up less than a paragraph.
We took Dollar Store candles, the kind with saints on them... And used ModPodge to secure tiny fabric scraps to them... They look even better than I expected them.

Tuesday, October 2, 2012

DIY: Halloween Tin Can Luminaries

Jolly Mom's blog has a very easy to follow DIY that features tin can luminaries.  There is still plenty of time to whip up these guys to line your steps or driveway.  Ideal for a party!

Head on over to her blog for even more DIY!


Photobucket

What You'll Need:


Photobucket

* Sharpie or marker in the same color as your paint
* Clean empty tin cans {I like to use the big coffee cans, any size will work}
* Hammer and large nail or awl
* Paint
* Paint brush
* Candles


Instructions

Fill the tin can with water and place it in the freezer. When the water in the can is frozen, remove the can from the freezer.

Photobucket

Using the marker, draw whatever image or word onto the tin can. You can freehand or print a design from the internet and then trace it onto the tin can. Keep the design simple though. Design Ideas: outline of a cat, a bat, a witch's hat, words like Boo or Happy Halloween.

Photobucket
Photobucket

Place the tin can on a folded towel. This will help brace the tin can and reduce the impact of punching the holes with the hammer.

Photobucket

Then, use the hammer and awl {or nail} nail to puncture the design in the can.

Photobucket

When you're done punching the holes, place the can under hot, running water to melt the ice.

Photobucket

Also, since water expands as it freezes, the bottom of your can will probably not be level. If not, then turn the can over, cover with a towel, and hammer down the edges until the bottom of the can is level.

Photobucket

Paint the tin can using either spray paint or acrylic paint. Once the the paint is dry, you'll probably have to go back with a toothpick and poke some of the holes through on the can since the paint can clog them up.

Photobucket


Place a candle inside the can and enjoy!

Photobucket

NOTE: You can also puncture one hole on either side of the tin can, attach a piece of wire, and then hang the luminaries as well!

Saturday, September 29, 2012

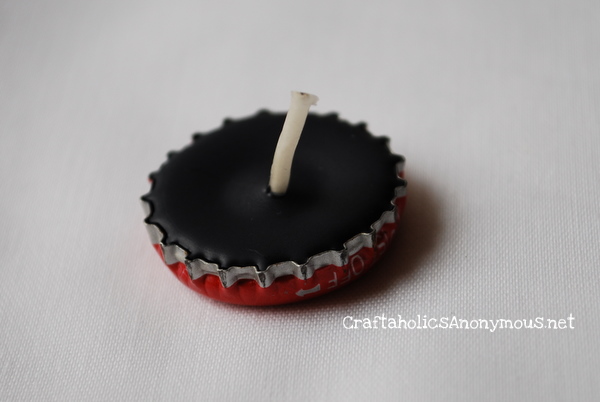
DIY: Crayon Candles in Bottlecaps

We are forever questing to find bottlecap crafts that are easy and look good!  We love to knokw that we can upcycle these bad boys and make it look like we spent hours, when we only spent minutes.  

Craftaholics Anonymous has come to our aid with their DIY for turning old crayons and bottlecaps into mini candles!
how to make candles with bottle caps
these tiny candles are a really fun to make and come together quickly. AND you can up-cycle several materials in the process.

To make these colorful tiny candles, I used several materials that usually end up in a land fill: bottle caps, broken crayons, and empty soup cans. the only thing i bought to make them was the pre-waxed wicks which cost me $1.50 for a set of 12.

How to Make Bottle Cap Candles
supplies: bottle caps, crayons {or wax}, pre-waxed wicks, soup cans, wax paper {optional}, small cooking pan, scissors, and water
remove paper from crayons. you can also use candle wax if you wanted.
put crayons in clean, empty soup cans.
take your pre-waxed wicks and…
bottle caps
put wicks inside the bottle caps. i placed my bottle caps on wax paper in case i spilled some wax.
then using a small cooking pan filled with a couple inches of boiling water, place the can in the pan and melt the crayons. {you could also use a candle warmer to do this}the crayons melt pretty quickly. *note: it only takes a few crayons to fill a bottle cap!
pour the melted crayons or wax into the bottle caps.
let cool for 1-2 hours. then trim the wicks and you have some fun tea light candles to enjoy!
**added later: crayon wax does not smell that great when burned. if you plan to burn these candles, you may consider adding a scent to them**

Friday, September 21, 2012

DIY: Pinecone Candle Holder

Crissy's Crafts blog has a great fall DIY that would jazz up any home, or make a wonderful Thanksgiving table center piece?  We think so!  Check out their blog for more.
 Material:
pine cones, spray paint, the bottom of a soda can, glue gun and scissors
 Spray paint the pine cones
After it dries, cut the top of the pine cone and spray paint again. 
Cut the button of a soda can and trim around it.
 Glue the aluminum circle to the pine cone.
You are done!

Sunday, August 26, 2012

DIY: Dipped Votives - Dollar Store Craft Idea

Nest of Posies made one of those dollar store crafts you know we like - since it's pretty and it's cheap!  We know she made them in bright summery colors (which are stunning), but we could totally see these in holiday colors - autumn, Christmas, etc. - with glitter or other funness!!

Check out her blog for more DIY!!


I used some votive candle holders I had from the Dollar Store & some craft paint.
Plastic bowls for dipping, newspaper & parchment paper for drying.
The only instruction I'll give, is once you start turning your votive around in the paint, don't pick it up until you are done.  
*Keep the votive against the side of the bowl that has the paint & continually move in circular motion until it is covered.*


Thursday, August 23, 2012

DIY: Autumn Leaf Luminaries


mla103665_1008_luminaria.jpg

We are either hit of miss with Martha Stewart's crafts - but this one we love!  Sometimes they can be just too detailed and complicated for our liking, but this one is just up our alley with simple materials and even more simple instructions.  You can get everything you need for cheap, and they look expensive - bonus!

Tools and Materials
- Fallen leaves
- Colored paper treat bags, matte-colored SOS in Sunbrite size No. 6, and Orange size No. 4, $10.10 to $11.19 per 100, from Paper Mart
- Acrylic paint (in colors that contrast with bags)
- 2-ounce misting bottle (176062), $1.29, from The Container Store

Autumn Luminarias How-To:
1. Collect fallen leaves, and arrange them on top of colored-paper treat bags.

2. Put 1 teaspoon acrylic paint (choose colors that contrast with bags) in a 2- to 3-ounce misting bottle. Fill halfway with water and shake to mix. Mist bags and leaves. Let dry 20 minutes. Remove leaves. Repeat on other side. Fill bottom of each bag with sand.

3. Illuminate: For safety reasons, use either glass holders that are three times as tall as candles or substitute battery-operated lights.

Wednesday, August 15, 2012

DIY: Dollar Store Candle Makeover

We love dollar store shopping, despite its dangerousness since we have ZERO self control in there....

But thanks to Banman Land's blog, we'll have some direction on what we want to buy next time we go!  We love being able to jazz up our dollar store finds, and they've done a wonderful job with these number candles!  So easy, so quick, but so very cute!


Ok, I have revamped a few Dollar Store candles and gotten a lot of questions and comments so I thought I'd talk you all through it.


Here's what Maddie's birthday candle looked like when I bought it.
Kinda predictable.

I grabbed some glittery puff paint
{not to be confused with glitter glue}
I stuck all sorts of cute buttons and tiny rhinestones in the inside of the outline with the puff paint.
{If I hadn't liked the teal outline for my party theme, I would have re-outlined it with my sparkly puff paint)

I let it dry for an hour
{at least}

After it was dry,

I gently stuck a toothpick into the bottom of the candle.


Here's what it looked like when I got finished with it.
{oops, this is BEFORE the toothpick but you can imagine what that would look like, right?}