Showing posts with label party budget. Show all posts

Friday, October 5, 2012

DIY: Halloween Party Favor Bag from Coffee Filters

Savvy n Sassy has a great upcycle tutorial for coffee filters.  These Halloween bags are just adorable, and are definitely party worthy ideas!

You will need: a coffee filter, some Halloween stamps, ink, ribbon and some sweet treats!
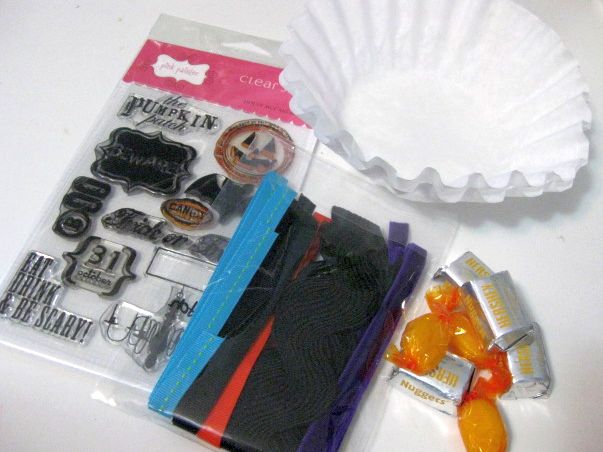
First step, stamp one side of your coffee filter.
Then, flip it over (wrong side up), and add in your sweet treats.  I chose to wrap my treats in some Halloween paper, but that’s up to you!
Wrap up your treats, and tie with some ribbon.  All done!! 

Sunday, September 9, 2012

DIY: Dollar Store Party Hat Makeovers

So, in keeping with our theme from yesterday - we are showcasing this tutorial that is brought to you by "From Marriage to Motherhood."  These party hats are so cute and really can be made into just about any theme for any party.  We can see so many uses for these it's overwhelming really...


And turned them into these....


Super easy to do.


IF YOU WOULD LIKE TO MAKE THEM, HERE ARE THE STEPS:

Find and purchase some pretty scrapbook paper patterns. I purchased mine at Hobby Lobby....


...for $ .59 cents per sheet {for the large sheets}.


Take a part ONE of your party hats. Choose the paper that you'd like to cover up the hat with. Have a pair of scissors and a pen {or pencil} handy....


Turn your scrapbook paper over and lay your hat flat down on it....


Using your pen or pencil, trace the hat {I did not include the tab in my tracing}...


Cut out the outline and then you will have this....


I use this first cut out as my template and place three sheets of paper behind it at a time and cut out more "party hat coverings" until I have all that I need. I save this first cut out to cover up my last hat.

Roll the paper cut out around the hat to create its new pretty covering....


I use clear tape secure the pretty paper to the party hat {you can also use double sided tape or craft glue}....

Back of the hat


If you want to fancy up your party hats even more like I did, you can purchase a pack of pom-pom's. I got mine at Hobby Lobby {just $ .99 cents for a pack of 24 in pink, 1" - or a pack of 36, 3/4"}. I bought two different sizes because I didn't know which size would look best on the hats. I preferred the larger ones so I used pink and love how they turned out!


Using a hot glue gun, place a dot of hot glue in the middle of a pom-pom and use your fingers to hold it down on top of the hat for about 5-10 seconds.


A super simple project that took these Dollar Store Hats....


And turned them into pretty little pieces that will be adorned on pretty little heads!

Wednesday, August 15, 2012

DIY: Dollar Store Candle Makeover

We love dollar store shopping, despite its dangerousness since we have ZERO self control in there....

But thanks to Banman Land's blog, we'll have some direction on what we want to buy next time we go!  We love being able to jazz up our dollar store finds, and they've done a wonderful job with these number candles!  So easy, so quick, but so very cute!


Ok, I have revamped a few Dollar Store candles and gotten a lot of questions and comments so I thought I'd talk you all through it.


Here's what Maddie's birthday candle looked like when I bought it.
Kinda predictable.

I grabbed some glittery puff paint
{not to be confused with glitter glue}
I stuck all sorts of cute buttons and tiny rhinestones in the inside of the outline with the puff paint.
{If I hadn't liked the teal outline for my party theme, I would have re-outlined it with my sparkly puff paint)

I let it dry for an hour
{at least}

After it was dry,

I gently stuck a toothpick into the bottom of the candle.


Here's what it looked like when I got finished with it.
{oops, this is BEFORE the toothpick but you can imagine what that would look like, right?}

Friday, August 10, 2012

DIY: Party Animal Candle Holders

The Sweetest Occasion has come up with such a cute idea and it's so easy we can't believe we haven't seen anyone else do this before! We can see these being in ANY color.  Having a princess party?  Make them pink with glitter!  A dino party for a little boy?  Make them blue and you could even hand stencil their age on them!


Supplies -
  • plastic animals
  • plastic candle holders
  • drill with 1/8″ drill bit
  • pliers
  • gold spray paint
For the plastic animals, you can use any kind you can find. Keep in mind the size of the cake or cupcake you are sticking it on. I used the animals with a flat back, so it is easier to stick in the candle holder.
Hold the animal with the pliers and drill a hole straight down, being careful not to pop out the other side. The hole just has to be deep enough for the holder to fit.
Spray paint the animals in a few light coats, rotating them to cover all sides. Note: I used gold (w/o primer) and it worked fine for both the nicer plastic animals and the dollar store ones. I wanted a pop of color but some of the animals didn’t take to regular spray paint, be sure to use a plastic spray paint or a primer for plastic and always test one first.
I also painted the candle holders to match. Let dry.
That’s it. Party on like an animal! Rawr.

Tuesday, July 3, 2012

Tuesday Tutorial: Paper Lantern Ornaments

Want a cute, simple decoration that you can make in minutes? These paper lanterns from The Creative Place are perfect!  Make a bunch and string them together as a garland, or put a bunch in a bowl, or in a hurricane glass in a bathroom or guestroom.

What you'll need:
- Paper - enough to cut 15 strips - ½"x4" (7.5"x4")
- 2 small brads
- Ruler, 1/16" hole punch or pushpin to poke holes, exacto blade or
rotary cutter and a cutting mat

1. Measure out and cut your paper into 15 strips - each strip ½"x4"
2. Punch holes 1/8" from edge on short edge on both ends of paper strips. I used a 1/16" hole punch, but a push pin can be used to poke holes - it might take a little longer to get the brad through.
3. Put a brad in each end of your punched paper strip stack.


(Back)
4. Starting with the strip on the bottom, twist it out to begin to unfold the paper lantern. It might look kind of wonky, but it will get better :)
5. Twist out each strip individually in order from bottom to top of paper strip stack.
6. Arrange to your liking and Voila! A paper lantern ornament!
These would make a great garland - I strung a few together and they looked fabulous!

Saturday, June 30, 2012

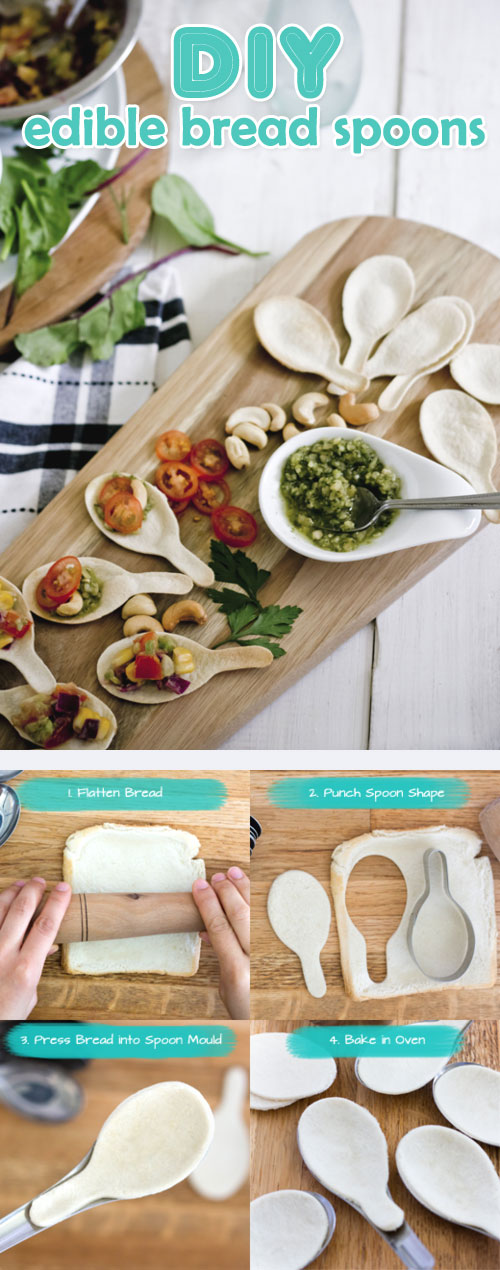
DIY – learn to make edible spoons

 Great idea from Zomoc.com - wonderful for parties! Quick, easy, and to the point!

DIY - learn to make edible spoons