Showing posts with label light. Show all posts

Monday, October 8, 2012

DIY: Paper Lanterns

We realize that these don't look to Halloween-y upon first glance, but these are definitely a versatile craft that could easily be done in orange and black to hang for a party!!  So, jazz it up and make a few for every holiday or party!  Thanks to Salty Pineapple for this wonderful step-by-step tutorial that couldn't have made it easier to understand.


With a piece of paper, scissors, and a bit of ribbon, you can make cheerful paper lanterns, perfect for decorating your patio. Kids who are old enough to use scissors and cut straight lines can help with this project, too--I remember making paper lanterns like these when I was a kid. I added a couple twists, just for fun: a peek-a-boo contrasting paper, and a ribbon handle.


You Need (for each lantern):


2 pieces of paper in contrasting colors (I used 8x8 scrapbooking paper because it was what I had on hand)
6" piece of ribbon
Scissors
One or more of the following: tape, glue, scissors


To Make:


1. Fold one piece of paper in half (lengthwise so it's long).
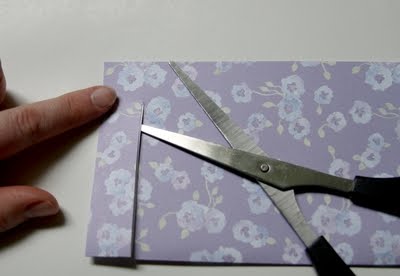

2. Starting at the fold, cut a straight line to within about 1/2" of the edge. DON'T cut all the way to the edge. (See, I'm pointing at the end, where you shouldn't cut.)


3. Continue to make cuts parallel to your first one, an even distance from each other, say about 3/4" from each other.

4. When you've completed your cuts, open the folded paper. Roll paper so fold is pointing outward in the middle of the lantern.


5. Tape, staple, or glue the top edges together. (I taped).

6. Repeat lantern-making process with contrasting color, but change the width between cuts. So, if you cut 3/4" from each other on the first lantern, do 1/4" cuts. Also, don't fasten lantern together yet.


7. After you're done cutting, open up like you did the first one, but roll lantern small enough to slip inside of first lantern. Insert into first lantern.


8. Allow second lantern to open up inside the first lantern, then tape the two together at the top edges to secure.


9. Put glue on one edge of a 6" piece of ribbon, and insert between two lanterns at the top. Squeeze to secure ribbon between two lanterns. (I used hot glue - Nikki's favorite!)

10. Repeat for second edge of ribbon, across from first side of ribbon. That's your handle.

Thursday, August 23, 2012

DIY: Autumn Leaf Luminaries


mla103665_1008_luminaria.jpg

We are either hit of miss with Martha Stewart's crafts - but this one we love!  Sometimes they can be just too detailed and complicated for our liking, but this one is just up our alley with simple materials and even more simple instructions.  You can get everything you need for cheap, and they look expensive - bonus!

Tools and Materials
- Fallen leaves
- Colored paper treat bags, matte-colored SOS in Sunbrite size No. 6, and Orange size No. 4, $10.10 to $11.19 per 100, from Paper Mart
- Acrylic paint (in colors that contrast with bags)
- 2-ounce misting bottle (176062), $1.29, from The Container Store

Autumn Luminarias How-To:
1. Collect fallen leaves, and arrange them on top of colored-paper treat bags.

2. Put 1 teaspoon acrylic paint (choose colors that contrast with bags) in a 2- to 3-ounce misting bottle. Fill halfway with water and shake to mix. Mist bags and leaves. Let dry 20 minutes. Remove leaves. Repeat on other side. Fill bottom of each bag with sand.

3. Illuminate: For safety reasons, use either glass holders that are three times as tall as candles or substitute battery-operated lights.

Monday, August 20, 2012

DIY: $12 Pendant Lamp Makeover!

We love Ikea, and we love this wonderfully done Ikea lamp makeover!  This tutorial comes to us from Apartment Therapy's blog, and we can't wait til this weekend when we can hit up Ikea and give this a shot.  This looks like a show piece - but for only $12 (including the price of lamp)!
010609-lamp2.jpg A
010609-lampthumbs.jpg
010609-lamp1.jpg
Ashley let us in on a few of her secrets ....
"After some experimentation I found that the best way to attach the petals was with 'shiny' scotch tape (the type that looks like packing tape) rather than the matte scotch 'magic' tape (which gave obvious seams/shadows that looked less than stellar). The 'petals' were cut in various lengths (I would cut a sheet of wax paper and fold it over several times so I was cutting 8 petals at a time) and attached from the bottom-->up (with shorter petals at the top)...don't be discouraged if you can see a subtle shadow cast by the tape initially as lots and lots and lots of layers are key! The petals curved naturally from the wax paper coming on a roll, and I placed most of them with the curl flipping out. Also, in lieu of wax paper I might use parchment paper for the next go-round as it has a more matte appearance when the light is off."
010609-lamp3.jpg
$1.19 (wax paper)
$0.50 (tape)
$6.00 (23.5" paper lantern from IKEA)
$3.99 (electric cord form IKEA)
---------
$11.68

Tuesday, August 7, 2012

DIY: Upcycled TetraBox Lamp

"Demilked" has a wonderful tutorial that we are pretty sure is just this side of awesome-sauce.  We may never have the energy / time to put this one together, but we are hoping to!!  Maybe a smaller version?  What do you think??

People are so creative, no?