Showing posts with label kid crafts. Show all posts

Saturday, October 13, 2012

DIY: Memory Game

We always have left over scrap paper and we love the idea of being able to upcycle it into a fun game for the niece and nephew!  Props to Craftiness is Not Optional for this wonderful idea. 


what you'll need:

16 wooden squares (i found mine at michael's for 30 cents a pop, and they are 2.5 inches square)
scrapbook paper
mod podge
foam brush

cut paper into squares (2 3/8 inches fit the best) 2 each, of course. it's great to use those scraps up!

spread a thin layer of mod podge on the wood and place the paper onto the glue. press firmly into place.

repeat for the other side, using paper that matches.


you can of course put another layer of mod podge on top of the paper, but i opted not to, cause that stuff is messy. then sand the wood for nice smooth edge

Thursday, August 23, 2012

DIY: Autumn Leaf Luminaries


mla103665_1008_luminaria.jpg

We are either hit of miss with Martha Stewart's crafts - but this one we love!  Sometimes they can be just too detailed and complicated for our liking, but this one is just up our alley with simple materials and even more simple instructions.  You can get everything you need for cheap, and they look expensive - bonus!

Tools and Materials
- Fallen leaves
- Colored paper treat bags, matte-colored SOS in Sunbrite size No. 6, and Orange size No. 4, $10.10 to $11.19 per 100, from Paper Mart
- Acrylic paint (in colors that contrast with bags)
- 2-ounce misting bottle (176062), $1.29, from The Container Store

Autumn Luminarias How-To:
1. Collect fallen leaves, and arrange them on top of colored-paper treat bags.

2. Put 1 teaspoon acrylic paint (choose colors that contrast with bags) in a 2- to 3-ounce misting bottle. Fill halfway with water and shake to mix. Mist bags and leaves. Let dry 20 minutes. Remove leaves. Repeat on other side. Fill bottom of each bag with sand.

3. Illuminate: For safety reasons, use either glass holders that are three times as tall as candles or substitute battery-operated lights.

Tuesday, August 21, 2012

DIY: Muffin Tin Crayons

This tutorial from Kaboose's blog couldn't be easier, more fun, or cheaper!  Three things that we just love in any craft.  

What you'll need:

  • Cupcake/muffin tin
  • Non-toxic broken crayons
  • Vegetable oil
  • toothpick

How to make it:

  1. Preheat the oven to 275 degrees F.
  2. Remove all the paper labels from crayon pieces. (Please check to make sure they are non-toxic crayons.)
  3. Put ¼ teaspoon of vegetable oil into each muffin pan cup, no cup liners needed.
  4. You will use the equivalent of 4 new crayons for each cup. Place broken crayons (no longer than an inch each) into the muffin pan. This will fill the cup about 1/3 full.
  5. Place into the preheated oven and watch carefully, they melt quickly!
  6. Bake crayons for 8 minutes or so.
  7. When the crayons begin to melt, remove them from the oven and stir gently with a toothpick.
  8. Crayon will look “ugly” and the colors may appear blended too much. Don’t worry! They look much better on the other side.
  9. Let the crayons cool completely.
  10. Once cooled, pop the crayons out of the muffin pan by tapping on the backside of the pan. Crayons should fall right out.
 

Tips:

  • If you have any new crayons available, use one as a measuring stick. Lay broken crayon pieces along side of the new crayon to measure out 4 full sized crayons. This is how many you will need for each completed chunky crayon.
  • Be sure to use extreme caution around kitchen utensils and the oven. Always use oven mitts and do not stick you fingers into the melted crayons.
  • If you don’t have any broken crayon pieces, you can buy a large box of cheap crayons at the Dollar Store.

Sunday, July 8, 2012

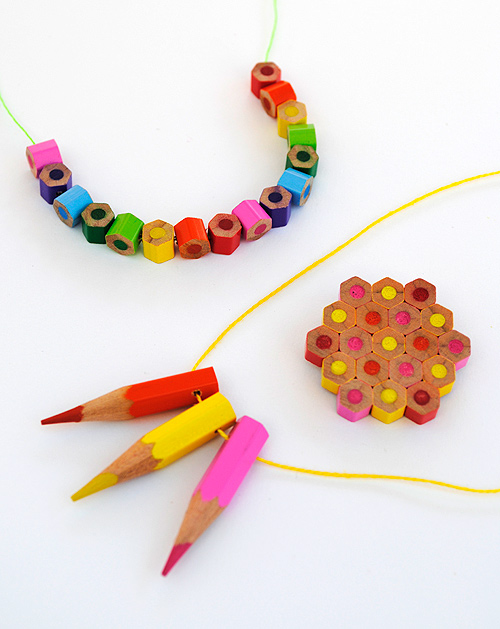
DIY: Colored Pencil Jewelry

Not just one - but THREE easy DIY color pencil jewelry pieces!!  Thanks to Design Mom's blog for posting this excellent and easy to follow tutorial.


Note from Design Mom: I asked Kate of Mini Eco to create a Back to School themed project for us to try. I think making beads out of colored pencils is brilliant! Wouldn’t these beads be fun for your elementary school-ers to string for a class project? It would also be a fun activity at an art-themed birthday party. Here’s Kate:
Lately I have become a little addicted to making (and wearing) colored pencil jewelry. The items pictured are really easy to make and only require a few basic tools. You don’t even need to buy any materials, simply chop a few centimeters from the end of your kids crayons…if you do this neatly then they will be none the wiser!!
I think the results look great and you, or your child, will definitely stand out from the crowd wearing them!

You will need
  • Colored Pencils
  • Junior hacksaw
  • Fine sandpaper
  • Drill and small drill bit
  • Thread (for the necklace)
  • Superglue (for the brooch and earrings)
  • Brooch back (for the brooch)

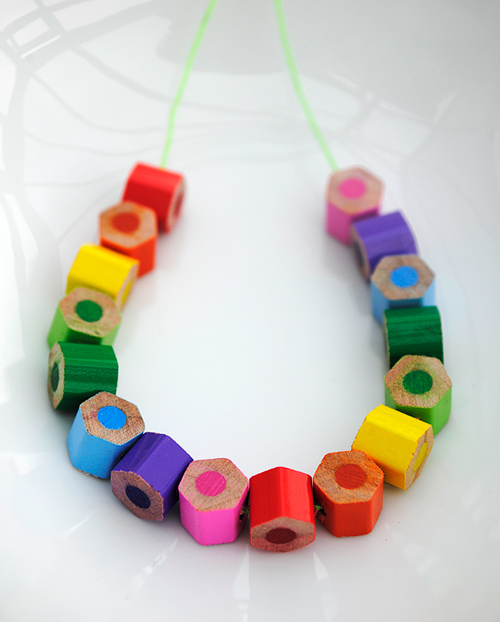
How to: Basic Bead Necklace
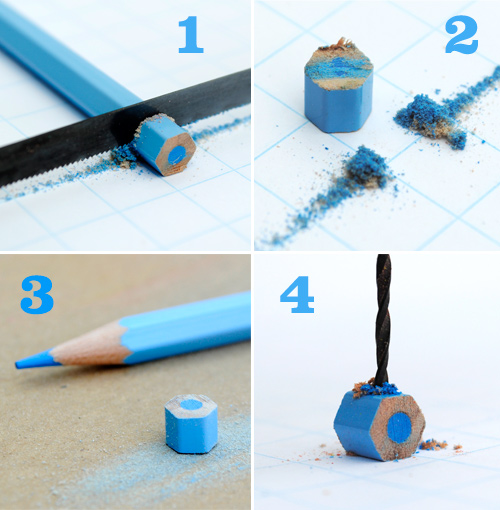
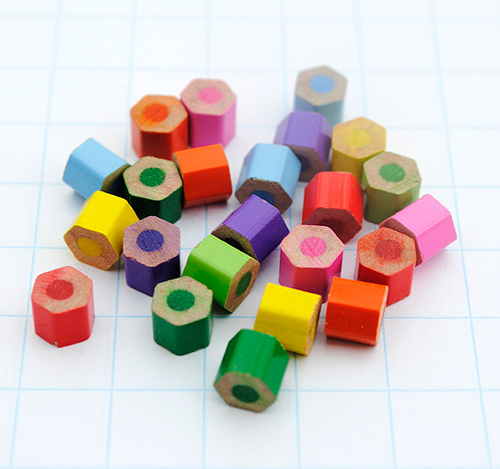
1. For the basic necklace you will need to begin by making your beads. You can use either hexagonal or round crayons. The beads I cut were 7mm long. To cut your beads use a small, sharp, hacksaw blade. (In the UK you can pick up a junior hacksaw for a pound or two in most hardware shops). Take your time when cutting the crayons and try not to apply too much pressure…that way you are less likely to chip the paint off the outside.

2 & 3. Don’t worry if the cut surface of your beads look a bit scruffy…all they need is a quick rub with some sandpaper. I found it easier to lay the sandpaper on a flat surface and rub the bead along it.

4. Now drill a hole in the side of each bead using a small drill bit. Make sure you place a scrap piece of wood underneath. It’s not a good idea to get holes in the kitchen table!
Once you have cut a number of beads simply string them onto a length of thread…job done!
Tip: These little beads are also make lovely bracelets. If bright colours aren’t your thing then try some more subdued shades. White colored pencil beads look especially nice.

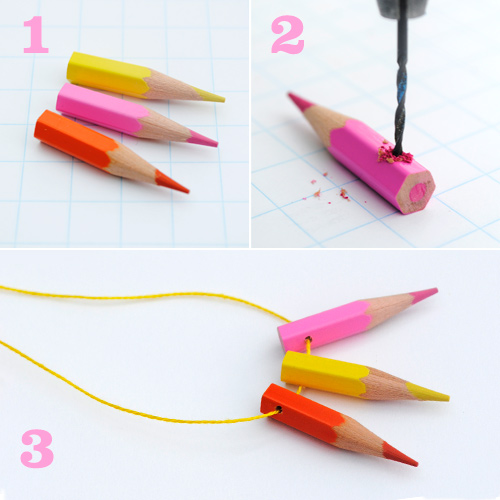
How to: Pointy Necklace
1. Begin by sharpening your colored pencil, then cut the end off as before. My beads measured about 3.5cm in length.

2. Drill a small hole through the end of your beads

3. String the beads onto some thread. You can add some co-ordinating beads if you wish.

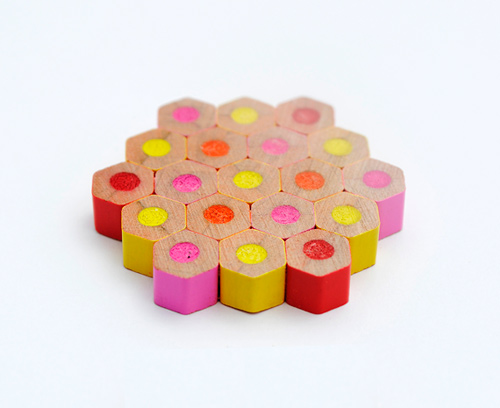
How to: Brooch
If you fancy a bit more of a challenge then why not have a go at making the colored pencil brooch?

 1. You will need to use hexagonal pencils for the brooch. Cut your beads as before. Mine were 6mm in length. You need 19 beads to make the brooch pictured.

2. Put some sandpaper on a flat surface and sand the beads so they are nice and smooth.

3. Work out how you want the beads to be arranged before you being gluing. Once you have decided simply start sticking the beads together using superglue.

4. Once your beads are all stuck together sand the underside of the brooch until it is flat and smooth.

 5. Superglue a ‘brooch-back’ to the back of the brooch.

Tip: The best way to avoid making a wonky brooch is to assemble it on a flat surface. The underside of the brooch will be the most even so make sure this becomes the front of the brooch.
Make sure you only use the tiniest dab of superglue on each bead….and don’t stick your fingers together! I have done this before and was reminded how powerful superglue is!

Finally, remember these necklaces are not recommended for under three’s. I would also avoid making the pointy bead necklace for any child…for obvious reasons.