Showing posts with label baby. Show all posts

Sunday, October 28, 2012

DIY: Neon Animal Garland

This garland would be ideal for a kids party, or even for a fun 80s theme party!  They are so easy to make you may just want to do it and decorate your house for fun and you'll have Design Happen's blog to thank for it!  Head on over to their blog for more.

DIY Neon Animal Garland - Erin Loechner
Neon animals and garlands are two of today’s hottest trends in the craft/party decor world, so why not combine the two to create a bright and vibrant neon animal garland? Here’s how!:
DIY Neon Animal Garland - Erin Loechner
MATERIALS: I spotted these plastic dinosaurs at the dollar store (my favorite spot for budget crafting!) and then headed to the hardware store for neon spray paint, twine and eyelets (screw eyes).
DIY Neon Animal Garland - Erin Loechner
INSTRUCTIONS: After spray-painting the dinos to my heart’s content we pre-drilled a 1/16 inch hole in the center of their back and inserted screw eyes from the hardware store.
DIY Neon Animal Garland - Erin Loechner
Stringing the garland is a piece of cake, as well – simply route the twine through each hanger and tie to secure (just to keep your dinos from sliding to the center after the garland is hung). I chose to use a natural twine to balance all of that crazy color so the look isn’t far too shocking to match the rest of my office. Luckily, the garland fits right in!

Monday, October 15, 2012

DIY: Easy Fabric Frames

I love this easy decor idea because of how simple it is, how quickly it can be done, but also the fact that it's easily interchangable for different occasions.  You can put holiday fabric in these and make your home more festive, and then quickly change it back out once the holiday passes.  We have plenty of scrap fabric that would be ideal to upcycle into these great frames.

This DIY comes from Tea Rose Home's blog, so check them out for more!

I found this cute frame at the dollar store; what a find! I bought four of them.

First, take out the glass inside and use it as a template. I used a pop tart box to make the squares.

Second, place the glass on the wrong side of the fabrics and draw a line. You will need about 1/2" extra around the line, so you can tape the fabric to the back of the cardboard.

On the wrong side of the fabric, place the cardboard that you cut out and tape the corners. (That way the corners will be less bulky.)


Tape the sides.


Put it in to the frame without the glass. I saved all my glasses, so in the future if I change my mind I can use the frame for something else.


It took me less than 30 minute to complete the project. I love quick and easy projects like this. On top of that the whole thing cost me about 4 dollars!
I took them to Rachel's room and did this:


Monday, October 8, 2012

DIY: Paper Lanterns

We realize that these don't look to Halloween-y upon first glance, but these are definitely a versatile craft that could easily be done in orange and black to hang for a party!!  So, jazz it up and make a few for every holiday or party!  Thanks to Salty Pineapple for this wonderful step-by-step tutorial that couldn't have made it easier to understand.


With a piece of paper, scissors, and a bit of ribbon, you can make cheerful paper lanterns, perfect for decorating your patio. Kids who are old enough to use scissors and cut straight lines can help with this project, too--I remember making paper lanterns like these when I was a kid. I added a couple twists, just for fun: a peek-a-boo contrasting paper, and a ribbon handle.


You Need (for each lantern):


2 pieces of paper in contrasting colors (I used 8x8 scrapbooking paper because it was what I had on hand)
6" piece of ribbon
Scissors
One or more of the following: tape, glue, scissors


To Make:


1. Fold one piece of paper in half (lengthwise so it's long).


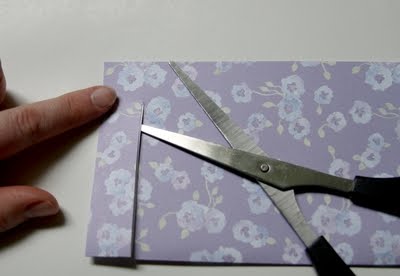
2. Starting at the fold, cut a straight line to within about 1/2" of the edge. DON'T cut all the way to the edge. (See, I'm pointing at the end, where you shouldn't cut.)


3. Continue to make cuts parallel to your first one, an even distance from each other, say about 3/4" from each other.

4. When you've completed your cuts, open the folded paper. Roll paper so fold is pointing outward in the middle of the lantern.


5. Tape, staple, or glue the top edges together. (I taped).

6. Repeat lantern-making process with contrasting color, but change the width between cuts. So, if you cut 3/4" from each other on the first lantern, do 1/4" cuts. Also, don't fasten lantern together yet.


7. After you're done cutting, open up like you did the first one, but roll lantern small enough to slip inside of first lantern. Insert into first lantern.


8. Allow second lantern to open up inside the first lantern, then tape the two together at the top edges to secure.


9. Put glue on one edge of a 6" piece of ribbon, and insert between two lanterns at the top. Squeeze to secure ribbon between two lanterns. (I used hot glue - Nikki's favorite!)

10. Repeat for second edge of ribbon, across from first side of ribbon. That's your handle.

Saturday, August 18, 2012

DIY: Paper Blossoms Hydrangea Pomander

Fancy Pants Wedding's blog has an unbelievably fantastic tutorial that could not be easier - we don't think that this is just for weddings either!  This could be great for home decor, gifts for friends, a house warming gift, holiday decor....you name it!

This cute little pomander is a super easy, super fun DIY wedding project brought to us by the fabulous Stephanie with Paper Garden.  Paper Garden is my favorite rubber stamp, paper and gift store in Sacramento.
These hydrangea balls could be used at a bridal shower or maybe a casual backyard wedding.  For the wedding they could decorate the aisle ends, be carried by your flower girl or stack a few in a cute basket or tin and use as a centerpiece.

Supplies:
  • Yellow Marvy flower paper punch
  • Blue Marvy flower paper punch
  • pearl headed straight pins
  • styrofoam ball (size depends on how big you want your finished pomander)
  • card stock in desired color
  • Multi-setting glue gun
  • Glue sticks
Optional:
  • green florist tape
  • wooden dowel
  • 3 yards of ribbon

Punch a variety of large and small flowers from your chosen card stock.  You can also use more than one color.
Place the pearl headed pin through the paper flower and push into the styrofoam ball.
Continue adding flowers to the ball, varying the sizes of the flowers and  overlapping the blossoms so you are covering all of the styrofoam.
If added security is desired, add a small dab of hot glue, set your glue gun for stun, I mean low heat, under the flower. If you are using the hydrangea ball as a flower girl pomander I highly suggest the extra strength of gluing the flowers into place.

To make hydrangea ball into a hanging pomander:
Take 1.5 feet of ribbon and make one large loop, knotting the ends.  Pin the loop into the pomander and using your glue gun on low heat setting, throughly glue the ribbon loop into place.  Allow the glue to dry before moving your pomander.
Make a multi looped bow and glue it over where your ribbon handle meets the pomander.

How to make hydrangea ball into a flower:
Wrap the wooden dowel in green florist tape

Insert wooden dowel into the styrofoam ball and glue into place.

Wednesday, August 15, 2012

DIY: Dollar Store Candle Makeover

We love dollar store shopping, despite its dangerousness since we have ZERO self control in there....

But thanks to Banman Land's blog, we'll have some direction on what we want to buy next time we go!  We love being able to jazz up our dollar store finds, and they've done a wonderful job with these number candles!  So easy, so quick, but so very cute!


Ok, I have revamped a few Dollar Store candles and gotten a lot of questions and comments so I thought I'd talk you all through it.


Here's what Maddie's birthday candle looked like when I bought it.
Kinda predictable.

I grabbed some glittery puff paint
{not to be confused with glitter glue}
I stuck all sorts of cute buttons and tiny rhinestones in the inside of the outline with the puff paint.
{If I hadn't liked the teal outline for my party theme, I would have re-outlined it with my sparkly puff paint)

I let it dry for an hour
{at least}

After it was dry,

I gently stuck a toothpick into the bottom of the candle.


Here's what it looked like when I got finished with it.
{oops, this is BEFORE the toothpick but you can imagine what that would look like, right?}

Friday, August 10, 2012

DIY: Party Animal Candle Holders

The Sweetest Occasion has come up with such a cute idea and it's so easy we can't believe we haven't seen anyone else do this before! We can see these being in ANY color.  Having a princess party?  Make them pink with glitter!  A dino party for a little boy?  Make them blue and you could even hand stencil their age on them!


Supplies -
  • plastic animals
  • plastic candle holders
  • drill with 1/8″ drill bit
  • pliers
  • gold spray paint
For the plastic animals, you can use any kind you can find. Keep in mind the size of the cake or cupcake you are sticking it on. I used the animals with a flat back, so it is easier to stick in the candle holder.
Hold the animal with the pliers and drill a hole straight down, being careful not to pop out the other side. The hole just has to be deep enough for the holder to fit.
Spray paint the animals in a few light coats, rotating them to cover all sides. Note: I used gold (w/o primer) and it worked fine for both the nicer plastic animals and the dollar store ones. I wanted a pop of color but some of the animals didn’t take to regular spray paint, be sure to use a plastic spray paint or a primer for plastic and always test one first.
I also painted the candle holders to match. Let dry.
That’s it. Party on like an animal! Rawr.

Wednesday, August 8, 2012

DIY: Bubble Blowing Wall Art Project

52 Weeks Project has an unbelievable blog filled with fun!  We just adore this bubble blowing art project they've come up with...and how amazing would this look in your own home?  We have seen bubbles at the dollar store and same goes for the jar.  Watercolors are pretty inexpensive at Michael's or Joann's if you use a coupon!

Get a watercolor pad here!

Time: 1 hour
Materials:  watercolors, watercolor paper, bubbles, jars