"A Thrifty Mom" has an AMAZING tutorial that we cannot wait to get our own hands crafting on. Fun, easy, good for kids, cheap (if not free)...what is not to love? Go to her site for the full tutorial, but here is a sneak peek of her fantastical craftiness.
A site for all of my own DIY project successes and failures and for posting all of the amazing tutorials and projects I find as I go - while staying on a budget and keeping as much money in my pocket as possible!
Showing posts with label halloween. Show all posts
Friday, August 16, 2013
Thursday, October 25, 2012
DIY: Book Page Pumpkin Tutorial
Halloween is just around the corner, and this tutorial can be made in just a short time, so it's perfect for last minute decorating! We love this idea which is from Creations by Kara's blog - so check her out!
Book Page Pumpkin Tutorial
1- Make a pumpkin shape out of a piece of paper. I roughly drew one,
then folded the paper in half and cut it so it would be symmetrical.
2-Take
the cover off of your book and place the pumpkin pattern with the fold
on the binding edge. If it doesn't fit, trim it a little.
3-Trace around the pattern with a pencil.
4-Now
it's time to cut out your pumpkin. You can use an exacto knife, but I
found that it was easier just to use scissors. I could cut through 5-6
pages at a time pretty easily. If you don't have fine tipped scissors to
cut all the way to the edge of the binding, you can use an exacto knife
there.
5-After you cut all the way around, pull the excess pages over to the binding and they should tear right off.
6-Now
trace around the pumpkin shape and cut through a few more pages. Tip:
cut slightly inside the pencil mark, or your pumpkin will keep getting
bigger. Yep, I learned that the hard way.
8-Now put a thin strip of glue on the very edge. I'm the impatient type, so I used hot glue.
9-Now
bring that back page around and attach it to the hot glue, keeping the
outside edges as even as possible. Then add a stip of hot glue to that
page, and glue the next page to it, just on the inside edges. I sure
hope that makes sense.
11-Don't
panic! It just needs to be "fluffed". Just go around pulling the pages
apart and arranging them how you want them. If I had a space where the
pages just refused to come together, I added a little hot glue right at
the inside seam. When you are done, it should look more like this. It's
OK that there are some spaces. We'll fix them later.
12-
At this point I decided my pumpkin needed a little color. I could have
inked all the edges with my orange ink pad. But I knew that would take
awhile. So I turned to my best friend Krylon. Spray paint that is. Yep,
you can totally spray paint book pages. Just use a very light touch, you
don't want it drenched or anything. One light spritz is all you need.
13-Now
it's time to add the stem. I just used a stick from my yard. If you
have any stubborn pages, now you can bend them to your will. Bwaahaha! I
used a bunch of hot glue, then forced the pages where I wanted them and
held the stem in place till the glue dried. Voila!
14-Next
I tied a ribbon around the stem. Not only does it look cute and add
some color, but it hides all the gobs of hot glue. Yay!
And just because I love it so, here is another shot of it sitting on my entry table.
Labels:
autumn,
book,
book pages,
craft tutorial,
decor,
decoration,
DIY,
do it yourself,
dollar store,
halloween,
halloween crafts,
handmade,
holiday,
holidays,
home,
home decor,
homemade,
paper,
thanksgiving,
tutorial
Friday, October 19, 2012
DIY: Ghost Decoration
Everyday is a Crafting Day's (we couldn't agree more) blog has a wonderful ghost DIY decoration tutorial. How fun is this thing??
Here's what you need...
1 Liter Pop Bottle,
Starch,
Cheese Cloth,
Old Towel,
Scrap piece of felt,
Styrofoam ball (the white kind works better.)
Scissor,
Hair dyer (optional)
Wire (not pictured)
First
thing you are going to do is cover your working area with your towel.
The starch is easily washed out of a towel but it gets messy if you
don't cover up your area.
Then
make you ghost form. I just shove the styrofoam ball on top of the
bottle. (if you are using a green floral ball cover it with plastic wrap
or something so you don't get green fuzzies on your cheese cloth.)
I also use some wire to make arms...
Next,
lay the cheese cloth over your ghost form. Spray it down with starch. I
like to use a spray bottle so I can control how my starch I use. The
more starch the stiffer your ghost.
Next you can use a hair dryer to help make the drying time faster. Since I live in AZ I just use the sun. :)
Once it is completely dry, pull it off of your form and glue on some felt eyes.
Labels:
accents,
autumn,
budget,
craft,
decor,
decoration,
DIY,
do it yourself,
dollar store,
fall,
ghost,
halloween,
halloween crafts,
haunt,
october,
tutorial,
upcycle
Monday, October 15, 2012
DIY: Nailhead Pumpkins
Strictly Simple Style is the perfect blog for people like us. Simple but elegant DIYs!
Be sure to check them out for more DIYs!!
Besides the traditional orange pumpkins, I also wanted to pick up a few white ones for a project I saw here and just loved, embellishing a pumpkins with decorative nails.
I started by printing a letter "E" and taping it to my pumpkin.
Labels:
autumn,
center piece,
decor,
DIY,
do it yourself,
dollar store,
fall,
family,
halloween,
holiday,
kids,
nails,
november,
pumpkin,
pumpkins,
thanksgiving,
thumbtacks,
tutorial
Monday, October 8, 2012
DIY: Paper Lanterns
We realize that these don't look to Halloween-y upon first glance, but these are definitely a versatile craft that could easily be done in orange and black to hang for a party!! So, jazz it up and make a few for every holiday or party! Thanks to Salty Pineapple for this wonderful step-by-step tutorial that couldn't have made it easier to understand.
With
a piece of paper, scissors, and a bit of ribbon, you can make cheerful
paper lanterns, perfect for decorating your patio. Kids who are old
enough to use scissors and cut straight lines can help with this
project, too--I remember making paper lanterns like these when I was a
kid. I added a couple twists, just for fun: a peek-a-boo contrasting
paper, and a ribbon handle.
You Need (for each lantern):
2 pieces of paper in contrasting colors (I used 8x8 scrapbooking paper because it was what I had on hand)
6" piece of ribbon
Scissors
One or more of the following: tape, glue, scissors
To Make:
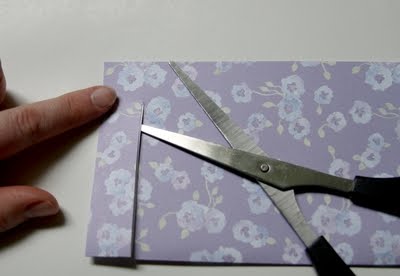
1. Fold one piece of paper in half (lengthwise so it's long).
2.
Starting at the fold, cut a straight line to within about 1/2" of the
edge. DON'T cut all the way to the edge. (See, I'm pointing at the end,
where you shouldn't cut.)
3. Continue to make cuts parallel to your first one, an even distance from each other, say about 3/4" from each other.
4. When you've completed your cuts, open the folded paper. Roll paper so fold is pointing outward in the middle of the lantern.
5. Tape, staple, or glue the top edges together. (I taped).
6.
Repeat lantern-making process with contrasting color, but change the
width between cuts. So, if you cut 3/4" from each other on the first
lantern, do 1/4" cuts. Also, don't fasten lantern together yet.
7.
After you're done cutting, open up like you did the first one, but roll
lantern small enough to slip inside of first lantern. Insert into first
lantern.
8. Allow second lantern to open up inside the first lantern, then tape the two together at the top edges to secure.
9.
Put glue on one edge of a 6" piece of ribbon, and insert between two
lanterns at the top. Squeeze to secure ribbon between two lanterns. (I
used hot glue - Nikki's favorite!)
10. Repeat for second edge of ribbon, across from first side of ribbon. That's your handle.
Labels:
adult,
baby,
decor,
decoration,
DIY,
do it yourself,
halloween,
holiday,
home,
home decor,
kids,
lantern,
light,
lighting,
paper,
paper lantern,
party,
shower,
tutorial,
wedding
Sunday, October 7, 2012
DIY: Paper Pumpkin Ornaments
Hostess with the Mostess has given us an excellent excuse to go back to the Dollar Tree to grab up some construction paper!! Not that we needed an excuse...
What do you think, aren't the cute??
***
PAPER PUMPKIN ORNAMENTS
Materials:
• 1-2 pieces of orange construction paper
• 1 piece of green construction paper
• 1 piece of brown construction paper
• scissors
• paper cutter (optional)
• paper clips and/or stapler
• string
• 1-2 pieces of orange construction paper
• 1 piece of green construction paper
• 1 piece of brown construction paper
• scissors
• paper cutter (optional)
• paper clips and/or stapler
• string
Directions:
Cut the orange pieces of construction paper into 1″ wide strips (each strip will be 1″ x 11″). Then, shorten some of the strips so that you have (1) 6″, (2) 7″, (2) 9″, and (2) 11″ long pieces.
Gather the
strips of paper together (with the ends flush) and place the smallest
one in the middle. Order them by size so that the largest strip is on
the outside. Secure with a paper clip or staple (I prefer the paper clip
so that I can keep adding more elements). Line up the opposite ends so
that they are together like the top.
Cut a brown strip of paper
1/4″ by 3″ long for the stem. To make it curl, wrap the paper around a
pencil and hold it in place while you count to 20 (or sing the ABC
song).
Cut out two leaf shapes from the green paper (ours were sort of like pairs of bunny ears).
Add the stem, leaves, and a piece of string to the paper clip at the top.
Hang up and enjoy!
Labels:
autumn,
decor,
decoration,
DIY,
do it yourself,
fall,
halloween,
halloween crafts,
home,
home decor,
homemade,
kids,
paper,
parties,
party,
pumpkin,
pumpkins,
thanksgiving,
tutorial
Friday, October 5, 2012
DIY: Halloween Party Favor Bag from Coffee Filters
Savvy n Sassy has a great upcycle tutorial for coffee filters. These Halloween bags are just adorable, and are definitely party worthy ideas!
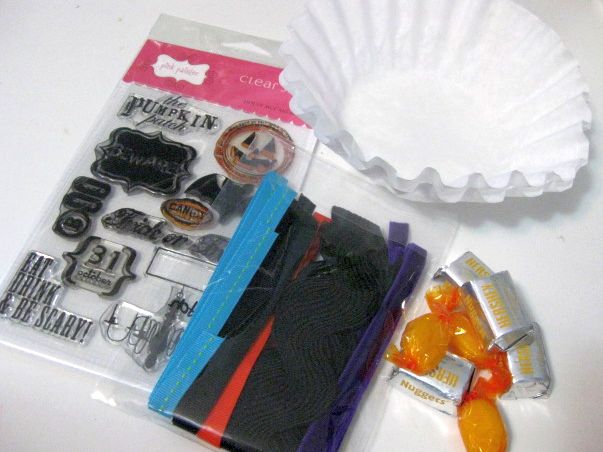
You will need: a coffee filter, some Halloween stamps, ink, ribbon and some sweet treats!
First step, stamp one side of your coffee filter.
Then, flip it over (wrong side up), and
add in your sweet treats. I chose to wrap my treats in some Halloween
paper, but that’s up to you!
Wrap up your treats, and tie with some ribbon. All done!!
Labels:
coffee filters,
DIY,
do it yourself,
favor,
favors,
halloween,
halloween crafts,
holiday,
holidays,
kids,
parties,
party,
party budget,
party ideas,
skull,
skulls
Thursday, October 4, 2012
DIY: Easy Halloween Ornaments
Shelterpop was featured on AOL with some very, very cute Halloween ornaments. These look easy enough to make, so get to it! We have almost everything we need to make these just hanging out around the house...
Still stumped by which Halloween decorations to use for your upcoming
party? How's this for a Halloween craft? Try these easy-to-make folded
paper ornaments. They'll add some spark to the corner of a room, over a
party table or on a covered porch. They're so simple to do, just think
back to your kindergarten days and get folding.
What you'll need:
Crepe or Tissue Paper
Paper Glue
Scissors
Ruler Pencil
Holepunch
String
Stapler
How to do it:
1. Measure, mark and cut two equally-sized rectangles from paper. Accordian fold each like a fan, trying to keep each fold the same width. Trim excess at end.
2. Fold pleated paper fan in half. Staple at the center point of each fan.
3. Glue folds of fan together where they meet in the center. Then, glue the first fan to the second fan along each edge.
4. Punch a hole in one pleat along outside edge and tie a long string to hang ornament. If desired hot glue a colored button at the center.
5. Vary the sizes and colors of each rectangle to create a mixed grouping. Think about using patterned paper (lightweight works best) as well as making a scalloped-edge, by trimming the square ends into a rounded shape.

What you'll need:
Crepe or Tissue Paper
Paper Glue
Scissors
Ruler Pencil
Holepunch
String
Stapler
How to do it:
1. Measure, mark and cut two equally-sized rectangles from paper. Accordian fold each like a fan, trying to keep each fold the same width. Trim excess at end.
2. Fold pleated paper fan in half. Staple at the center point of each fan.
3. Glue folds of fan together where they meet in the center. Then, glue the first fan to the second fan along each edge.
4. Punch a hole in one pleat along outside edge and tie a long string to hang ornament. If desired hot glue a colored button at the center.
5. Vary the sizes and colors of each rectangle to create a mixed grouping. Think about using patterned paper (lightweight works best) as well as making a scalloped-edge, by trimming the square ends into a rounded shape.
Labels:
adult,
autumn,
cheap,
decor,
decoration,
DIY,
do it yourself,
easy,
fall,
halloween,
halloween crafts,
holiday,
home decor,
ornament,
ornaments,
paper,
party,
party ideas
Wednesday, October 3, 2012
DIY: Witch's Broom Favors
Here is a Martha Stewart craft that we think it pretty simple and cheap! Now to go out and buy brown lunch bags!!
Give witches-for-a-night a proper send-off with broomstick
favors. You need two lunch-size paper bags for each broomstick. Unfold
one bag, and push out its base while folding in the left and right
sides. Using scissors, cut the bag into thin strips, stopping short of
the base. Cut thin strips into the top inch of the second bag. Open both
bags, and place the second bag inside the shredded one; fill with
candy. Insert a small branch 1 inch into the bag; cinch the tops of both
bags, and secure with black twine.
Labels:
autumn,
broom,
broom stick,
broomstick,
decor,
decoration,
DIY,
fall,
favor,
favors,
halloween,
halloween crafts,
holiday,
holidays,
home,
home decor,
kids,
party,
witch,
witches
Subscribe to:
Posts (Atom)