Showing posts with label upcycle. Show all posts

Saturday, February 2, 2013

DIY: "Spring" Letters

So spring is just around the corner and we cannot wait.  Hoosier Homemade's blog has just the DIY project to get us going on spring related projects so we can be ready to roll!

This one is a "Spring" decor idea that brings color and happiness to any room!  Be sure to check out their blog for more DIY.
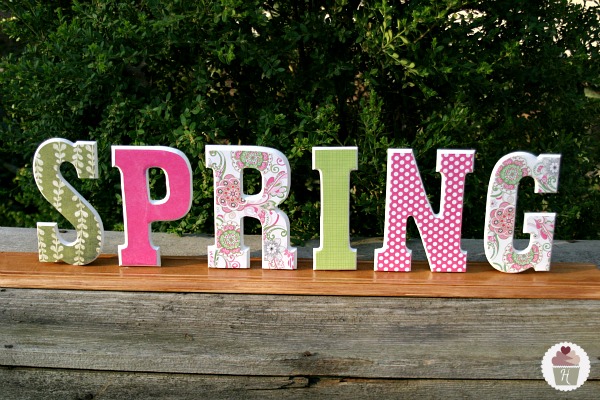
I just love how it turned out! Doug did an AMAZING job on it…don’t you think?
The concept for the scrapbook paper being applied to the wood is similar to the St. Patrick’s Day Door Hanging we made, but the letters were a little curved on the edge, so Doug had to cut out the paper before applying it to the wood. It was a little more time consuming, but well worth it.
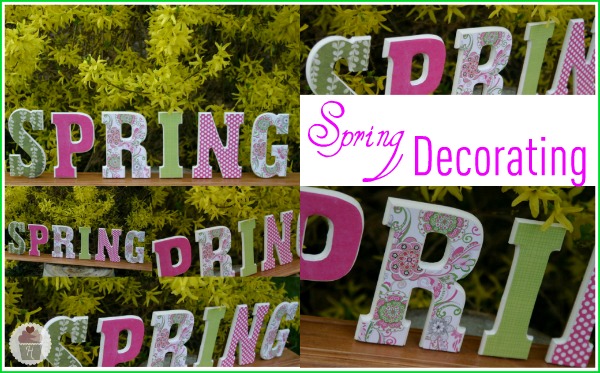
And we couldn’t help but take pictures outside in the beautiful Spring weather we have!
Let’s gather our supplies…
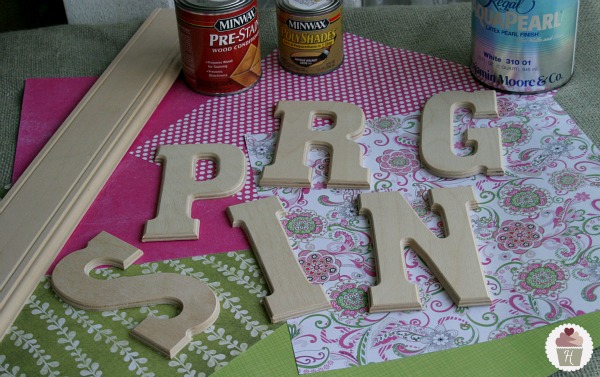
Spring Craft Supplies:
  • Wood – We used a piece of baseboard from our local molding outlet (length will depend on how many letters)
  • Letters
  • Scrapbook paper
  • White paint for the edges of the letters
  • Pre-stain and stain for the wood
  • Spray adhesive to apply paper {not pictured}
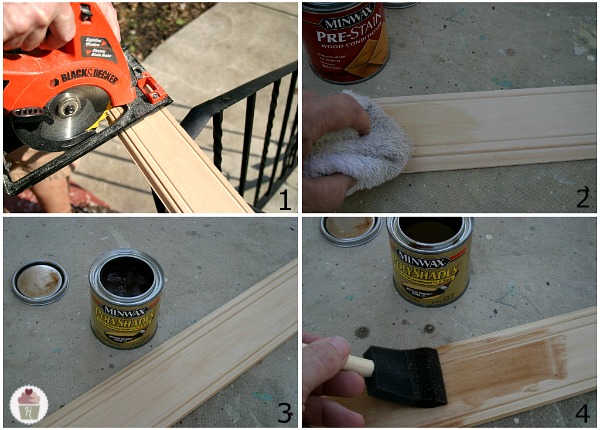
Wood Preparation:
  1. Cut your wood to length. Doug cut this piece, 5 inches longer than what we needed, leaving 2 1/2 inches on each end.
  2. Using a rag, apply the pre-stain. Pre-stain is needed when staining soft or porous types of wood to prevent the finish from being blotchy.
  3. Let sit 15-20 minutes to allow to soak in, wipe off any excess.
  4. Apply stain evenly with a foam brush and allow to sit for 5-10 minutes depending how dark you want the final product to be, carefully wipe and excess stain off. {We used a combination stain/polyurethane product to speed up the process}
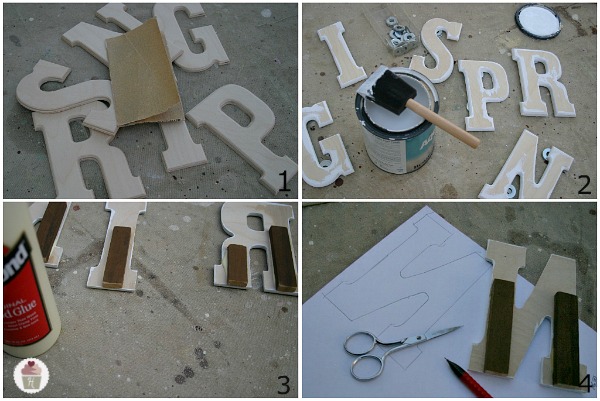
Letter Preparation:
  1. Slightly sand the edges of the letters with 180 grit or finer sand paper. {the higher the number the finer the grit}
  2. Paint the edges (2 coats) we used a satin latex that we had on our shelf {the washers are just to keep the letters up off the drop cloth}
  3. Glue a small block of wood to the back side of the letters to give more area to glue to base.
  4. Trace the letter onto the back of the scrapbook paper and cut out
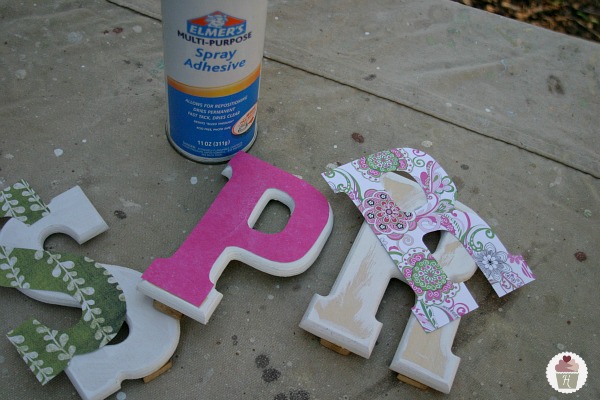
Decorating the Letters:
  • Spray the back side of the paper with adhesive and carefully adhere to the wood letters
  • To attach the letters to the wood, use a hot glue gun {note: Doug tried wood glue and even super glue, but the glue gun worked the best}
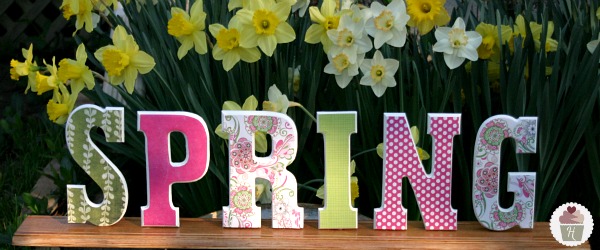
Wednesday, January 30, 2013

DIY: Gumball Candy Dish

Who doesn't love candy?  We certainly love candy and that makes this Gumball Candy Dish from Wrapcandy Crafts right up our alley!


Materials:
1 (one) 4″ Terra Cotta Pot
2 (two) 4″ Terra Cotta Saucers
1 (one) Bubble Bowl...Found at Walmart sku# 3100927117
1 (one) Wooden Ball – 1 1/4″
1 (one) E-6000 GLUE  
1 (one) Spray Can Clear Gloss ( Triple Thick – Rustoleum , your choice )
Acrylic Paint

 
Assembly:
1. Paint Both Terra Cotta pot and saucers –and knob- let dry overnight..
( if you were going to add a graphic and/or face plate , you would do this after the paint has dried overnight )
** Note – Face Plate directions below **
2. Place Terra Cotta Pot upside down…apply E6000 to the bottom rim of the pot..
apply Saucer-  let dry OVERNIGHT.

Add Wooden Ball to Saucer number 2, with the E6000 (let dry overnight)

4. Add lid to top of Bubble Bowl
 
FACEPLATE:
The face plate size is pretty much up to you… I use the dimensions either
2 1/4 x 2 1/4″… choice is yours…

Tuesday, January 29, 2013

DIY: Wood and Felt Arrows

"Today's Assignment: Be Inspired" is a wonderful blog with tons and tons of fun ideas.  We especially love these arrow that could make for a stunning center piece or hanging mobile!

Here’s a sweet little project that your little crafters can make for Valentine’s Day.
Make some simple Valentine Cupid’s arrows out of items on hand like twigs and felt. Use craft glue to adhere the felt arrow heads and feathers to the twig. 

Add Baker's Twine or even attach a sweet message. For little crafters who are too young for twigs, you can use straws instead of twigs.

Wednesday, January 16, 2013

DIY: "Love" Yarn Letters

Thanks to My Sister's Suitcase we now have a new yarn letter DIY to add to our list!  This is a great tutorial that really shows you how to go above and beyond with letter wrapping so that each side looks perfect and the yarn is going in the right directions from every view line.

Be sure to check out their blog for more fun ideas!


Thanks for all your sweet comments on my Valentine's Day Mantel! I'm back today to share my tutorial for the LOVE yarn letters I created. I had never tried wrapping anything in yarn {other than a wreath}, so I had a few trial and errors along the way :) I'm going to share the technique that ended up working the best and fastest for me.

Start with your letters... mine are 8" hollow cardboard letters. I found them at JoAnn's for $1.99 each, but I'm sure you could find something similar at any craft store. I used 3 different colors of yarn because I wanted to create an "ombre" effect, but I think they would look just as cute in one color if you have some yarn you need to use up :) {I will say, after using a pretty thin yarn I think next time I would try something a little thicker. It would take less wrapping and might give it a more textured look.}

The trick to wrapping these letters is the number of surfaces that have to be covered. You can't simply wrap in one direction and cover the front, back, and all the edges. On a few of my edges {ends of the letters} I ended up using a technique where I glued the yarn instead of wrapping. I tried both ways, and this ended up being much faster. You need to figure out which edges need the "glue" method and do those first. Here's how I did it:


1. E was the hardest letter so I figured I'd show you that one :)

2. Loop your yarn into 2" segments, then cut the loops with scissors to create several small pieces of yarn.

3. Take 6-8 pieces of yarn at a time and group them together. {Make sure your glue gun is ready!}

4. Apply a generous amount of hot glue on the edge of you letter - enough to cover the width of your 8 pieces of yarn - a little less than 1 inch. Place the yarn on the glue and press down quickly. Make sure the pieces are nice and snuggled together so you get a tightly wrapped look :)

5. Once the top has been glued down, the ends of the yarn will be sticking out. Just trim them evenly, leaving enough room to glue them down on the sides.

6. You only need to cover the edge to the point where the actual wrapping will begin. {See, I only went about 2 inches in on the top and bottom of the E.} Here's a view of the top:


Now you are going to start wrapping!


7. For the letter E, you will need to wrap each of the 3 "arms" first, in a vertical direction. Wrap each section separately, and secure the ends of the yarn on the back of the letter with a drop of hot glue {or tape, if you don't want to burn your fingers like I did!}

8. Once all 3 sections have been wrapped vertically, you will start at the top of the letter and wrap in the other direction - horizontally :) Do you like my arrows? This will cover the long section of the E, as well as the remaining exposed edges. Just make sure if you are using different colors that you switch your yarn accordingly :)

9. Finally you're done! I'm going to be honest, it probably took me at least an hour to complete each letter. I'm not exactly sure because I was working on them random times during the day and night {whenever my kids let me!} So I dragged out the process for several days before I finished :) But if you had one night to completely devote to the project, you could definitely bang it out.

Here is how I made the transition between colors to create the "ombre" effect:


Sunday, January 13, 2013

DIY: Valentine Sweet Bags!

She's Kinda Crafty is a way fun blog that has some cute sweet bag DIYs.  There are two fun downloads you can use from her blog as well - so be sure to go check it out!


Thursday, January 10, 2013

DIY: Felt Heart Garland

Oopsey Daisy is an absolutely adorable blog that helps us stay on track with our Valentine's Day themed crafts.  We are closing in with only 35 days to go until the big day filled with hearts, dinner, champagne, and stuffed animals.  Speaking of hearts - this felt heart garland couldn't be any sweeter. 


You can make your own with some scraps on hand!

Let's get started!


I started with the felt.   I secretly wanted to use all wool felt, but my frugal conscience got the best of me.  So I purchased the red and mustard wool felt, and I had the other colors on hand.  I LOVE the color scheme!  The mustard and turquoise were fun and unexpected pops of color.


Then I sat down and just started cutting out a whole lot of hearts!  I didn't use a pattern--just used the old traditional method of folding the fabric over to achieve a symmetrical heart.  I think I cut out about 90 hearts total.


It was 12:30 AM, and I couldn't thread the yearn through the needle for the life of me.  Finally I tried this trick of taping the end with masking tape. Duh!  It worked perfectly.


I knotted the end of the yarn to prevent fraying and then started stitching!


I made sure that I had plenty of excess yarn so I could sew as long of a garland as possible.  (I didn't want to have to thread that needle any more times than completely necessary!)


I wanted to be unpredictable, so I didn't repeat the colors in any certain pattern.  Crazy, I know!!


I just knotted the very end of the yarn, and started draping!

So what do you think?


Wednesday, January 9, 2013

DIY: Valentine's Day Mantel

So, it is that time of 2013 when all the stores remove any last remnants of Christmas and New Year's items and start overloading on pink and red Valentine's Day jazz!  We are getting in the spirit to with this great mantel decoration idea from My Blessed Life.

We think that this would be easily adaptable to an office / cube space if you feel like making your work spot more interesting.

We hope that you find this as inspiring as we did and gets you into the mood for pink and red EVERYWHERE!


I love the layered simplicity of how the mantel turned out.  I kept the background {old window and vintage ceiling tile} that I used for my Christmas mantel and I switched out the printer’s drawer for another one that is a bit lighter. My hubs and I dug out the V-day decor out from last year and I had a blast making it work on the mantel!


I love my DIY “Be Mine” Topiary from last year.  I also used my Ruffled Satin Heart Wreaths and little balls.


Are you tired of seeing aqua insulators in just about every mantel I decorate? Ahem. I love ‘em, so they aren’t going away anytime soon. :) My Burlap Valentine’s Wreath from last year adds a fabulous texture to the mantel. The white vases with pink tulips make me smile because they are simple and calm.


An old cigar box and salvaged piece of trim {from Southern Accents} created a perfect stand for my little white vase.  The pink leather flower is part of a boutonniere from our wedding…almost six years ago. Wow.


This yellowing, falling apart framed “art” was a gift to my husband back long before he was my husband.  It is sentimental and I love seeing it every day.  Oh, if you haven’t read our story, it’s a good one!


So pretty!

Monday, December 31, 2012

DIY: Three Easy New Year's Eve Party Favors

Free People's Blog has three wonderful last minute party favor ideas for those of you procrastinators out there (like me).  These look fun and easy to make and definitely have the ability to be ready to go in a short amount of time.  
Post image for 3 Easy New Year’s Eve Party Favors 
 Confetti Cones
diy new year's eve party favors
This gold acrylic paint is my jam – it looks like liquid gold! It’s made by Reeves and I can’t get enough of it.
diy new year's eve party favors
I painted a piece of card stock with the gold paint, and to make the confetti I did it the old fashioned way – I used a hole punch and a stack of multicolored post-it notes!
diy new year's eve party favors
Roll the gold paper into a cone, fill it with confetti, and voila! An adorable confetti cone. Make a bunch of them and place them on a table for your guests to pick up and toss at midnight!
Mustache Photo Props
diy new year's eve party favors
I also love the idea of making little props for photos – especially if you have a photo booth at your party! I used my mustache stamp from a while back and stamped a few on card stock and then just cut them out and glued them to coffee stirrers!
diy new year's eve party favors
Party Hats
diy new year's eve party favors
You can also use the gold-painted card stock to make party hats! I added some gold glitter to the bottom for some extra sparkle. Roll your hat into a cone shape and attach a string so it can be worn.
diy new year's eve party favors
Stick a confetti cone and mustache in a diy glitter champagne flute and you’ve got some seriously adorable New Year’s Eve party favors!

Saturday, December 29, 2012

DIY: Balloon False Ceiling

Wants and Wishes blog has a fantastic last minute idea for that New Year's Eve party!  If you've been debating how to jazz up the home for the festivities - here you go!!  Visit them for more ideas.
 

 1. Blow up all of the balloons you would like to use. I wanted a variety of colors of balloons so I used 2 different colors of purple, 3 different blues and silver. I think it turned out really well to have the mix of colors.
2. Roughly arrange the colors the way you would like them, this will help when your tying them together that you don't have all the same blues together, but a even mix of colors. (Note I used almost double the amount of silver balloons since I have different shades of blues & purple balloons).
3. Tie them together with string or curly ribbon. Don't tie them too close as they need a lithe room in between. I tie them together so you have 2 rows of balloons- one hanging on the right then one on the left.
Here is a picture with one strand hung up so you can see how full one strand can be. You can add as many strands of balloons you need to create the depth of your area.