Showing posts with label wedding decor. Show all posts

Wednesday, January 30, 2013

DIY: Gumball Candy Dish

Who doesn't love candy?  We certainly love candy and that makes this Gumball Candy Dish from Wrapcandy Crafts right up our alley!


Materials:
1 (one) 4″ Terra Cotta Pot
2 (two) 4″ Terra Cotta Saucers
1 (one) Bubble Bowl...Found at Walmart sku# 3100927117
1 (one) Wooden Ball – 1 1/4″
1 (one) E-6000 GLUE  
1 (one) Spray Can Clear Gloss ( Triple Thick – Rustoleum , your choice )
Acrylic Paint

 
Assembly:
1. Paint Both Terra Cotta pot and saucers –and knob- let dry overnight..
( if you were going to add a graphic and/or face plate , you would do this after the paint has dried overnight )
** Note – Face Plate directions below **
2. Place Terra Cotta Pot upside down…apply E6000 to the bottom rim of the pot..
apply Saucer-  let dry OVERNIGHT.

Add Wooden Ball to Saucer number 2, with the E6000 (let dry overnight)

4. Add lid to top of Bubble Bowl
 
FACEPLATE:
The face plate size is pretty much up to you… I use the dimensions either
2 1/4 x 2 1/4″… choice is yours…

Thursday, October 18, 2012

DIY: Upcycled Dollar Store Candles

Libby Dibby has a great upcycle tutorial for Dollar Store candles.  We love the idea of taking something that is already usable, but making it so that it fits our home and decor - or even fits a holiday, party or wedding theme!

Check out their blog for more DIY!  This one couldn't be more simple!  We like instructions that are so easy they take up less than a paragraph.
We took Dollar Store candles, the kind with saints on them... And used ModPodge to secure tiny fabric scraps to them... They look even better than I expected them.

Sunday, September 30, 2012

DIY: Paper Lanterns

You definitely need to head on over to Jellyfish Jelly's blog for an amazing PDF download with step-by-step instructions on how to make these gorgeous paper lanterns.  We think they'd be great in orange and black colors for Halloween or in deep bold colors for fall!  Have fun with it and show us what you make!

Tuesday, August 28, 2012

DIY: Giant Paper Sunflower

Aunt Peaches' Blog has this excellent tutorial on a giant paper sunflower that we could see hanging on our door in the near future...check out her page for more DIY!


Materials
  • Thick brown craft paper
  • Multiple colors of latex paint (leftover house paint does just fine)
  • Hot Glue Gun
  • One platter size lightweight/paper plate
  • One dinner size  lightweight/paper plate
Start by painting the craft paper –make it good and thick. For a flower this size you will want to paint at least three large sheets about the size of your dining room table. Make them nice and colorful and enjoy the painting process. You can smear down a decent base coat with a cheap sponge or roller. Go out of your way to be messy. Eat some chocolate while you are at it. I painted my petals shades of yellow pus some brown scraps to insert in the middle, but you could do any color. Or all colors. Oh please, somebody hurry up already and make a giant rainbow sunflower and send me a picture.

The amount of craft paper you will need depends on how many petals you want--I estimate I covered my dining room table with painted craft paper three times for this project.


For the center of the flower, cut three circles with painted edges. Again, no template here. Just cut the edges nice and jagged then fringe the perimeter. Do this on each circle, fold up the edges, then stack them inside of each other. This could be a small flower all by itself.


For the center, cut a small circle of a lighter color, fringe the perimeter, and fold all the petals  in on each other.


Assembly
The critical base of this whole project is a lightweight bamboo/wicker/basket platter thing from the thrift store. If you have ever had cause to order catered food, chances are the food came delivered on one of these, but if you do not have one laying around in your garage already, I guarantee you, every thrift store in the country has a lightweight platter basket laying around on a shelf for 99cents or less. Yes, you could substitute with a big circle of cardboard but then you won’t get the lip around the edge that helps the petals curve inward a bit like a real flower.


For the bottom tier, adhere half the petals to the platter with hot glue. Now that I think about it, staples might work as well.


For the  second tier, glue the remaining half of the petals to a reasonably sturdy paper plate and then glue the back of the paper plate to the center of the first tier.


For the center of the flower, stack the three brown circles, hot glue, then fluff the fringe to your heart's desire. Finish off with that fringy thing you made seven steps ago. Tada!

Saturday, August 18, 2012

DIY: Paper Blossoms Hydrangea Pomander

Fancy Pants Wedding's blog has an unbelievably fantastic tutorial that could not be easier - we don't think that this is just for weddings either!  This could be great for home decor, gifts for friends, a house warming gift, holiday decor....you name it!

This cute little pomander is a super easy, super fun DIY wedding project brought to us by the fabulous Stephanie with Paper Garden.  Paper Garden is my favorite rubber stamp, paper and gift store in Sacramento.
These hydrangea balls could be used at a bridal shower or maybe a casual backyard wedding.  For the wedding they could decorate the aisle ends, be carried by your flower girl or stack a few in a cute basket or tin and use as a centerpiece.

Supplies:
  • Yellow Marvy flower paper punch
  • Blue Marvy flower paper punch
  • pearl headed straight pins
  • styrofoam ball (size depends on how big you want your finished pomander)
  • card stock in desired color
  • Multi-setting glue gun
  • Glue sticks
Optional:
  • green florist tape
  • wooden dowel
  • 3 yards of ribbon

Punch a variety of large and small flowers from your chosen card stock.  You can also use more than one color.
Place the pearl headed pin through the paper flower and push into the styrofoam ball.
Continue adding flowers to the ball, varying the sizes of the flowers and  overlapping the blossoms so you are covering all of the styrofoam.
If added security is desired, add a small dab of hot glue, set your glue gun for stun, I mean low heat, under the flower. If you are using the hydrangea ball as a flower girl pomander I highly suggest the extra strength of gluing the flowers into place.

To make hydrangea ball into a hanging pomander:
Take 1.5 feet of ribbon and make one large loop, knotting the ends.  Pin the loop into the pomander and using your glue gun on low heat setting, throughly glue the ribbon loop into place.  Allow the glue to dry before moving your pomander.
Make a multi looped bow and glue it over where your ribbon handle meets the pomander.

How to make hydrangea ball into a flower:
Wrap the wooden dowel in green florist tape

Insert wooden dowel into the styrofoam ball and glue into place.

Thursday, August 16, 2012

DIY: Rolled Paper Flowers

We admit it - we are in love with paper flowers.  We want so badly to try our hand at this one, but just haven't had the time with all of our other projects!!  We will get on this one though after being so inspired by Jones Design Company's blog, we feel that we just might die if we don't try this since they make it look so simple...what do you think??

rolled flowers
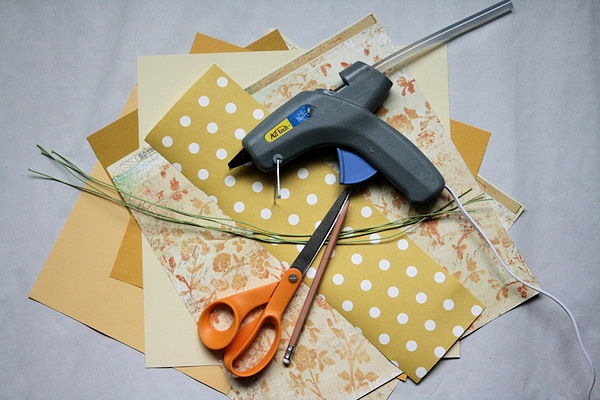
Here’s what you’ll need:
IMG_0769
:: paper {either cover or text weight}
:: florist wire
:: scissors, pencil, glue gun
STEP ONE: cut irregular circle
cut
This circle is approximately 8 inches, but you can do any size you wish.
cut 2
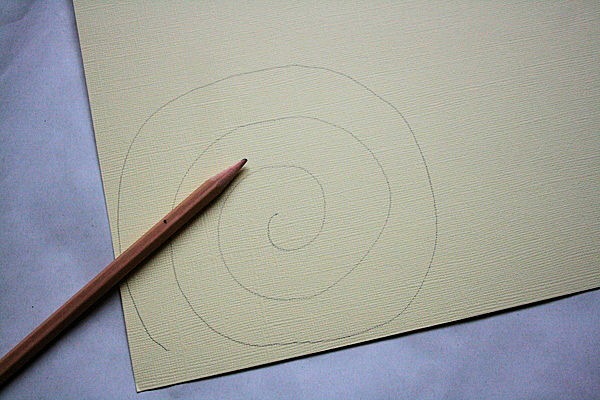
STEP TWO: cut spiral
cut spiral
Start at the outside edge and cut in a spiral fashion to the center.
spiral
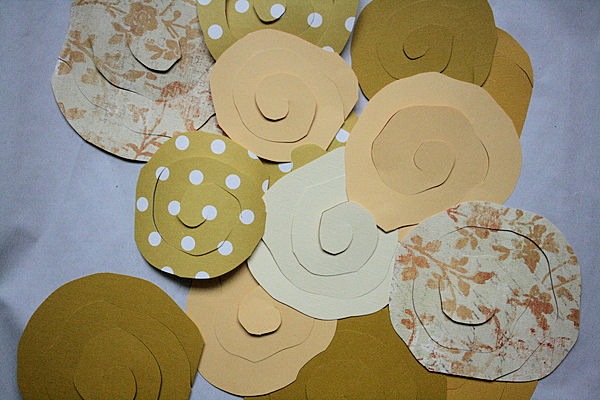
I like a sort of bumpy shape so that the petals end up a bit irregular
spiral 2
If you aren’t so sure about your cutting skills, feel free to draw your spiral before cutting. I did this one with a straight edge, but you could make it bumpy as well.
IMG_0787
To add a little interest to my bouquet, I used a variety of yellow scrapbook papers {my favorite is that yellow dot}
IMG_0800
STEP THREE: roll your blossom
start rolling
start at the outside edge and coil tightly
roll
rolling
Continue rolling until you get to the center. You’ll have a tightly coiled rosette.
rolled
STEP FOUR: release coil
open
And your flower grows.
STEP FIVE: glue together
glue
Add a glob of glue to the center and press to adhere the coiled paper
press
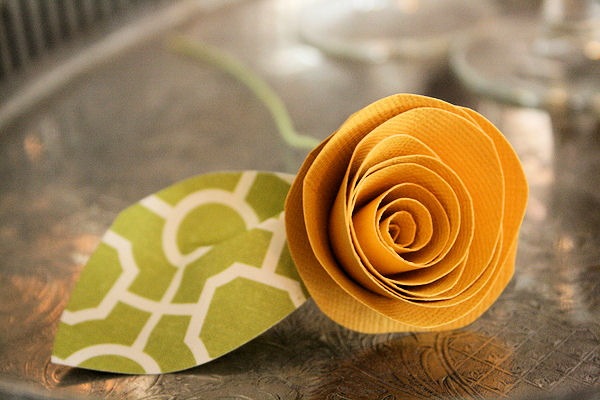
TO MAKE A LEAF:
cut a leaf shape out of green paper
leaf
Fold in an accordion-style fold
fold leaf
and adhere with a dab of hot glue.
glue leaf
TO ADD A WIRE STEM:
Cut a piece of floral wire to desired size {mine are about 6 inches} and bend a small piece at a 90 angle.
wire
Glue wire to the bottom of the flower.
glue wire
Then attach the leaf to cover the wire.
glue leaf
IMG_0845
When grouped together, you have a very sweet bouquet of wilt-less blossoms.
bouquet
flowers
sweet bouquet
I also tried these with sheet music.
sheet music
And attached to a wreath form covered in linen.
music flowers
Aren’t those the cutest paper rosettes? Start rolling …