Showing posts with label home decor. Show all posts

Friday, August 16, 2013

DIY: Pumpkins From PaperBack Books!

"A Thrifty Mom" has an AMAZING tutorial that we cannot wait to get our own hands crafting on.  Fun, easy, good for kids, cheap (if not free)...what is not to love?  Go to her site for the full tutorial, but here is a sneak peek of her fantastical craftiness.

pumpkin out of a book6

We can just see these on a work desk to show our love of the holiday without getting HR called on us for any rule breaking of policies!  ; )

Monday, January 14, 2013

DIY: Valentine's Mirror

The 36th Avenue has an adorable mirror DIY that would make for the perfect home decor and / or kid's project depending on how decorative you want to get with it!


My plan was a little bit different in the beginning since I was aiming for some type of cool frame.
This is what I used. An IKEA mirror-frame that I already had,
 DecoArt Paint, glue gun and Valentine’s plastic necklaces. 


TUTORIAL

1
♥

The first thing I did was paint the frame in white.

{ TIP: I always use a garbage bag to protect my table,
then when I’m done I throw the craft mess away inside of it. }


2
♥♥

After a few coats of paint I added one light coat of Silver Glamour Dust from DecoArt.
I love this stuff because you get to see the white through it under the silver glitter dust.
So pretty!


While the glue gun heated up I took the time to cut a bunch of necklaces that
I found over at Big Lots. I bet the Dollar Store will have something similar.


To get the right size all I did was to put the necklaces on top
and cut it in each corner.


I ended with this…


3
♥♥♥

The last step was to glue it!
I wish the picture could show how much the silver dust actually shines…

Friday, December 21, 2012

DIY: Glittered Chain-Link Holiday Garland

HGTV has a simple, but wonderful idea for those last minute holiday decorations!  We love this easy to make and inexpensive garland idea! 


Materials Needed:

  • 12x12 sheet of gold scrapbook paper (enough for 3 feet of chain)
  • mint-green acrylic paint
  • small bowl for paint
  • 1" Paint Brush
  • pencil or pen
  • Ruler
  • 1"-wide blue painter's tape
  • X-Acto knife
  • hot glue gun and glue sticks

Paint Back of Paper Then Mark Chain Links

Completely cover non-glitter side of gold scrapbook paper with mint acrylic paint. Once paint has fully dried, make inch marks on both edges of paper. Connect marks to create 1-inch stripes.
+

Score Then Bend Paper

Using an X-Acto knife, carefully score (but don't cut) along marks. Make sure not to cut all the way through; cut the paper just enough to make it easy to tear later. Flip paper over and slightly crease at score marks to make them more visible.
+

Tape Off Then Paint Strips

On paper's glittered side, place painter's tape along the center of each scored line (Image 1). Paint exposed paper with mint-green paint. Once paint has dried, carefully remove tape to reveal tone-on-tone pattern (Image 2).

Tuesday, December 18, 2012

DIY: Santa Belt Napkin Rings

http://crafts.kaboose.com/swf/santas-belly-napkin-ring-christmas-craft-photo-350x255-aformaro-07_rdax_65.jpgKaboose's blog has these adorable (and crazy easy to make) Santa belt napkin rings that would be ideal for your holiday table!  Wouldn't you just love to sit down to these cuties at your table?  We think that they are very whimsical and fun!  


What you'll need:


  • Cardboard tube
  • 1 sheet each of red, white, and black felt 
  • Gold chenille stem
  • Scissors
  • White craft glue

How to make it:


  1. Cut cardboard tube into 1-1/2-inch segments.
  2. Place one piece of the tube onto the red felt and cut the felt just slightly wider than the tube. Wrap the felt around the tube and trim off the excess, leaving enough for a small overlap. Glue the red felt around the cardboard tube. (See photo.)
  3. Cut a strip of black felt, about 1/2-inch wide, and glue it around the red tube, lining up the seams. (See photo.)
  4. Cut two strips of white felt, about 1/4-inch wide and glue them around the outside of the red felt, overlapping the edge a little.
  5. Cut a 3-inch piece of gold chenille and bend it into a square for the buckle. Glue the buckle to the black felt, be sure that the seam is on the opposite side. Let everything dry completely. (See photo.)

Tips:


  1. These can also be made with construction paper or craft foam.
  2. Instead of gold chenille, you can use gold glitter glue, but you will need to take into account the drying time needed.
  3. These will look just as good on fancy napkins as they will on rolled up paper towels!

Monday, December 17, 2012

DIY: Candy Cane Mice

mslkids_1003_xj1s_mice.jpgThank goodness for Martha Stewart around Christmas time!  I hope you love her crafts for the holidays as much as we do.  I think pretty much everything she has on her site is adorable and / or gorgeous.  

These are such fun little mice candy cane covers it is a touch ridiculous how much I love them.  I can't wait to give these a shot!  What do you think?  Can you see yourself making a dozen of these cuties and giving them to co-workers as a surprise on their desk for the holidays?

Click the link to get the full directions on making these!  Be sure to Pin It and Stumble It for others!

Sunday, December 16, 2012

DIY: Ribbon Christmas Trees

Whipper Berry has kept it simple, but stunning!  We love her tutorial on making these great ribbon trees!  We can totally see these being a year round home decor project.

Ribbon Trees
Instead of folding the ribbon in half (picture on left), I looped it around (picture on right).
p_100576310_1-              ribbon-no-image
First I spray painted my Paper Mache cones black. Then I cut black and white stitched grosgrain ribbon into pieces ranging from 2.5 –4 inches. I started with the longer pieces at the bottom. After looping the ribbon, I secured each piece with hot glue, and finished row by row, shortening the ribbon lengths as I got higher.
Ribbon Trees 018
On one tree I alternated colors every row, and on the other I alternated each piece.
Ribbon Trees 024-
I finished the top with a bit more ribbon wrapped around the tip.
Ribbon Trees 013
Now I have two beautiful trees that go perfectly with my new décor!

Monday, December 10, 2012

DIY: Miniature Lantern Ornaments

The Crafty Crow's blog has a ton of great ornament DIYs - especially ones that are kid friendly to make for the holidays!  You will definitely want to start saving those left over toilet paper rolls so that you can craft these up!
CC10 miniature lantern garland These little lanterns are about 2" tall and are made 
from a toilet paper tube. You can make two lanterns from
each tube. They are adorable individually and hung as
a group for a garland. You can also forgo the hanger
and pop one over a light on your tree to
see it really glow!*

Supplies:
toilet paper tube
pencil
scissors
acrylic paint
paint brush
glue
wire for hanging (optional)

Directions:
CC10 miniature lanterns deconstructed


#1 cut the tp tube open vertically

#2 cut the tube in half horizontally

#3 cut 2" off so you are left with... #4

#5 paint the inside yellow if you want the lantern
to look like it's glowing from the inside and use
the color of your choice for the outside; let dry

#6 fold in half horizontally, then make small,
evenly spaced cuts beginning on the fold to
¼" from the open edge

#7 glue the lantern closed; squash down a
bit to shape

For the handle I used #20 floral wire, shaped the
rounded part around the barrel of a marker, then flipped
up each end to hook through the slots of the lantern.

*Use caution, tree lights can get very hot!

CC10 mini lanterns close up


CC10 mini lanterns garland

Friday, December 7, 2012

DIY: Bird Seed Ornament (can be used outside!)

Saltwater kids has a great and easy ornament tutorial that can be used inside and outside!  These would be great to make with the kids!

 My boys spend hours perched in our front window, just watching birds.
They especially love putting out treats for their feathered friends.
It is amazing how quiet and still a three & five year-old can be - completely memorized. 


So, for gifts this year we are keeping it simple - giving an experience rather than just more stuff.  We are giving the experience of spending a few moments watching nature - a few moments to slow down, and relax.

These molded bird seed ornaments are a lot of fun to make, and very inexpensive. You may already have all the materials you need in your home - we were able to make gifts for all the wonderful friends in our life for around $3.

I found this recipe here, and it worked great!
You'll Need:
3/4 cup flour
1/2 cup water
1 envelope unflavored gelatin
3 tbsp. corn syrup
4 cups birdseed
molds (muffin tin, cookie cutters, etc.)
nonstick spray
drinking straw
waxed paper
ribbon/twin


1: Combine the flour, water, gelatin and corn syrup in a large mixing bowl. Stir until well-combined.

2:
Add the birdseed to the mixture, stir until well coated.

3:
Spray your mold(s) with cooking spray, and spoon birdseed mixture into each mold. Use the bottom of a measuring cup to pack it down, and make the top smooth.

Poke a hole through top of each birdseed mold using a drinking straw, making sure it goes all the way through.

4: Leave the birdseed mixture in the molds for two to three hours. Then, remove the straws and lay out a sheet of waxed paper. Gently remove the hardened ornaments from the mold, and place them on the wax paper upside down. Allow them to dry for at least two to three more hours, or overnight.
5: Cut your ribbon and carefully put it through the hole. 

6: Package them up!

Monday, December 3, 2012

DIY: Felt Holiday Tree(s)

Danielle Thompson is keeping us inspired and in the Christmas spirit.  We love these felt trees and can't wait to give them a try!  Check out her blog for more DIY!
  Tutorialimage 

First I wanted to give credit to my initial inspiration for these (b/c it is one of my pet-peeves when people don't give proper credit... grr.. i've seen this happen so many times to other people, and even me... and it just makes me so sad. I try very hard to always give proper credit! although unfortunately with all of the things i bookmark, i do lose track sometimes where i got the idea in the first place. But very very rarely.) 
My inspiration for this actually came from a project (no surprise!) from Emily Martin/The Black Apple last year. I had the idea of making these felt trees in my head this year, and knew the concept was hidden in my subconscience from SOMEWHERE, and then i remembered her trees from last year. :-) But after looking at them for the first time this year, i realized they're pretty different! But same concept...
I wish I could provide some patterns for the felt pieces, but #1, as I've mentioned, I don't trust my pattern making skills, especially when it comes to fabric! and #2, I'm not sure that all styrofoam trees are standard sizes at all craft stores, so the patterns might end up being off depending on where you buy your tree forms.
But essentially the shape will look something like this and get smaller as you layer up the tree:
Shape 
You just freehand cut the scallop along the bottom of the shape. It doesn't have to be perfect, and I sort of like the freehand look: :-)
Scallop
To start:
1. Cut out your pieces of felt. I used generally 3-5 pieces/colors of felt per tree depending on how layered you want it to look. For each color tree, I used 3-5 shades of one color to show a gradiation of the darkest shade to the lightest shade going towards the top. On some I did a dark-light-dark-light look as well. Whatever worked with the shades of felt that I had. I used wool felt, but you could also use craft felt at craft stores... it's cheaper, but not as pretty, and you won't have the same amount of color shades as you'll find in wool felt.. i got mine online.
The first layer will be your bottom layer. It won't have the scalloped edge b/c it will wrap around the bottom of your tree form. You'll need to snip the area that wraps around like this so that it will fold over with little bulk. Then just hot-glue to the bottom:
Snip-bottom 
Then you can glue a circle of felt to cover your bottom completely.
(I used 3 different sizes of tree forms: small, medium and large. So if you do try to make a pattern, you'll need to make a different pattern for each size/shape tree as they will of course differ.) I basically just winged it with each layer of felt... wrapped the fabric around and just cut away til i got generally the shape that i mentioned above. Then i wrapped it around hot-glued, where the ends met, to the tree form, overlapping:
Treeback2 
Treeback1 
Since I knew my that my trees would only be seen from the front, i didn't stress too much about how they looked on the back. As you can see, the backs of mine look a bit haphazard. They still look tidy at least. If you wanted, and you know they'll be seen from all sides, you could add a strip of ribbon along the seam on the back like I did here, vertically:
Treeback4  
Treeback3 
If you want to be REALLY tidy, you could wait on adding the vertical strip of ribbon, and first wrap your trims and ribbons around the tree horizontally and when you're done with that, you could add your vertical strip of ribbon to hide all of the felt seams/ribbon-ends on the back. Or just leave the felt seams as-is. It really doesn't look bad, as long as you overlap the ends so that no foam shows through. If you're a sewer, you could even sew the ends together on each felt layer and slip over the form!
The great thing about using these styrofoam forms is that you can also pin things to it (as you can see I used lots of pearly colored pins). And that is actually even easier than having to use hot-glue constantly. I'm not a big fan of glueing (i don't totally trust it!), so i try to use it only if i have to. But you'll definitely want to add some hot-glue to reinforce everything.
2. Ok you're done adhering your felt layers, it's time to embellish. You can start adding your trims and ribbons to wrap around the tree horizontally. (or you can leave them as-is with no embellishment! sort of a more modern look) I wanted to embellish, but not overly, still keeping a somewhat clean design (well, clean for ME at least).

Sunday, December 2, 2012

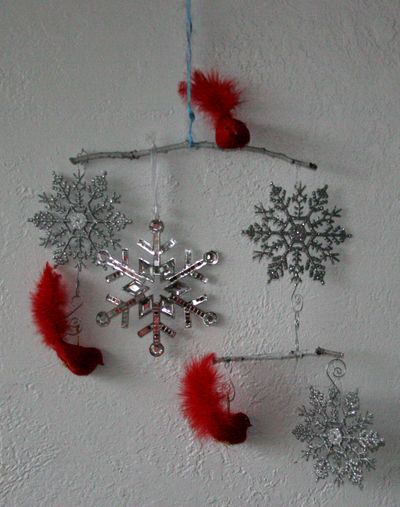
DIY: Winter Mobile

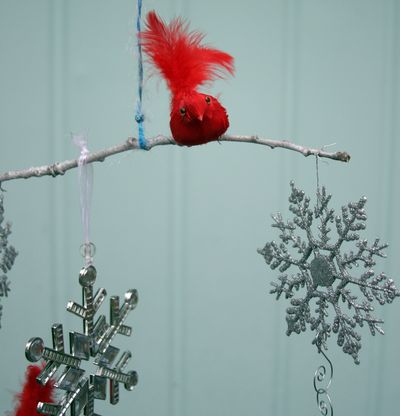
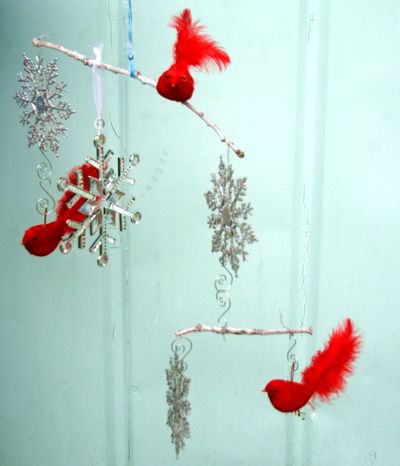
We are obsessed with Dollar Store Craft's blog and how they always make the cutest and more elegant things with such inexpensive supplies.  Here is a great Winter Mobile for your home!  Be sure to give their blog a read!
mobile-garage
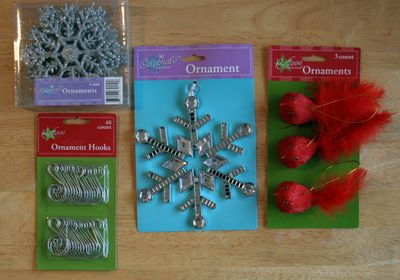
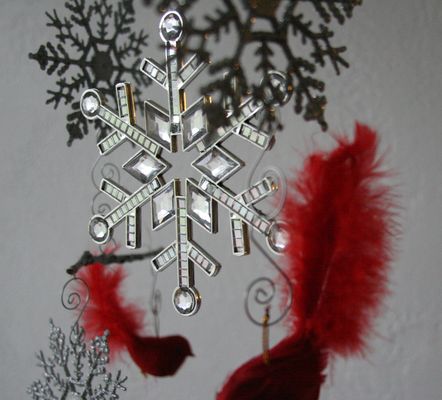
The dollar store has so many cute ornaments this year. I picked up some shiny snowflakes and pretty red birds at the store, found some branches outside, and strung them together for a wintry mobile. You can use pretty much anything on your mobile, so pick your favorite things, attach them to a string and start making one!
mobile-supplies
Project Materials:
  • Assorted ornaments, $3 or on hand
  • Swirly ornament hooks (optional), $1
  • Wire, on hand (I used the wire that came attached to the red birds)
  • Sticks, dowels, or other things to make up the backbone of your mobile, on hand
  • Spray paint (optional), on hand or $1
Total: FREE and up (I spent $4)
mobile-branches
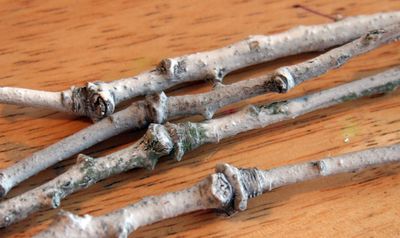
I used oak branches from my yard because I have a ton of them. I spray-painted them with a light coat of white to make them look sort of like birch branches (more wintry!). My oak branches were pretty straight, but they have pretty big knots on them which hurts the balancing process (because the knots kept me from putting things precisely where I wanted to -- strings would slide off a knot). Choosing the smoothest sticks you can find is a good idea!
mobile-sat
Balancing the Mobile:
Balancing the mobile is sort of a process of trial and error, but it's all about balance. The easiest route is to make sure the mobile has equal items on each side and hang them symmetrically. You will get the quickest results by planning a symmetrical mobile.
mobile-snowflake2
If you choose to ignore this advice and opt to make an asymmetrical mobile, here are some tips:
  • I like to think of my mobile like one of those big doctor's scales that has the heavy weights that you move from slot to slot to adjust until you get the bar to balance just perfectly. You will have to do a lot of slight adjustments to get your mobile to balance correctly.
  • I also like to think of my mobile like a teeter-totter (or seesaw): You know how they have three slots at the fulcrum so you can adjust them to compensate if one rider is heavier than the other? You can do that with your mobile by adjusting where the center attachment is located on your stick. Slide it closer to heavier items to help tip the balance in favor of lighter items.
  • You can also slide items closer to the end of the stick to help them act heavier (or closer to the center of the stick to help them act lighter).
  • It helps to have an ornament near the center of a stick (see my rhinestone snowflake) because you can move it to adjust the weight distribution.
  • Use a piece of wire to attach your components to the sticks because they won't slide around very much, making it easier to adjust the balance.
  • Items should float freely and not bump into each other.
  • Expect to have a lot of trial and error when building your mobile!
mobile-straight