"A Thrifty Mom" has an AMAZING tutorial that we cannot wait to get our own hands crafting on. Fun, easy, good for kids, cheap (if not free)...what is not to love? Go to her site for the full tutorial, but here is a sneak peek of her fantastical craftiness.
A site for all of my own DIY project successes and failures and for posting all of the amazing tutorials and projects I find as I go - while staying on a budget and keeping as much money in my pocket as possible!
Showing posts with label pumpkin. Show all posts
Friday, August 16, 2013
Sunday, November 25, 2012
DIY: Apple Placemats
With Thanksgiving just around the corner - we think it'd be super easy to adjust this DIY from Bloesem Kids' blog for fun Pumpkin Placemats!
Apple Placemats by Courtney Russel from Two Straight Lines
As we celebrate the harvest season here in the US, it's nice to get the kids involved in decorating the holiday table. These cute apple placemats are painted using a freezer paper stencil, a technique easy enough for kids. Freezer paper can be found at many grocery stores or online, but be careful, once you start you'll be stenciling every thing in sight.
You will need:
*Burlap
*Scissors
*Printed fabric
*Fabric glue (I like Alene's Tacky Glue)
*Red and Brown Textile Paint (I use Jacquard Paint)
*Paintbrushes- 1 wide, 1 narrow
*Freezer Paper
*Iron
*Heavy Weight Paper
*Marker
Step one:
Cut your burlap to 13" x 17".
Step two:
On the heavy paper, sketch your apple, refining your drawing until you're happy. Cut the apple out and trace around it on the paper side of the freezer paper. Cut the apple out of your freezer paper, making sure that the area surrounding the apple is uncut-- this is your stencil.
Step three:
Place your stencil on the burlap where you would like it and iron it in place.
Step four:
Using the wide paintbrush, paint the area inside of your stencil with the red textile paint (tip: I used both foam and bristle paintbrushes and preferred the bristle). Carefully peel your stencil away. Using the narrow paintbrush and the brown paint, paint the stem on your apple.
Step five:
Cut a leaf from your printed fabric. Glue it next to your stem just above your apple. If desired, use the marker to draw pretend "stitches" on the leaf.
Step six:
One at a time, pull four or five threads from each edge of the placemat to create a fringe.
Step seven:
Repeat until you have a placemat for every seat at your table.
Labels:
autumn,
center piece,
decor,
decoration,
DIY,
do it yourself,
dollar store,
fall,
family,
holiday,
holidays,
home,
kids,
november,
place mat,
placemat,
pumpkin,
pumpkins,
table,
thanksgiving
Thursday, November 22, 2012
DIY: Pumpkin Pie Potpourri
Plus now is the perfect time to cut into those pumpkins and they won't spoil!
Labels:
autumn,
candle,
candle holder,
craft,
decor,
decoration,
DIY,
do it yourself,
dollar store,
eco-friendly,
fall,
family,
handmade,
homemade,
howto,
november,
pumpkin,
pumpkins,
tutorial,
upcycle
Monday, October 15, 2012
DIY: Nailhead Pumpkins
Strictly Simple Style is the perfect blog for people like us. Simple but elegant DIYs!
Be sure to check them out for more DIYs!!
Besides the traditional orange pumpkins, I also wanted to pick up a few white ones for a project I saw here and just loved, embellishing a pumpkins with decorative nails.
I started by printing a letter "E" and taping it to my pumpkin.
Labels:
autumn,
center piece,
decor,
DIY,
do it yourself,
dollar store,
fall,
family,
halloween,
holiday,
kids,
nails,
november,
pumpkin,
pumpkins,
thanksgiving,
thumbtacks,
tutorial
Sunday, October 7, 2012
DIY: Paper Pumpkin Ornaments
Hostess with the Mostess has given us an excellent excuse to go back to the Dollar Tree to grab up some construction paper!! Not that we needed an excuse...
What do you think, aren't the cute??
***
PAPER PUMPKIN ORNAMENTS
Materials:
• 1-2 pieces of orange construction paper
• 1 piece of green construction paper
• 1 piece of brown construction paper
• scissors
• paper cutter (optional)
• paper clips and/or stapler
• string
• 1-2 pieces of orange construction paper
• 1 piece of green construction paper
• 1 piece of brown construction paper
• scissors
• paper cutter (optional)
• paper clips and/or stapler
• string
Directions:
Cut the orange pieces of construction paper into 1″ wide strips (each strip will be 1″ x 11″). Then, shorten some of the strips so that you have (1) 6″, (2) 7″, (2) 9″, and (2) 11″ long pieces.
Gather the
strips of paper together (with the ends flush) and place the smallest
one in the middle. Order them by size so that the largest strip is on
the outside. Secure with a paper clip or staple (I prefer the paper clip
so that I can keep adding more elements). Line up the opposite ends so
that they are together like the top.
Cut a brown strip of paper
1/4″ by 3″ long for the stem. To make it curl, wrap the paper around a
pencil and hold it in place while you count to 20 (or sing the ABC
song).
Cut out two leaf shapes from the green paper (ours were sort of like pairs of bunny ears).
Add the stem, leaves, and a piece of string to the paper clip at the top.
Hang up and enjoy!
Labels:
autumn,
decor,
decoration,
DIY,
do it yourself,
fall,
halloween,
halloween crafts,
home,
home decor,
homemade,
kids,
paper,
parties,
party,
pumpkin,
pumpkins,
thanksgiving,
tutorial
Friday, September 28, 2012
DIY: Upcycled Plastic Pumpkins
Random Thoughts of a Super Mom has definitely captured our attention with this great and super simple DIY. Check her out for more fun!
Just in case you want to make a HUGE mess and some
SUPER cute pumpkins...here is the list of supplies and steps we followed
to make them.
*******************************
Plastic pumpkins {mine were $1 at Walmart}
Scrapbook Paper {8 sheets for $1 at Target}
Mod Podge
Paint Brushes
*********************************
Tear scrapbook paper into small pieces
Then use a foam paintbrush to apply a coat of Mod Podge all over the pumpkins and let them dry.
Our pumpkins {coated with Mod Podge} drying on the
table!
Our finished Thanksgiving/Fall Pumpkins!
Labels:
autumn,
center piece,
decor,
decoration,
DIY,
easy,
fall,
holiday,
holidays,
home,
home decor,
homemade,
kids,
pumpkin,
pumpkins,
table,
thanksgiving
Thursday, September 27, 2012
DIY: Autumn Garland
Dollar Store Mom continues our trend of finding wonderful DIYs that are all about dollar store re-purposing! We love when we can go to the dollar store and keep things cheap, but cute and fun.
Be sure to check out her blog for even more fun DIY!
This Autumn Garland cost less than $0.50 in supplies!
Though I actually spent $5 for the supplies used in this project, I
used less than 1/5 of them, leaving me with more than enough for quite a
few more projects from these same ingredients.
- Paper doilies in various colors/shapes- $1 per pack of 32
- Bag of cranberry-like “container filler”- $1 (this project used less than 1/8 of the bag)
- glue- on hand
- twine or string- on hand
I wrote each letter on the doilies using glue, then had my daughter
add the tiny cranberries. Let this dry for a few hours. If you’d like to
just make this yourself, or if you’ve got older kids, hot glue is a
better option.
I strung each doily on to some basic twine that I had on hand, and
hung my garland across my piano. Tomorrow you’ll see what else I created
from my dollar store finds to add to this cute display!
Tuesday, September 25, 2012
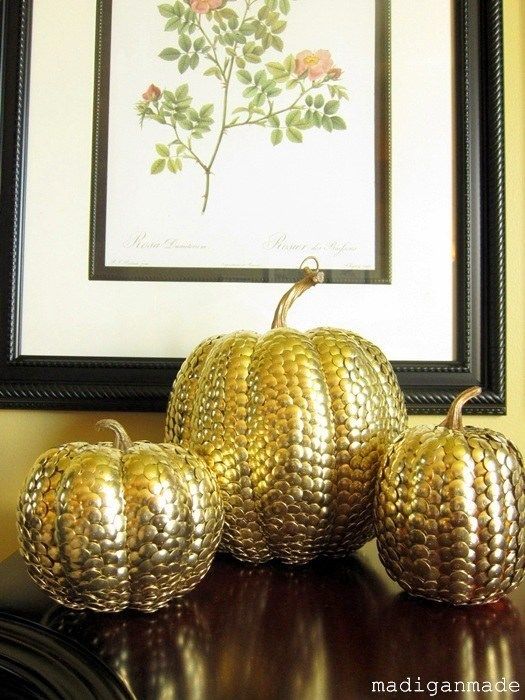
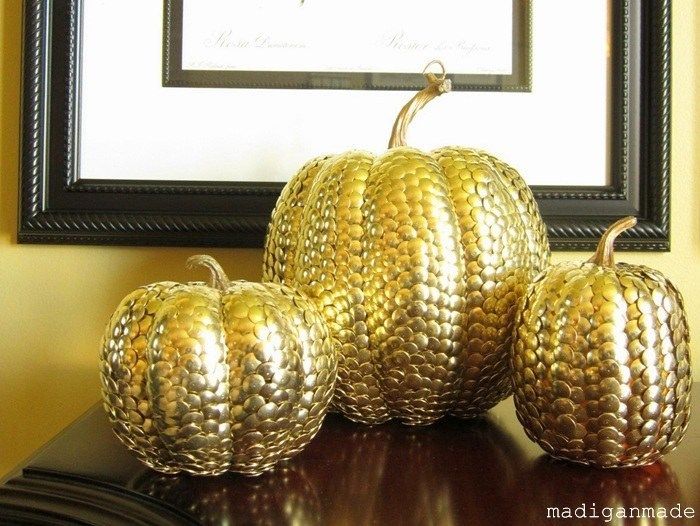
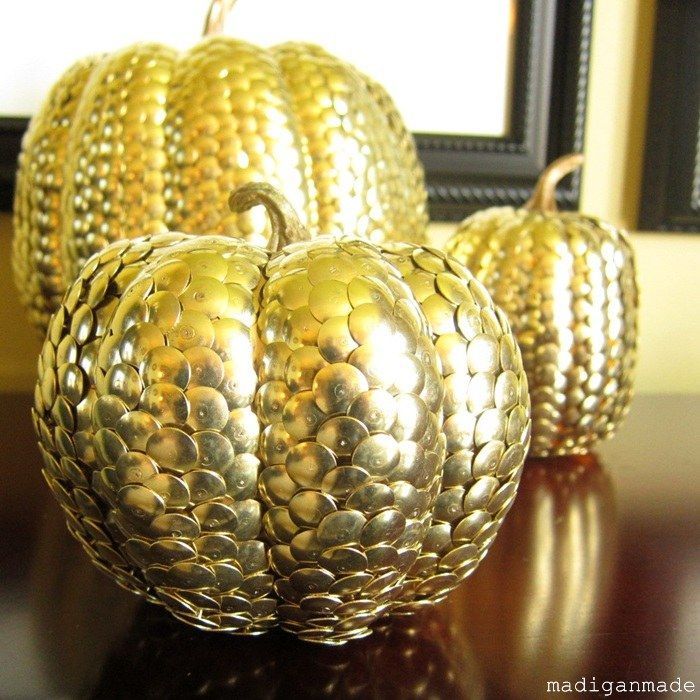
DIY: Gold Thumbtack Pumpkins
Here is another FUN-tastic Autumn DIY that would make a stunning center piece. It comes from Madigan Made's blog so check her out for more!
Question: What do you do when you are
Answer: Find a repetitive, mindless task that does not require power. (You know, in case the power goes out. Fortunately, it didn't for us.) And if you are crafty (or not!) that tedious activity might be to create one of these studded pumpkins.
Yep... the gold thumbtack train continues here on Madigan Made!!
(BTW- The runner up title for this post was "Thumbtackular!" thanks to Chelsea from two twenty one and her suggestion last night on Twitter.)
Sunday I showed you my brass tack covered wreath.
Now I want to show you my gilded pumpkins!
I actually made these beauties before I made the thumbtack wreath, but I wanted to show you the wreath first to coincide with the Nester's wreath party.
Like the wreath, I was inspired to make these metallic gourds after I made my thumbtack covered globe. The thumbtack texture was so neat, I wanted to try it on other things.
AND, if you follow me on Pinterest, especially my Fall inspiration board, you would see that I've also been enamored with the idea of gilded and gold leaf pumpkins lately.
I love sparkle and shine around Christmas... and I'm slowly appreciating a little glam for autumn, too. I could have made these silver, I suppose. But lately, I'm learning to love brass.
Gold hues can add warmth in the cooler months, don't you think?
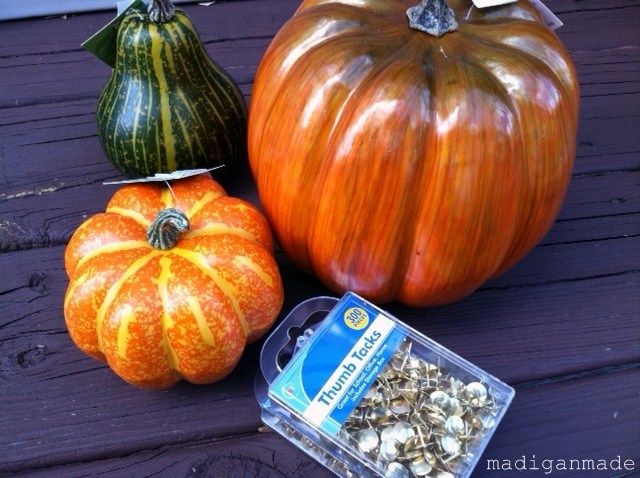
Anyhoo, back to the pumpkins... To create them I used a couple of fake foam pumpkins from the craft store. The largest pumpkin was about 6" across. I spray painted them a gold color first in case any of the tacks did not fully cover an area.
(Note: I did not use the green gourd pictured here... but I went and grabbed a pumpkin from the dollar store instead... while I was buying more tacks. That third pumpkin did not get a coat of gold paint and I regret that fact, because you can kind of see the orange peeking through.)
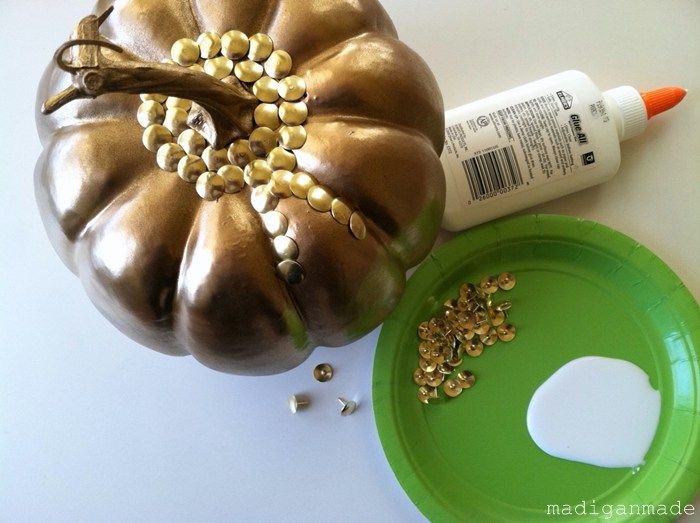
Then, I proceeded to dip the ends of each tack in white glue and press them into the foam shapes. I used glue because I was worried that the tacks would fall out. I stopped using the glue about half way through the large pumpkin because
For placement, I first circled the top and the stem with brass tacks, overlapping as I went. Then I worked my way down the each 'rib' section of the pumpkin. I outlined each of those sections with tacks and then filled in with overlapping tacks. There really was not much of a science to my method. I overlapped the tacks and where I saw 'holes', I just added another one!
I had quite a few comments from you all about how many tacks I used on the brass tack wreath! ;)
Well, I used a TON more tacks with these three shapes! Good thing I
With the large pumpkin, I lost count after 6 boxes of tacks. I'd guess that I used about 7 for that one. So, there are at least 1800-2100 tacks on that pumpkin alone! The smaller pumpkins took about 2-3 boxes of tacks.
Considering it was a dollar for a box of tacks plus $5 or less for a pumpkin form - it really did not cost that much to make these gilded pumpkins. It just cost me loads of time! ;)
Labels:
autumn,
center piece,
decor,
decoration,
DIY,
do it yourself,
fall,
halloween,
halloween crafts,
holiday,
holidays,
home,
home decor,
homemade,
how to,
pumpkin,
pumpkins,
table,
thanksgiving,
upcycle
Monday, September 24, 2012
DIY: Glittered Pumpkin Place Card Holder
Infarrantly Creative's blog has stunning DIY Glittered Pumpkin Place Card Holders that would be ideal for any Halloween party! Or we think it'd be super simple to just leave off the place card holder portion and have a snazzy glittered pumpkin!
Supplies:
Styrfoam pumpkins
Hole saw and drill
Spray primer
Krylon’s Glitter Blast Spray Paint
Krylon Clear Spray
Votive candle
Tea light candles
Brad or Thumbtack
I purchased two different size pumpkins from Dollar Tree. I used my
hole saw bit (the size of the tea light candles) attached to my
cordless drill to make a hole in the top of the mini pumpkins. Using a
knife I scraped out the excess Styrofoam to create a nice even hole for
the tea light to fit in. Then I spray primed the pumpkins and then used
the Glitter Blast spray all over them. I let them dry and then I
sprayed a clear coat over the top of them. You can seriously rub your
hand all over it now and not a sparkle will come off.
Next I printed out the guest’s name on cardstock and cut it to size.
Then I stuck a scrapbook brad or thumbtack into the pumpkin to hold it
in place.
I also used the larger pumpkin with a votive (drilling with the same
hole saw bit) thinking it would make a nice fall centerpiece.
Look at the depth of color in this. It has lots of golds, orange and brown flecks in it. So rich and beautiful!
Labels:
budget,
cheap,
DIY,
do it yourself,
dollar store,
easy,
halloween,
halloween crafts,
holiday,
holidays,
parties,
party,
party ideas,
pumpkin,
pumpkins,
whimsical
Subscribe to:
Posts (Atom)