Showing posts with label table. Show all posts

Friday, February 1, 2013

DIY: Free Printables (Chevrons)

Who doesn't love free stuff?  Who doesn't love free printable / customizable stuff?  That's what we thought.  ;)

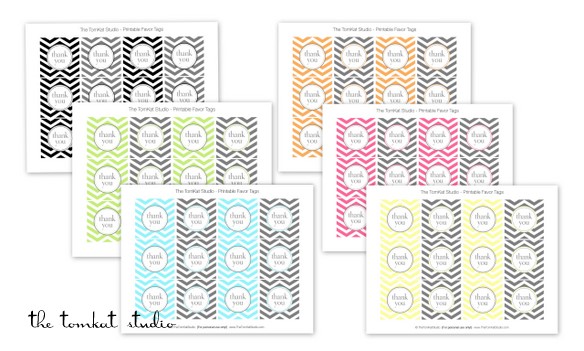
So, we are happy to share HGTV's wonderful (and FREE) printable chevron invitations and favors in 6 different color choices.  You.  Are.  Welcome.
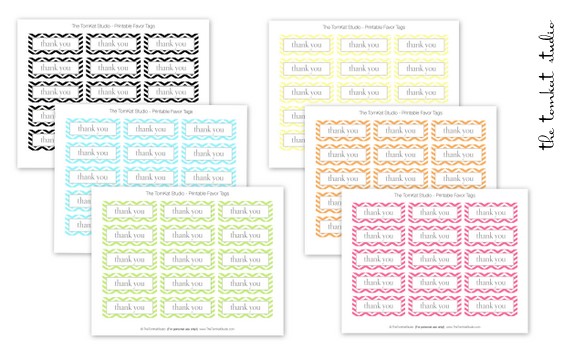
I was recently asked to design a few all occasion invitations and favor ideas for the entertaining section of HGTV’s website. Both stories just went live, so you can download these fun, easy printables for any event! Available in pink, orange, lemon, lime, aqua or black. The invitations for free download are fill-in invitations. If you would like the text customized, they will be available in our shop!
I designed coordinating favor tags in two shapes. Our regular party circle size, as well a rectangular version.

Saturday, December 22, 2012

DIY: Anthropologie Inspired Snow Globes

Zomoc.com has a wonderfully easy DIY - there aren't really any instructions, but these look pretty self explanatory!  We could see us whipping up a few of these wonderful gifts for far less than what Anthropologie is charging for them....

Inspired Snow Globes Tutorial

Tuesday, December 18, 2012

DIY: Santa Belt Napkin Rings

http://crafts.kaboose.com/swf/santas-belly-napkin-ring-christmas-craft-photo-350x255-aformaro-07_rdax_65.jpgKaboose's blog has these adorable (and crazy easy to make) Santa belt napkin rings that would be ideal for your holiday table!  Wouldn't you just love to sit down to these cuties at your table?  We think that they are very whimsical and fun!  


What you'll need:


  • Cardboard tube
  • 1 sheet each of red, white, and black felt 
  • Gold chenille stem
  • Scissors
  • White craft glue

How to make it:


  1. Cut cardboard tube into 1-1/2-inch segments.
  2. Place one piece of the tube onto the red felt and cut the felt just slightly wider than the tube. Wrap the felt around the tube and trim off the excess, leaving enough for a small overlap. Glue the red felt around the cardboard tube. (See photo.)
  3. Cut a strip of black felt, about 1/2-inch wide, and glue it around the red tube, lining up the seams. (See photo.)
  4. Cut two strips of white felt, about 1/4-inch wide and glue them around the outside of the red felt, overlapping the edge a little.
  5. Cut a 3-inch piece of gold chenille and bend it into a square for the buckle. Glue the buckle to the black felt, be sure that the seam is on the opposite side. Let everything dry completely. (See photo.)

Tips:


  1. These can also be made with construction paper or craft foam.
  2. Instead of gold chenille, you can use gold glitter glue, but you will need to take into account the drying time needed.
  3. These will look just as good on fancy napkins as they will on rolled up paper towels!

Friday, December 14, 2012

DIY: Christmas Present Topiary

That Village House has a wonderful idea for decorating either the inside of your house or outside of your house with a large topiary!  We could totally see this being made in a mini version using dowels and smaller boxes as a great center piece for a table!

pletely done, but I thought I would share it with you anyway.
I started with 3 different sized boxes...9, 12 & 14 inch cubes.
I used an ice pick to punch holes in each of them so that I could run a rebar through them. (It's easier to do the holes first, before getting them all wrapped & pretty.) For the smaller boxes, I slightly off-centered my holes, so that the boxes would tilt on each other.
Then I wrapped them and made bows for each.
Tip: Keep your wrapping paper pattern running the same direction.
Tip #2: Before you poke holes through the paper, put a little tape on it. It will help the paper from ripping.
I also made sure my seams were right down the middle of the boxes so that the ribbon would cover them up. And I used double-sided tape to hold the ribbon and bows in place. I'd love to take credit for these tidbits, but again, I straight up copied this idea!!

Monday, December 3, 2012

DIY: Felt Holiday Tree(s)

Danielle Thompson is keeping us inspired and in the Christmas spirit.  We love these felt trees and can't wait to give them a try!  Check out her blog for more DIY!
  Tutorialimage 

First I wanted to give credit to my initial inspiration for these (b/c it is one of my pet-peeves when people don't give proper credit... grr.. i've seen this happen so many times to other people, and even me... and it just makes me so sad. I try very hard to always give proper credit! although unfortunately with all of the things i bookmark, i do lose track sometimes where i got the idea in the first place. But very very rarely.) 
My inspiration for this actually came from a project (no surprise!) from Emily Martin/The Black Apple last year. I had the idea of making these felt trees in my head this year, and knew the concept was hidden in my subconscience from SOMEWHERE, and then i remembered her trees from last year. :-) But after looking at them for the first time this year, i realized they're pretty different! But same concept...
I wish I could provide some patterns for the felt pieces, but #1, as I've mentioned, I don't trust my pattern making skills, especially when it comes to fabric! and #2, I'm not sure that all styrofoam trees are standard sizes at all craft stores, so the patterns might end up being off depending on where you buy your tree forms.
But essentially the shape will look something like this and get smaller as you layer up the tree:
Shape 
You just freehand cut the scallop along the bottom of the shape. It doesn't have to be perfect, and I sort of like the freehand look: :-)
Scallop
To start:
1. Cut out your pieces of felt. I used generally 3-5 pieces/colors of felt per tree depending on how layered you want it to look. For each color tree, I used 3-5 shades of one color to show a gradiation of the darkest shade to the lightest shade going towards the top. On some I did a dark-light-dark-light look as well. Whatever worked with the shades of felt that I had. I used wool felt, but you could also use craft felt at craft stores... it's cheaper, but not as pretty, and you won't have the same amount of color shades as you'll find in wool felt.. i got mine online.
The first layer will be your bottom layer. It won't have the scalloped edge b/c it will wrap around the bottom of your tree form. You'll need to snip the area that wraps around like this so that it will fold over with little bulk. Then just hot-glue to the bottom:
Snip-bottom 
Then you can glue a circle of felt to cover your bottom completely.
(I used 3 different sizes of tree forms: small, medium and large. So if you do try to make a pattern, you'll need to make a different pattern for each size/shape tree as they will of course differ.) I basically just winged it with each layer of felt... wrapped the fabric around and just cut away til i got generally the shape that i mentioned above. Then i wrapped it around hot-glued, where the ends met, to the tree form, overlapping:
Treeback2 
Treeback1 
Since I knew my that my trees would only be seen from the front, i didn't stress too much about how they looked on the back. As you can see, the backs of mine look a bit haphazard. They still look tidy at least. If you wanted, and you know they'll be seen from all sides, you could add a strip of ribbon along the seam on the back like I did here, vertically:
Treeback4  
Treeback3 
If you want to be REALLY tidy, you could wait on adding the vertical strip of ribbon, and first wrap your trims and ribbons around the tree horizontally and when you're done with that, you could add your vertical strip of ribbon to hide all of the felt seams/ribbon-ends on the back. Or just leave the felt seams as-is. It really doesn't look bad, as long as you overlap the ends so that no foam shows through. If you're a sewer, you could even sew the ends together on each felt layer and slip over the form!
The great thing about using these styrofoam forms is that you can also pin things to it (as you can see I used lots of pearly colored pins). And that is actually even easier than having to use hot-glue constantly. I'm not a big fan of glueing (i don't totally trust it!), so i try to use it only if i have to. But you'll definitely want to add some hot-glue to reinforce everything.
2. Ok you're done adhering your felt layers, it's time to embellish. You can start adding your trims and ribbons to wrap around the tree horizontally. (or you can leave them as-is with no embellishment! sort of a more modern look) I wanted to embellish, but not overly, still keeping a somewhat clean design (well, clean for ME at least).

Saturday, December 1, 2012

DIY: Glitter Trees

I Heart Nap Time's blog is kicking off the beginning of December with some excellent Glitter Trees that are amazing decor and eye candy.

Check out their page for more holiday DIY!
Here’s what you’ll need:
-3 Styrofoam trees: sizes 15×5, 12×4, and 9×4
-3 small candlesticks (you can find these at just about any thrift store for about 50 cents)
-spray adhesive
-glue: Elmer’s glue for the glitter and a stronger glue like E6000 to glue the tree to the candlestick
-glitter in your favorite 3 colors (we found these awesome colors of glitter at hobby lobby)
-white spray paint
Here’s what you’ll need to do:
- give your tree a good coating of the spray adhesive. you can use the elmers glue for this part, but the spray adhesive covers better and gives a nice smooth finish, plus it’s a lot faster. leave the bottom of the tree undone, this will get glittered at the end.
- once you have your tree coated in glue, cover it completely with glitter. when all 3 trees have been glitterized set them aside to dry.
- next take your 3 candlesticks and give them a couple quick coats of white spray paint. then let those dry completely. 
- now take your E6000 and glue the candlesticks to the trees. it’s best to let them sit overnight. (keep an eye on it though. on one of the trees the glue ate away some of the styrofoam and my tree tilted to the side. so just check on it for the first hour or so.)
-  when everything is completely dry, flip them over and cover the remaining part with glue and glitter. (we used the elmers glue for this part)
- then all you have left to do is decide where to put them!!

Sunday, November 25, 2012

DIY: Apple Placemats

With Thanksgiving just around the corner - we think it'd be super easy to adjust this DIY from Bloesem Kids' blog for fun Pumpkin Placemats!  

4_apple1
Apple Placemats by Courtney Russel from Two Straight Lines

As we celebrate the harvest season here in the US, it's nice to get the kids involved in decorating the holiday table.  These cute apple placemats are painted using a freezer paper stencil, a technique easy enough for kids.  Freezer paper can be found at many grocery stores or online, but be careful, once you start you'll be stenciling every thing in sight.

You will need:
*Burlap
*Scissors
*Printed fabric
*Fabric glue (I like Alene's Tacky Glue)
*Red and Brown Textile Paint (I use Jacquard Paint)
*Paintbrushes- 1 wide, 1 narrow
*Freezer Paper
*Iron
*Heavy Weight Paper
*Marker
4_applecollage
Step one:
Cut your burlap to 13" x 17".
Step two:
On the heavy paper, sketch your apple, refining your drawing until you're happy.  Cut the apple out and trace around it on the paper side of the freezer paper.  Cut the apple out of your freezer paper, making sure that the area surrounding the apple is uncut-- this is your stencil.
Step three:
Place your stencil on the burlap where you would like it and iron it in place.
Step four:
Using the wide paintbrush, paint the area inside of your stencil with the red textile paint (tip: I used both foam and bristle paintbrushes and preferred the bristle).  Carefully peel your stencil away. Using the narrow paintbrush and the brown paint, paint the stem on your apple.
Step five:
Cut a leaf from your printed fabric.  Glue it next to your stem just above your apple.  If desired, use the marker to draw pretend "stitches" on the leaf.
Step six:
One at a time, pull four or five threads from each edge of the placemat to create a fringe.
Step seven:
Repeat until you have a placemat for every seat at your table.


Wednesday, October 17, 2012

DIY: Jeweled Planters

Centsational Girl has been one of our favorite blogs for a long time now.  We love her sense of home design and fashion on a budget!  Check her out!  Today we are featuring her blog on how to fancy up your planter.  These would be fantastic for a garden party or an outdoor wedding perhaps?  What do you think?
This planter makes a gorgeous statement, on a wedding table, surrounding your orchids, or adding glamour to your outdoor table.
How to Make a Jeweled Planter:
Supplies:
  1. Inexpensive terra cotta planter(s)
  2. Outdoor spray paint
  3. Glass marbles (with flat side) from craft store
  4. Silicone rubber sealant or epoxy glue from hardware store
Step One:  Spray paint your terra cotta planters with some outdoor spray paint and allow to dry.  I use a beautiful shade of cream by Rustoleum called ‘Heirloom White’.
Step Two: Attach your glass marbles with silicone rubber sealant.  This product is waterproof and will withstand outdoor abuse.
Silicone sealant takes about 24 hours to cure, but after that, your ‘jewels’ will stay on regardless of moisture.
This DIY project makes your planters look like they’re wearing jewelry!

Friday, September 28, 2012

DIY: Upcycled Plastic Pumpkins

Random Thoughts of a Super Mom has definitely captured our attention with this great and super simple DIY.  Check her out for more fun!


Just in case you want to make a HUGE mess and some SUPER cute pumpkins...here is the list of supplies and steps we followed to make them.
*******************************
Plastic pumpkins {mine were $1 at Walmart}
Scrapbook Paper {8 sheets for $1 at Target}
Mod Podge
Paint Brushes
*********************************
Tear scrapbook paper into small pieces
Attach the paper to the pumpkin and continue to coat it with Mod Podge until all the paper is wet and stuck to the pumpkin really well. This is the messy part, because the only way to make the paper stick really well is to work it with your hands!

Then use a foam paintbrush to apply a coat of Mod Podge all over the pumpkins and let them dry. 

Our pumpkins {coated with Mod Podge} drying on the table!

Our finished Thanksgiving/Fall Pumpkins!

Tuesday, September 25, 2012

DIY: Gold Thumbtack Pumpkins

Here is another FUN-tastic Autumn DIY that would make a stunning center piece.  It comes from Madigan Made's blog so check her out for more!


Question: What do you do when you are nervously patiently waiting out a large hurricane? How do you keep your mind off the approaching storm?

Answer: Find a repetitive, mindless task that does not require power. (You know, in case the power goes out. Fortunately, it didn't for us.) And if you are crafty (or not!) that tedious activity might be to create one of these studded pumpkins.

Yep... the gold thumbtack train continues here on Madigan Made!!

(BTW- The runner up title for this post was "Thumbtackular!" thanks to Chelsea from two twenty one and her suggestion last night on Twitter.)
Sunday I showed you my brass tack covered wreath.
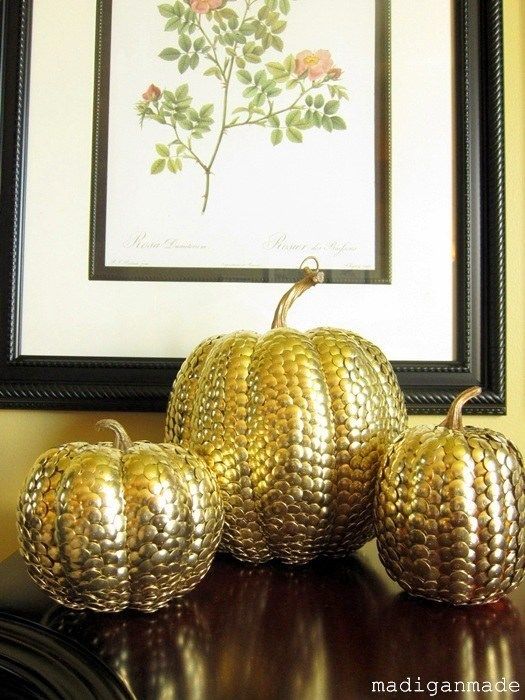
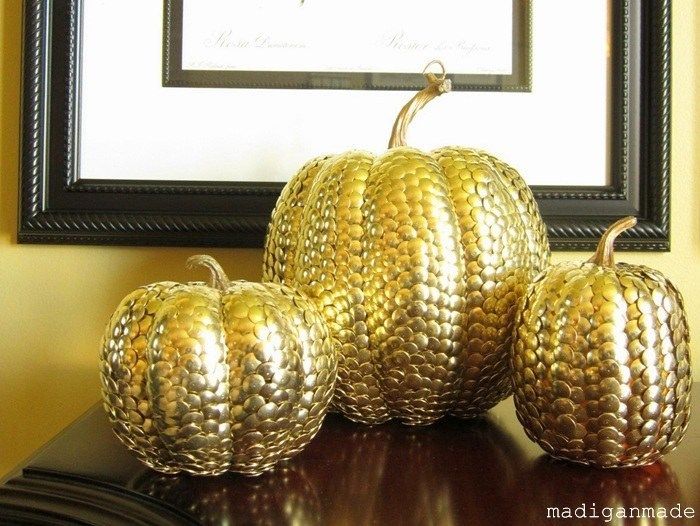
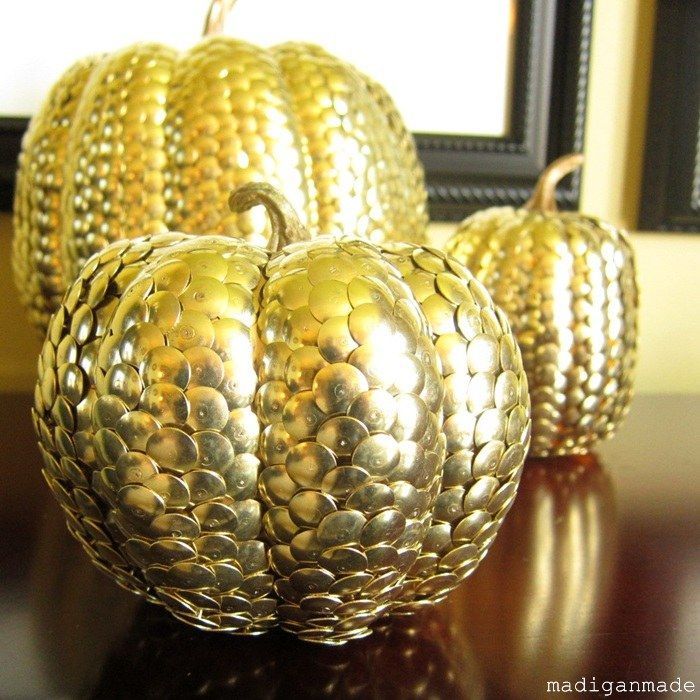
Now I want to show you my gilded pumpkins!

I actually made these beauties before I made the thumbtack wreath, but I wanted to show you the wreath first to coincide with the Nester's wreath party.

Like the wreath, I was inspired to make these metallic gourds after I made my thumbtack covered globe. The thumbtack texture was so neat, I wanted to try it on other things.

AND, if you follow me on Pinterest, especially my Fall inspiration board, you would see that I've also been enamored with the idea of gilded and gold leaf pumpkins lately.
I love sparkle and shine around Christmas... and I'm slowly appreciating a little glam for autumn, too. I could have made these silver, I suppose. But lately, I'm learning to love brass.
Gold hues can add warmth in the cooler months, don't you think?

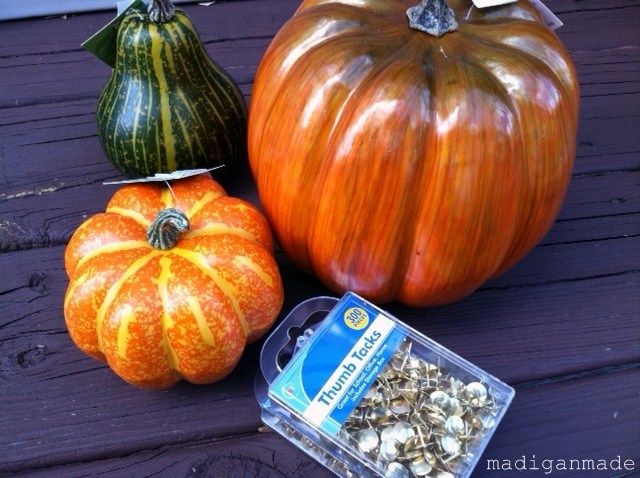
Anyhoo, back to the pumpkins... To create them I used a couple of fake foam pumpkins from the craft store. The largest pumpkin was about 6" across. I spray painted them a gold color first in case any of the tacks did not fully cover an area.

(Note: I did not use the green gourd pictured here... but I went and grabbed a pumpkin from the dollar store instead... while I was buying more tacks. That third pumpkin did not get a coat of gold paint and I regret that fact, because you can kind of see the orange peeking through.)

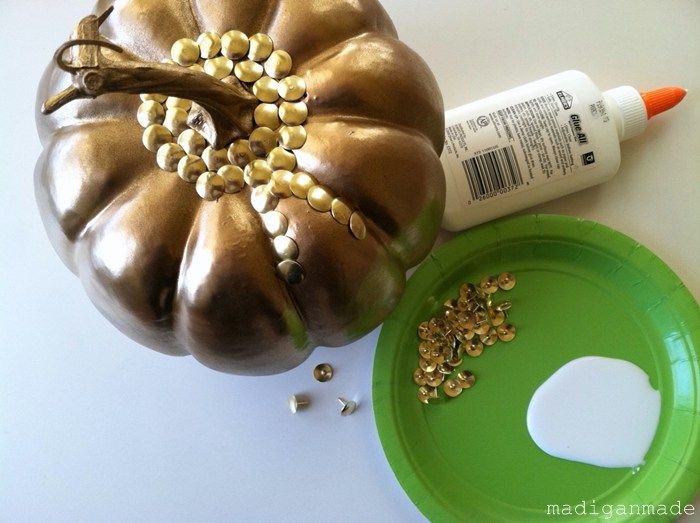
Then, I proceeded to dip the ends of each tack in white glue and press them into the foam shapes. I used glue because I was worried that the tacks would fall out. I stopped using the glue about half way through the large pumpkin because I was tired I realized that the glue was not really necessary.

For placement, I first circled the top and the stem with brass tacks, overlapping as I went. Then I worked my way down the each 'rib' section of the pumpkin. I outlined each of those sections with tacks and then filled in with overlapping tacks. There really was not much of a science to my method. I overlapped the tacks and where I saw 'holes', I just added another one!

I had quite a few comments from you all about how many tacks I used on the brass tack wreath! ;)

Well, I used a TON more tacks with these three shapes! Good thing I needed an excuse like running to the dollar store!


With the large pumpkin, I lost count after 6 boxes of tacks. I'd guess that I used about 7 for that one. So, there are at least 1800-2100 tacks on that pumpkin alone! The smaller pumpkins took about 2-3 boxes of tacks.

Considering it was a dollar for a box of tacks plus $5 or less for a pumpkin form - it really did not cost that much to make these gilded pumpkins. It just cost me loads of time! ;)