Showing posts with label thumbtacks. Show all posts

Monday, October 15, 2012

DIY: Nailhead Pumpkins

Strictly Simple Style is the perfect blog for people like us.  Simple but elegant DIYs!

Be sure to check them out for more DIYs!!
I love simple projects and this is one of the simplest. I purchased my nails online but since this post first published I found that they are available at Hancock Fabrics in several finishes for about $1.29 per box, more than enough to finish several pumpkins. To save money, after Thanksgiving I removed the nails so that I could use them again for this year's pumpkins.

Image from myhomeideas.com

Besides the traditional orange pumpkins, I also wanted to pick up a few white ones for a project I saw here and just loved, embellishing a pumpkins with decorative nails.

I started by printing a letter "E" and taping it to my pumpkin.


Next, I took a pen and traced the outline of the letter just hard enough that a faint line would be left on the exterior of the pumpkin.

To finish, I pressed the nails into the pumpkin following the line that I had traced. In minutes I was done. (I don't call this blog "Strictly Simple Style" for nothing!) No carving necessary.

Tuesday, September 18, 2012

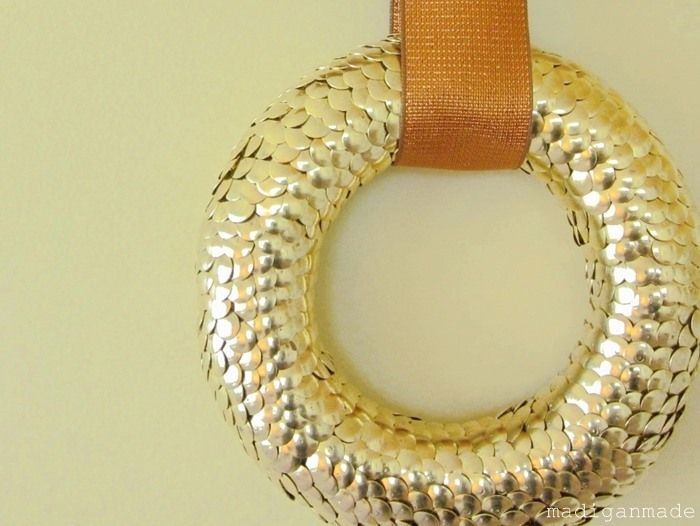
DIY: Autumn Gold Thumbtack Wreath

Madigan Made has gone above and beyond with this amazing wreath.  The materials are so inexpensive and we NEVER would have thought to do this with these things.  Love it, and can't wait to make it.  Period.  


"You made a wreath out of... thumbtacks???"

Yes, I made a wreath out of gold thumbtacks! :) 
I wanted to make a new wreath this season and gold seemed like the perfect color for a fall wreath. I think it looks great with a copper ribbon, too.

There is something about the warmth of gold and copper together that reminds me of fall.


Don't get me wrong, I love my brushed nickel and stainless steel. But I'm slowly warming up to the use of gold and brass in my home.  (pun intended!) Gold can scream terrible and tacky 1980's decor... but used thoughtfully, I think it can add a layer of coziness and brightness to a space.

To me, mixing gold and copper is a natural autumnal combination. Using a copper ribbon with my new gold tack wreath seemed perfect for this upcoming season.

Are you asking: "What on earth made you think about using thumbtacks on a wreath?"

Well, after I made my thumbtack covered globe, I knew I could cover other things with tacks for a unique texture.  I figured, why not try it on a foam wreath?

The steps to making this wreath were simple.

I used a small six-inch wreath form and several boxes of brass tacks (Tip: the dollar store sells boxes of 300). I started with a circle of tacks around one section and just kept poking the tacks in and layering them on top of each other.


I worked my way around the wreath layering the tacks. The ribbon covers the area where the two ends meet up, because it was hard to make that transition look seamless.

This wreath took a loooong time to finish (a perfect tedious job to do in front of the TV) and it used at least 2-3 boxes of 300 tacks.

Sunday, September 2, 2012

DIY: Thumbtack Art!

We will take a brief hiatus from holiday crafts to show you this wonderful DIY project from Things Bright's blog!  We can see all sorts of quotes, song lyrics, or just fun sayings that could be used here.  Perhaps even a variation that could be holiday themed?  We know you can get plain white thumbtacks from Wal-Mart for $0.88 and you could paint them with any color or even use polka dots, glitter, stripes, or anything!  Have fun with it.
You Me Oui Thumbtack Art
Happy Monday, friend!
I made myself a bit of art for my wall completely inspired by Pakayla Biehn’s Neon which I featured this morning.
It was so fun!
You Me Oui Thumbtack Art
Earlier that day I had gone thrifting and found giant graph paper and vintage thumbtacks. I had no plans, but as per usual, figured I’d use them for something, or put them in my vintage shop. (I’m working on some paper ephemera kits.)
Same for the canvas.  A friend who was moving didn’t want the art she’d made for her daughters old room and didn’t want the canvases either.  Guess who knew the canvases would get used for something sooner or later?
Then, idea! What if I made some thumbtack art?
I’ve been wanting to add some metallic shine to the living room. But what to make? I thought of a compass or star…but neither felt right for the moment. And then I remembered totally crushing over Biehn’s neon sign, wishing I could have it.
I love the simplicity and cleverness of the play on words!
You Me Oui Thumbtack Art
Once that was settled, I put my new graph paper to work.  I outlined my canvas, then free-handed the words.  Me turned out perfectly sized and centered, and then I rewrote you and oui a couple times.  It took a bit to get the Y and Os the way I wanted them.
(I’m almost sure there’s some messed up psychology in there somewhere!)
You Me Oui Thumbtack Art
I also played with the idea of painting our last name in gloss along the OUI at the bottom. 
When I first realized I had to remember how to spell Drouillard, I thought, “But I took Spanish!”  But even I knew oui was yes in French, so once I realized that, I was helped immensely.  Ever since then, designs with oui in them, like this bag, have made me happy.
But I think I was complicating the design.  I couldn’t figure out how to make it look cool because putting “dr OUI llard” on there, even in a hint of gloss, brought the OUI off-center.
Besides, now it leaves something for people to figure out, since I didn’t literally spell it out for them. 
(Except you, of course.)
You Me Oui Thumbtack Art
After I spray painted the canvas olive green – because I like olive green and gold – I originally started thumbing the tacks right through the paper onto the canvas.
You Me Oui Thumbtack Art
At this point I started realizing two things….
One,  I was not going to be able to just tear away the paper when I was finished.  Those tacks held it tight.
You Me Oui Thumbtack Art
Two, those tacks needed something more to hold onto than just the canvas.
So I recycled a bunch of cardboard box pieces into the back of the canvas and taped them in with painter’s tape. 
I have nice brown packing tape somewhere that would have looked better, but I couldn’t find it.  I’m thinking my little urchins may have used it up. That is usually the cause of “lost” craft supplies for me. 
(But oh well, no one but will see the back anyway, right? Ahem.)

You Me Oui Thumbtack Art
I also took all the Y tacks back out, firmly, and then firmly but gently traced all the letters over a few times and put dents in the canvas. 
I’m sure there’s a better way to transfer these with carbon paper or something, but this is what made the fastest sense at the time.  I forgot to get a good shot of that, but you can see the rest of the M and the top of the E at the bottom of this photo if you look carefully.
You Me Oui Thumbtack Art