Showing posts with label crafts on a budget. Show all posts

Thursday, August 2, 2012

DIY: Tissue Paper Flowers

The Craftinomicon Blog has some amazing DIYs, including this one which shows you how to make Tissue Paper Flowers!  It basically is taking the same concept as tissue paper pom pom, but making them into smaller versions that look very flower like and would be gorgeous to change out for each season as it approaches!!  This would be a stunning centerpiece for a wedding or party...


To make these tissue paper flowers all you will need is:

Tissue paper in your desired color

A pair of scissors
Floral wire

Start by cutting your tissue paper to size. For these small flowers, I used 4 sheets of tissue paper cut to 4"x5". Stack them on top of each other, and fold like an accordion as pictured below.


Next, find the middle of your accordion folded paper (it's easiest to just fold your paper in half again, you won't see any fold lines in your finished product). Using a piece of floral wire about 6 or 7 inches long (also folded in half) secure your paper by twisting the wire around the center of your paper like so:


I find it is easiest to work with these in a variety of ways if I leave a longer wire stem. So I twist the remainder of my wire all the way down. You can cover this with floral tape later of you wish.


Now, you get to decide what kind of edge your flower petals will have. A soft, rounded edge will give you a rounder finished flower. A sharp, triangular cut, will give you something spikier, almost like a sea urchin. You can also use pinking shears or other decorative scissors before you fold your paper to get a more subtle edge. I chose a rounded edge for this tutorial.


To make poofing out your flower petals easier, I recommend fanning out your flower before you begin, like so:


Now, all you have to do is gently pull up on each layer of tissue paper and fluff as necessary to achieve a finished look. Be careful not to tear your paper, but don't worry if you get a little snag here or there. These flowers are particularly forgiving.

Continue separating and fluffing each layer of tissue until you are done. If you want a fuller flower, feel free to use more layered sheets. You can also do multiple colors. If you want the middle of your flower to be white, make sure you have a white sheet of tissue on top of your paper pile before you fold, tie etc.

Here is my finished flower:


Sunday, July 29, 2012

DIY: Make Your Own Stickers

Little Grey Kitteh has a wonderful tutorial on making your own stickers.  This will come in really handy as the holiday gets closer and closer!  Just think, we are already more than halfway to Christmas...Eek!  But, if you start now, maybe it won't be so overwhelming??  What do you think?  Ready for the holidays?  Love these stickers?  We do!!


So for starters, pick out whatever paper you want to use and a hole puncher for the shape that you want your stickers to be. I used some cute cardstock that I had on hand as well as a heart hole puncher that I had purchased at Michaels. You could also be more elaborate and use an Xacto knife or scissors to cut out your design, but I just wanted a simple heart. :P


Now, cut out your shapes! I only made two stickers, but it would be just as easy to make a whole ton! :P


Then, you need to gather the following things:
  • White Vinegar
  • White Glue (such as Elmer's)
  • A bowl
  • A spoon
  • A paintbrush


Now, the magazine said to combine equal parts of white glue and white vinegar into a bowl. I used a spoonful of each, which ended up being wayyy more than plenty for my two stickers. So combine the two ingredients and stir until the mixture becomes milky and somewhat thin.

Finally, once it's been mixed enough, grab your paint brush and the paper pieces that you cut or punched out earlier. Dip the brush into the milky mixture of glue and vinegar, and liberally smear a thin-medium amount of it onto the backside of your paper. Wait about ten or fifteen minutes, depending on how thickly you applied the glue-vinegar mixture. You just want it to be wet or moist, but not soaked. My stickers were still flimsy when I applied them to the card, and they worked fine. So in short, the drying time isn't an essential and precise part of the process. :P


I didn't have anything special in mind for these guys, so I tested them on a plain piece of white copy paper. I folded the paper in half to represent a card, then I placed one sticker on the front of the card and used the other sticker to close and seal the card. They held up well and they didn't soak the paper, so all in all, I was very pleased! :D

Monday, July 23, 2012

DIY: Shabby Fabric Flower Tutorial

Thanks to Ali Foster Patterns, this tutorial for how to add some jazziness to anything is just a little fabric away!

Fabric Flower Tutorial
Step 1: Cut out circles of fabric.  The number of circles you cut and the size just depends on the size of the flower you are making.  My circles are about 2.5″ in diameter.  You can use something circular for a template (like a cup) or you can just cut them without a template at all.  They don’t have to be exact.
Fabric Flower Petals

Step 2:   Take one circle of fabric and fold it from the center as shown in the picture. There is no exact way to fold it.
Fabric Flower Tutorial
Fabric Flower

Step 3: Using you needle and thread, stitch the center of the “petal” to your  fabric. Make sure you go through all the folds so you keep the shape. 
Stitch Through Petal
flower5

Step 4: Continue stitching your petals around until you get your desired look.
Shabby Fabric Flower Tutorial
flower10
 How to Make a Fabric Flower
Pretty easy, right?  For  a different look, try cutting squares of fabric instead of circles.

Sunday, July 22, 2012

DIY: Two Toned Ring in 5 Minutes!

Michele Ng has created this stunning fashion accessory in no time and with minimal cost to your bottom line!  I think we all have nail polish around somewhere that we could use for this project - and just think of all the varieties you can do...even using more than two colors, glitter nail polish, or making stripe patterns just to name a few!
easy steps to make a dual coloured ring in five minutes finished
easy nail polish ring tutorial under five minutes
Instructions:
Wrap a piece of wire around the finger you want to wear it on. It’s up to you if you want it fine or thick and how many rounds you want. Here, I used a 20 gauge wire that was leftover from a previous project.
Keep wrapping till you’re happy and wrap it round the end at the back to close the ring up.
Make sure to keep the edges pointing into the rest of the wire so it doesn’t poke you!
Take nail polish of your choice and paint half of it. Let it dry and voila! You have a duo-coloured ring in a matter of minutes

Friday, July 13, 2012

DIY: Workout Shirt!

Falling behind on that New Year's Resolution for a healthier life?  Want to just hit the gym more often?  Tired of spending money on gym clothes??  Here is a fantastical tutorial from Rabbit Food for My Bunny Teeth that will get you back on track or just more budget friendly!

DIY Workout Shirt
Makes 1 sexy little tank
Ingredients:
1 old T-shirt
1 pair of scissors
20 minutes
1. Start with a pre-washed T-shirt. Any old shirt will do! The bigger the better.
2. Cut away the ribbed neckline and bottom hem. For the sleeves, cut downwards starting from the shoulder, determining how thick you want your straps. Cut straight down and then begin to curve down below the armpit seam.
3. Determine how low you want your front neckline, and cut away.
4. Flip the shirt over and make a narrow racerback, curving inward from the armpits.  Then cut a deep “V” shape from the top neckline.
5. Using the excess bottom hemline, stretch it out until it becomes one long string of fabric. Knot the string a couple of inches above the bottom of the “V” shape.
6. Wrap the string all the way down around the center of the racerback, and back up to meet the other ends. Knot the ends together tightly. Trim the loose ends.
7. To give your tank a high-low look, lay your shirt sideways, flattening it out evenly. Starting a few inches up at the front of your shirt, start cutting diagonally until you reach the back.

Thursday, July 12, 2012

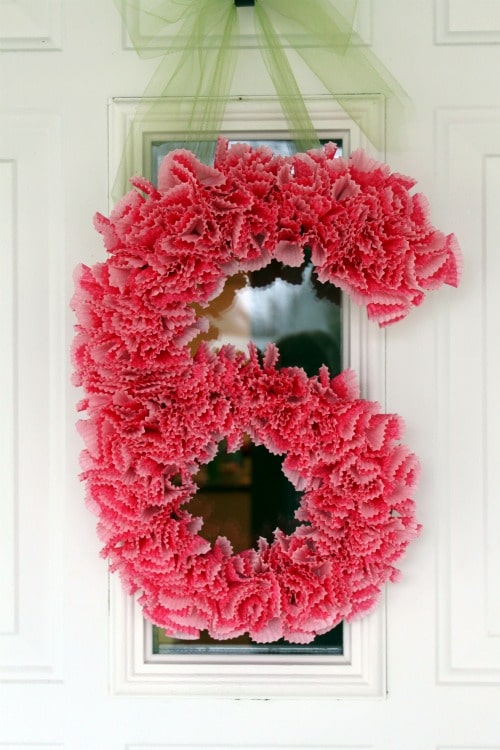
DIY: Cupcake Wrapper Door Number

How fun is this tutorial from All Things Mamma??  You can get cupcake wrappers from Michaels for pretty cheap, and there are so many fun ways to revamp this idea it's almost mind boggling!  Almost... ;)

cupcake wrapper number


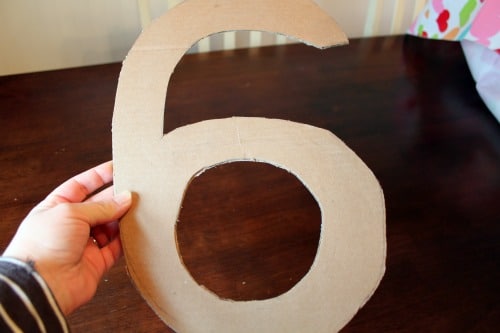
First, take a piece of cardboard and using a pencil draw the number or letter you’d like to use.  Next, using an Exacto knife or scissors, cut out your number or letter.

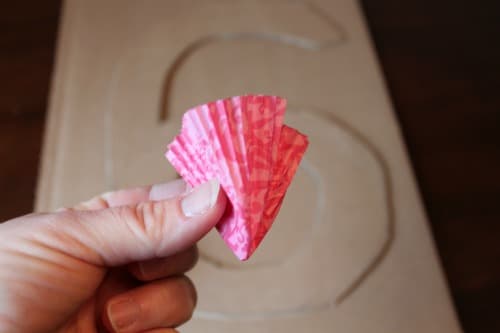
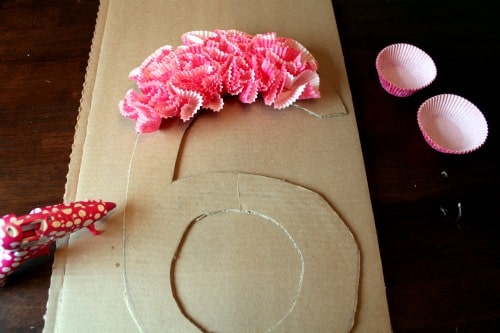
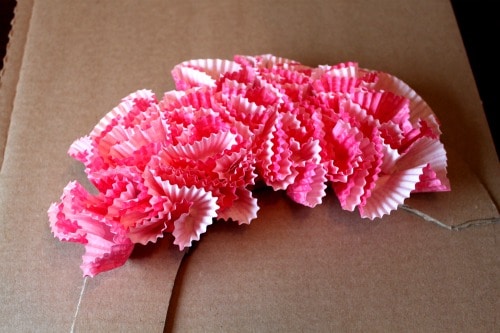
Take cupcake wrappers (Meri Meri Owl & Daisy Bake Cups, Set of 48) and gather them together at the bottom, like in the form of a flower.  Use a dot of hot glue and glue it onto the cardboard.  Hold for a few seconds to hold in place.

Work in small sections around your cardboard so that the glue has time to harden a firm up.

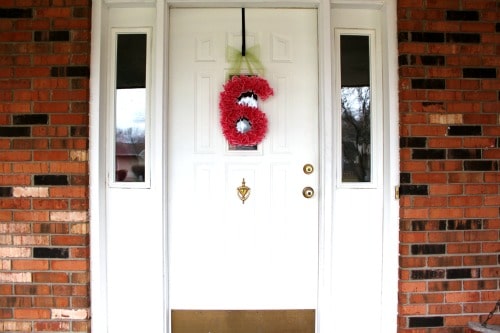
After you’ve filled the entire space, use tulle or ribbon and glue onto the back of your number and tie a bow and hang up! That’s it!
cupcake wrapper door number


Wednesday, July 11, 2012

DIY: Upcycled Hair Comb

This is a super simple project from Lemon Jitters!
All you need is a hair comb and embroidery floss. 
Doesn't get much easier or budget friendly, now does it?

Wrap in a V-shape pattern. Tuck ends under the next color and tie off the last piece.

Tuesday, July 10, 2012

DIY Butterfly Rice Tosser by Posh Paperie + Jackie Wonders

Check out Posh Paperie for this fantastic tutorial on how to make Butterfly Rice Tossers!  Super cute, and super easy - we can think of other ways to use these great paper wrappers, can you??

Photography By / Jackie Wonders
Design By / Posh Paperie
Photography By / Jackie Wonders
Design By / Posh Paperie
Supplies needed to make these pretty, pretty Rice Tossers:
Butterflies (found at a craft store)
Cardstock: different colors and patterns (thinner works best!)
Photocopy of “Tags”
Hole Punch
Red Tape
Scissors
Photography By / Jackie Wonders
Design By / Posh Paperie
Photography By / Jackie Wonders
Design By / Posh Paperie
Photography By / Jackie Wonders
Design By / Posh Paperie
Photography By / Jackie Wonders
Design By / Posh Paperie
Photography By / Jackie Wonders
Design By / Posh Paperie
Photography By / Jackie Wonders
Design By / Posh Paperie
Photography By / Jackie Wonders
Design By / Posh Paperie

Saturday, July 7, 2012

Tutorial: Super Simple Paper Stars

Incredibly easy, but incredibly cute tutorial from AnneKata!  These wonderful simple paper stars would be awesome for party decoration, or just around the house!

Paper Stars
Here’s how to make your own:

Paper Stars Material
Materials: - origami paper or other square paper (mine was approx. 6″)
- pencil
- scissors
- glue
- string to hang hem

How to:
Just follow the directions in the picture tutorial below.
Paper Stars 1
Turn the paper over and fold as in the picture below.
Paper Stars 2
Paper Stars 3
Paper Stars 4a
Mark with a pencil a little less from the border to the middle. Do it on all four sides.

Paper Star  5
Cut with scissors from the edge to your pencil mark on all four sides.
Paper Stars 6

Paper Stars 7
Glue every other side on the folded flaps.

Paper Stars 8
Pull the unglued side over the glued side.
Paper Stars 9
One side is ready, but you need one more to complete the star.
Repeat previous steps to make another star.
Paper Stars 10
Paper Stars 11
Glue as shown.

Paper Stars 12
The glue is missing in this image, but this is the way to attach the 2 stars together.

Paper Stars 13