Showing posts with label free. Show all posts

Friday, February 1, 2013

DIY: Free Printables (Chevrons)

Who doesn't love free stuff?  Who doesn't love free printable / customizable stuff?  That's what we thought.  ;)

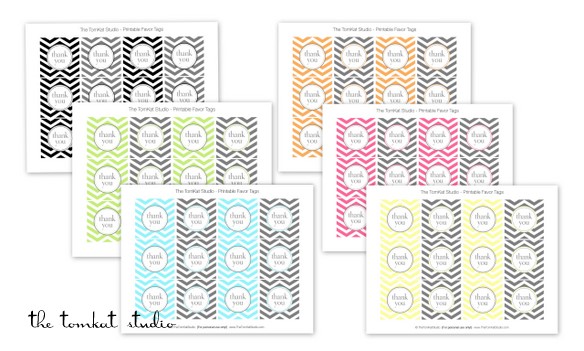
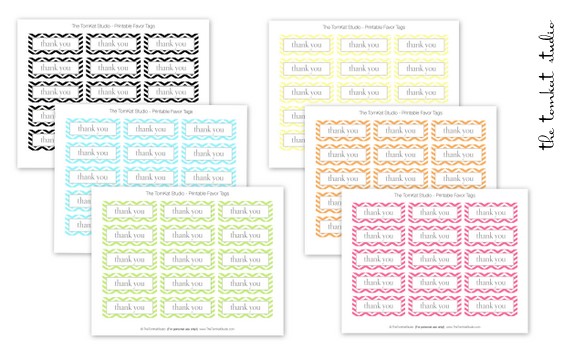
So, we are happy to share HGTV's wonderful (and FREE) printable chevron invitations and favors in 6 different color choices.  You.  Are.  Welcome.
I was recently asked to design a few all occasion invitations and favor ideas for the entertaining section of HGTV’s website. Both stories just went live, so you can download these fun, easy printables for any event! Available in pink, orange, lemon, lime, aqua or black. The invitations for free download are fill-in invitations. If you would like the text customized, they will be available in our shop!
I designed coordinating favor tags in two shapes. Our regular party circle size, as well a rectangular version.

Thursday, January 31, 2013

DIY: You've Been Bugged!

LOVE LOVE LOVE this idea from Jen's Happy Place.  I'm doing this around my office place starting Friday.  What do you guys think??  Head to her blog for more!!


I think everyone will get a kick out of putting the
sign up by their desks that says "Don't BUG me!"
That will really show off our customer service- LOL!

One of the complaints from the boo'ed game in October was that people had to do two treats (and some people went overboard with what they gave), and also we started running out of co-workers to boo. So, I thought I would get it going by bugging two people, but then after that, each person would only have to assemble one treat. Hopefully this will work out better.
Here are my treats that I will secretly place on two of my co-workers' desks today:

This is how they will look when first given . . .


The pink mailbox!

Yep, still obsessed with vinyl! I had so much fun
with the mailboxes I decorated for Christmas gifts (HERE)
that I just couldn't pass up these Target dollar section cuties!

And the classic valentine red mailbox!

I will flip if my recipients win the $1000 a week for life!

This Target sticky note pad is so cheery-
much needed in our boring office! 

And could one ever go wrong with chocolate????

Here are the mailboxes dumped out . . .

Another fun sticky notepad from Target!

Supplies:
  • Cricut Quarter Note cartridge for name lettering (welded on my Gypsy)
  • Cricut Designer's Calendar cartridge for heart
  • Cricut white indoor vinyl
  • Metal mailboxes from the dollar section of Target
  • A rolled up copy of the sheet shown above rubber-banded to mailbox flag (I forgot to add it before I took pics, but I did add valentine ribbon from Michael's and tied it in a pretty bow which covered up the rubber band-Oops!)
  • Love Bug graphic found on the internet HERE
  • GeoSlab703 XBd BT font for headings
  • Kabel Bt BT font for body text
  • DelRay font for "Happy Valentine's Day"
  • Instant lottery tickets
  • Ande's Valentine mint chocolates with sweet thoughts/messages on them
  • Lindt Lindor chocolate truffles
  • Reese's peanut butter chocolate hearts
  • Sticky note pads from Target's dollar section
Hope you enjoyed and are inspired to start something fun like this in your own workplace! Help yourself to the sheet I created. All I ask is that you credit me and leave me a comment that you used it! I would love to see your take on it! :)

I am entering this fun "party-starter" in Decorate to Celebrate's Valentine Party challenge!

Monday, January 14, 2013

DIY: Valentine's Mirror

The 36th Avenue has an adorable mirror DIY that would make for the perfect home decor and / or kid's project depending on how decorative you want to get with it!


My plan was a little bit different in the beginning since I was aiming for some type of cool frame.
This is what I used. An IKEA mirror-frame that I already had,
 DecoArt Paint, glue gun and Valentine’s plastic necklaces. 


TUTORIAL

1
♥

The first thing I did was paint the frame in white.

{ TIP: I always use a garbage bag to protect my table,
then when I’m done I throw the craft mess away inside of it. }


2
♥♥

After a few coats of paint I added one light coat of Silver Glamour Dust from DecoArt.
I love this stuff because you get to see the white through it under the silver glitter dust.
So pretty!


While the glue gun heated up I took the time to cut a bunch of necklaces that
I found over at Big Lots. I bet the Dollar Store will have something similar.


To get the right size all I did was to put the necklaces on top
and cut it in each corner.


I ended with this…


3
♥♥♥

The last step was to glue it!
I wish the picture could show how much the silver dust actually shines…

Sunday, November 18, 2012

DIY: Pencil Holder Using an Upcycled Can

Hello Inspirations by D's blog has a great upcycle DIY for those metal cans you get your veggies or other groceries in.  We love this and think it'd make a great gift for someone that loves crafts (ex. YOU!). 
Hi everyone!  Today I'm sharing a tutorial on how to make your own pencil holder
with a recycled can.  Are you ready?  Here we go...
First you will need these items:


* A recycled soup or bean can (cleaned)

*Scrapbook paper, wall paper
or gift wrap paper
* Scissors or other cutting device
* Spray adhesive or mod podge
*Clear tape
This is what I did...

I purchased scrapbook paper which runs about 50 to 60 cents a sheet.
I grabbed a soup sized can from the recycling bin.
I Removed the wrap from the can.
I Cleaned the can with soap and water and set it to air dry.
I measured the original can wrap against the scrapbook paper with a ruler.
Made marks with a pencil and erased later.
Once I had my measurements, started cutting the paper.
I Wrapped the paper around the can, to keep it sturdy,
I took a small piece of tape and taped down one end of the sheet of a paper on the can,
then wrapped the sheet of paper around the can and sealed it with clear tape, you can use mod podge.
Hello new pencil holder and it holds magnets too!!
Be creative!!  You can add extra decor by using buttons, ribbons and other decorative items.

Saturday, June 30, 2012

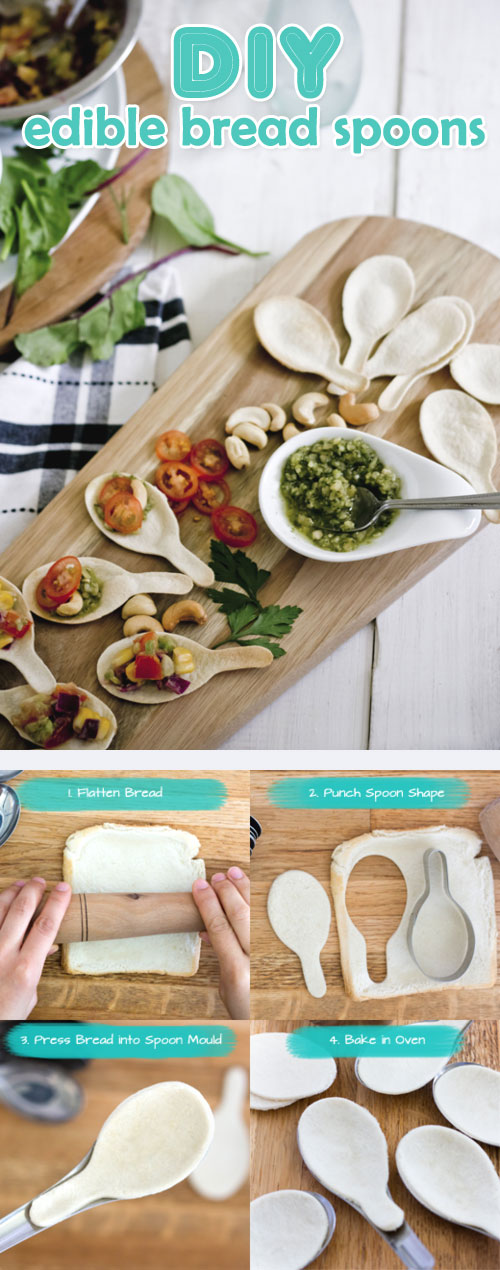
DIY – learn to make edible spoons

 Great idea from Zomoc.com - wonderful for parties! Quick, easy, and to the point!

DIY - learn to make edible spoons

Tuesday, June 26, 2012

DIY Paper Plate Basket Tutorial


The following directions are based on the craft from Martha Stewart. The tutorial on her site said to hold the basket together with a rubber band. I think that would be cute, but I love love love washi tape so I decided to use that. You can use either method, if you find another way to hold the basket together, please let me know.


1. You will need the following supplies: white paper plates (1 plate per basket), scissors, paper edger scissors (I used my pinking shears), a ruler, pencil, washi tape or rubber bands, and 4 paper clips.


2. Using the paper edger scissors or pinking shears, trim about 1/4″ off of the circumference of the plate.


3. Flip the plate over so the front side is facing down. Use the pencil and ruler to make a 9-section grid. Try your best to make the center square in the center of the plate. If you want you can measure it.


4. Use the regular scissors to cut a slit along every other vertical line. Stop cutting where the vertical line intersects with the center square.


5. Fold one side at a time up to form the “basket”. Use one paper clip to hold each side together as you assemble the basket.


6. Use washi tape and wrap it around the basket and then remove the paper clips. If you are using rubber bands, simple wrap the rubber bands around the basket. And you’re done! Now fill them up with summer treats!

Sunday, June 24, 2012

DIY: Glass Bottle Makeover

We LOVE this remodeled bottle from Turnstyle Vogue's blog.  Head their way to check out all their tips and tricks to creating this masterpiece yourself!!IMG_5525 IMG_5525
IMG_5522


Although I removed the label from the top, the wording on this bottle is actually raised lettering that could not be removed.  However, sanding the bottle worked perfectly.


After I cleaned it up, I sprayed it with a metallic bronze spray paint.


IMG_5523
I then started to work away with ASCP in Provence. This shows the first coat but I ended up doing two coats.


IMG_5524


I then got my 80 sanding block and started distressing the raised areas, sanding down to only the metallic paint in some areas and all the way down to the glass in others.


IMG_5527

IMG_5530

IMG_5532


I used dark wax to create a light patina.


I chose to leave the lid metallic, but with the same distressing.


IMG_5526

IMG_5536
I can see a really cool monogram or stencil right in the middle, can’t you?  My daughter really likes this color so she will be taking this home with her.  I’ll let the new owner decide about a stenciled embellishment. 

Wednesday, June 6, 2012

DIY Ombre Pinwheels

We found an excellent tutorial on Wedding Chicks blog, which was created by Los Angeles event designer Yoleine Dumarsais  and takes us through the easy process of making your own ombre pinwheels.

Perfect for any party or celebration, this doable diy project will add a major touch of whimsey and some seriously cute eye candy. 

Read on for instruction on how to make your own ombre pinwheels.

A special thanks to Yoleine Dumarsais for this DIY Ombre Pinwheels tutorial.

Supplies
1. cardstock paper
2. glue gun
3. scissors
4. paint brush
5. watercolor paint in your favorite color
6. hole punch
7. watercolor paper
8. 36″ dowels (not shown)

Step One 
To create a colored wheel for a gradient look or an ombre appearance, paint half (or a little more then half) of your paper. Make sure to paint the end darker and go lighter on the half. Take a piece of napkin or washcloth and wipe the paint to the other half of the paper. Repeat this on multiple sheets to create 1 pinwheel fan. Note: All of your pinwheels do not have to be watercolored you can make some using this technique and some without.  For the water-colored pinwheels, I like to use Van Gogh water color paint, and water color paper (water color paper has texture compared to regular cardstock paper). But you can use any kind of water color paint.

Step Two 
Fold cardstock paper accordion-style into 1/2 inch folds. It’s good to have different size papers in order to form different sized pinwheels. So you can cut the paper in different sizes.

Step Three 
Fold accordion in half and secure using a glue gun for extra hold. This creates a part of the pinwheel. Repeat this 3 times. 3 fans equal 1 pinwheel.

Step Four 
Punch holes with a hole punch or cut holes about a quarter of an inch from the ends of the pinwheels.You can add as many or little to your pinwheel. This is to make them a bit different!

Step Five
Use the glue gun to glue your pinwheels to the dowel for extra hold since this will be fastened to your wall. There’s no systematic way to glue wheels. Glue wheels at different angles whether it’s to the dowel or to another wheel. Make sure to cover the whole dowel!  About 7 pinwheels will create a pinwheel dowel for your pinwheel wall. Repeat this whole process 4 times to create your pinwheel wall!

Sunday, June 3, 2012

Upcycle Empty Shampoo Bottle into Sponge Holder

Revolutionaries has a great tutorial on upcycling that used shampoo / conditioner / lotion bottle into a handy sponge holder!  We think that this idea could even be tweaked a bit to add some waterproof paint to make it even jazzier!  What do you think??

SUPPLIES:

1. A plastic bottle. I used a shampoo bottle, but you could use a lotion bottle, body wash bottle, etc.
2. Scissors.
3. Pen or marker.
4. Sand paper.

How To Do It:

1. Clean out your empty bottle.
 
2. Cut off the top of your bottle. The plastic becomes sharp once you cut it, so be very careful.
3. Put your sponge up against the bottle and mark how high you want the front of the sponge holder to be. I marked it a little bit above the half-way point of my sponge. Cut the front half of your bottle.
4. Draw a circle on the back half of your bottle. I traced a measuring cup in order to make a perfect circle.. but it still wasn't that perfect haha. Then, cut your circle out. This is what it should look like so far:
 
 
5. Round the edges of the back part of your bottle. I traced the lid to my butter container to make it as even as possible.
6. With sandpaper, smooth the edges of your plastic.
 
7. With scissors, poke small holes in the bottom of your sponge holder. This will allow water to drain from the holder (you don't want any nastiness growing in there!)
You're done! This is what your sponge holder will look like hanging from your sink:
 
We've had this for about a week now and everyone loves it! 

Other uses for this cute little holder include:

  • Hang one on the door knob of each of your children's rooms. Every day/week write a sweet note to let them know how special they are!
  • Hang one from the door knob of your bathroom to store little items such as hair ties, clips, etc.
  • Hang one from a hook to store small craft/office supplies.