We realize that these don't look to Halloween-y upon first glance, but these are definitely a versatile craft that could easily be done in orange and black to hang for a party!! So, jazz it up and make a few for every holiday or party! Thanks to Salty Pineapple for this wonderful step-by-step tutorial that couldn't have made it easier to understand.

With
a piece of paper, scissors, and a bit of ribbon, you can make cheerful
paper lanterns, perfect for decorating your patio. Kids who are old
enough to use scissors and cut straight lines can help with this
project, too--I remember making paper lanterns like these when I was a
kid. I added a couple twists, just for fun: a peek-a-boo contrasting
paper, and a ribbon handle.

You Need (for each lantern):
2 pieces of paper in contrasting colors (I used 8x8 scrapbooking paper because it was what I had on hand)
6" piece of ribbon
Scissors
One or more of the following: tape, glue, scissors

To Make:

1. Fold one piece of paper in half (lengthwise so it's long).
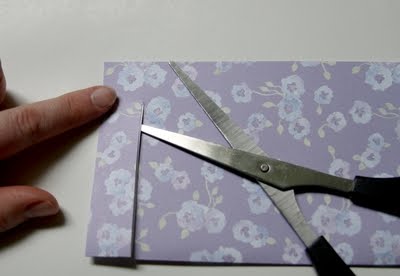
2.
Starting at the fold, cut a straight line to within about 1/2" of the
edge. DON'T cut all the way to the edge. (See, I'm pointing at the end,
where you shouldn't cut.)

3. Continue to make cuts parallel to your first one, an even distance from each other, say about 3/4" from each other.

4. When you've completed your cuts, open the folded paper. Roll paper so fold is pointing outward in the middle of the lantern.

5. Tape, staple, or glue the top edges together. (I taped).
6.
Repeat lantern-making process with contrasting color, but change the
width between cuts. So, if you cut 3/4" from each other on the first
lantern, do 1/4" cuts. Also, don't fasten lantern together yet.

7.
After you're done cutting, open up like you did the first one, but roll
lantern small enough to slip inside of first lantern. Insert into first
lantern.

8. Allow second lantern to open up inside the first lantern, then tape the two together at the top edges to secure.

9.
Put glue on one edge of a 6" piece of ribbon, and insert between two
lanterns at the top. Squeeze to secure ribbon between two lanterns. (I
used hot glue - Nikki's favorite!)
10. Repeat for second edge of ribbon, across from first side of ribbon. That's your handle.


