Showing posts with label lantern. Show all posts

Monday, December 10, 2012

DIY: Miniature Lantern Ornaments

The Crafty Crow's blog has a ton of great ornament DIYs - especially ones that are kid friendly to make for the holidays!  You will definitely want to start saving those left over toilet paper rolls so that you can craft these up!
CC10 miniature lantern garland These little lanterns are about 2" tall and are made 
from a toilet paper tube. You can make two lanterns from
each tube. They are adorable individually and hung as
a group for a garland. You can also forgo the hanger
and pop one over a light on your tree to
see it really glow!*

Supplies:
toilet paper tube
pencil
scissors
acrylic paint
paint brush
glue
wire for hanging (optional)

Directions:
CC10 miniature lanterns deconstructed


#1 cut the tp tube open vertically

#2 cut the tube in half horizontally

#3 cut 2" off so you are left with... #4

#5 paint the inside yellow if you want the lantern
to look like it's glowing from the inside and use
the color of your choice for the outside; let dry

#6 fold in half horizontally, then make small,
evenly spaced cuts beginning on the fold to
¼" from the open edge

#7 glue the lantern closed; squash down a
bit to shape

For the handle I used #20 floral wire, shaped the
rounded part around the barrel of a marker, then flipped
up each end to hook through the slots of the lantern.

*Use caution, tree lights can get very hot!

CC10 mini lanterns close up


CC10 mini lanterns garland

Monday, October 8, 2012

DIY: Paper Lanterns

We realize that these don't look to Halloween-y upon first glance, but these are definitely a versatile craft that could easily be done in orange and black to hang for a party!!  So, jazz it up and make a few for every holiday or party!  Thanks to Salty Pineapple for this wonderful step-by-step tutorial that couldn't have made it easier to understand.


With a piece of paper, scissors, and a bit of ribbon, you can make cheerful paper lanterns, perfect for decorating your patio. Kids who are old enough to use scissors and cut straight lines can help with this project, too--I remember making paper lanterns like these when I was a kid. I added a couple twists, just for fun: a peek-a-boo contrasting paper, and a ribbon handle.


You Need (for each lantern):


2 pieces of paper in contrasting colors (I used 8x8 scrapbooking paper because it was what I had on hand)
6" piece of ribbon
Scissors
One or more of the following: tape, glue, scissors


To Make:


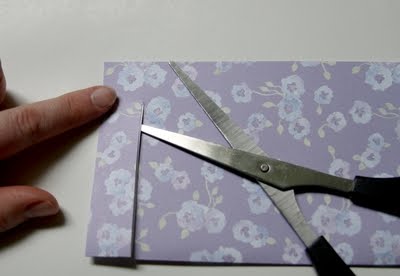
1. Fold one piece of paper in half (lengthwise so it's long).


2. Starting at the fold, cut a straight line to within about 1/2" of the edge. DON'T cut all the way to the edge. (See, I'm pointing at the end, where you shouldn't cut.)


3. Continue to make cuts parallel to your first one, an even distance from each other, say about 3/4" from each other.

4. When you've completed your cuts, open the folded paper. Roll paper so fold is pointing outward in the middle of the lantern.


5. Tape, staple, or glue the top edges together. (I taped).

6. Repeat lantern-making process with contrasting color, but change the width between cuts. So, if you cut 3/4" from each other on the first lantern, do 1/4" cuts. Also, don't fasten lantern together yet.


7. After you're done cutting, open up like you did the first one, but roll lantern small enough to slip inside of first lantern. Insert into first lantern.


8. Allow second lantern to open up inside the first lantern, then tape the two together at the top edges to secure.


9. Put glue on one edge of a 6" piece of ribbon, and insert between two lanterns at the top. Squeeze to secure ribbon between two lanterns. (I used hot glue - Nikki's favorite!)

10. Repeat for second edge of ribbon, across from first side of ribbon. That's your handle.

Sunday, September 30, 2012

DIY: Paper Lanterns

You definitely need to head on over to Jellyfish Jelly's blog for an amazing PDF download with step-by-step instructions on how to make these gorgeous paper lanterns.  We think they'd be great in orange and black colors for Halloween or in deep bold colors for fall!  Have fun with it and show us what you make!