Showing posts with label crafting. Show all posts

Wednesday, August 14, 2013

It's Autumn!! Let's Craft to Celebrate!

Sorry I have been MIA for a few months.  We moved across the country and it's been a tad hectic!  On that note - today's post is a nod to the coming of AUTUMN!  I absolutely love this time of year.  The warmth of colors and the depth of beauty in the changing of the leaves and the way the cool breeze starts to calm the hot summer nights...breathtaking!

This craft idea comes from the amazing creators of Midwest Living and it's all about making decorations for the autumn holiday.  They have 32 awesome ideas that are easy and cheap to do!

This is our favorite of the bunch - ghostly gourds!  How adorable are these guys???  Great for the little ones, too!

Grab some fun looking gourds from the grocery store, some white and black paint, and perhaps some twine for hanging these bad boys (or set them on your mantel - no twine required)!

You have the idea - so go and do!  Send me pics of your ghostly adventures!  I plan to do this tutorial on my YouTube channel, so if you want to watch head on over that way here in the next week or so and the video should be up and running.

Friday, October 26, 2012

DIY: Pinhole Cards

The Proper Pinwheel has a great idea for homemade cards.  If you love to add your own personal touch to the cards you give people, this idea is just perfect for you!  You could even jazz up a store card with this method!  

Check out their blog for more paper crafting diy!
When I think back, most of my favorite crafts were learned in grade school. Using crayons over watercolor, making art from paper towels, and nap time. Those are some of my fave elementary memories. One of the best skills I learned (and I still use it to this day!), is pricking paper with a pin and creating stationery. So fun. And so easy!
Pinhole stationary has to be one of the best ways to dress up some regular old paper. The font choices are endless, and you can make it as big or as small as you want! Read below for the refresher!
To make your own you’ll need:
  1. cardstock in assorted colors
  2. scissors
  3. tape
  4. safety pin
  5. mirrored image or text
To mirror your text, copy from Word and paste into Paint. Right-click ”Image” and select “Rotate or Flip” and flip yo’ message horizontally. Easy as pie, I tell you. Tape the words to the inside of your card and start pricking with a pin. Outline the text with the pin. Don’t poke holes all over the place. It’s not as pretty looking. Trust me.
Watch some TV while you poke all of the little holes. I did this while watching The Graduate. I don’t know why I thought I would like that movie. I clearly didn’t remember how strange it was. Finish pricking/poking, remove the tape and paper, and…
Bada-bing.
Play around with a few fonts and see what you like! They look pretty cool when held up to the light.

Monday, October 22, 2012

DIY: Lined Paper Tee Tutorial

U Create has some amazing tutorials and DIY projects.  We highly recommend checking them out for more!  Today's highlighted tutorial is a lined paper tee.  These are so cute and would make a great gift for not just students, but teachers!
 
A little about me first . . .
 
My name is Rachel, and I blog over  Maybe Matilda. I'm from small-town New York, currently living in Utah with my soon-to-be-chiropractor husband and our soon-to-be-one-year-old son. When I'm not sweeping up Cheerios, I love sewing and crocheting for my etsy shop, and sharing what I make on my blog.
 
I think this lined paper tee is such a fun way to bring out the inner student, and possibly even encourage a little bookishness in a little one (maybe that's a stretch, but a girl can hope, right?).
 
 
It's really simple to put together, and you can easily make it in any size. And how cute would it be if you embroidered or stamped your child's name or a favorite quote onto the lines?
Here's what you'll need to make this tee:
 
a white tank, tee, or onesie
masking tape
foam brush
blue and red acrylic paint
fabric painting medium (available at craft stores--you'll find it with the paint supplies)
 
To start, place some cardboard between the front and back of the top so your paint doesn't bleed through to the back of your shirt, then place your tape in straight horizontal lines across your shirt to mark the areas where you'll paint your blue lines. I put my first strip of tape right beneath the sleeves. I spaced the tape strips about 1/4" apart from each other, but only painted in every other open space (on an adult size tee) to create a little more distance between the lines. For my little guy's onesie, I painted in the spaces between each tape strip.
 
Mix your blue paint and fabric painting medium according to the directions on the medium (usually a 2 to 1 mixture of paint to medium), and lightly sponge it between your tape strips. A little goes a long way, so try not to get too heavy-handed with your brush. (And personally, I really like the look of a lightly painted, sort of splotchy paint line!)
 
 
(You can see here that I only painted in every other open space for the adult tee. For a baby/toddler top, you can paint in each open space.)
Give it some time to dry, then carefully remove the tape. Place two long strips of tape vertically down the left side of the shirt where you'll paint your red line. Again, place the strips about 1/4" apart, and make sure they're running straight down the tee so you don't end up with a wavy line.
 
 
Mix your red paint with the fabric painting medium according to the directions on the package, and sponge it on as you did for the blue lines. Let it dry for a while and carefully remove the tape.
 
 
If you're making a baby onesie, don't forget to lift up the shoulder flap to tape and paint underneath it!
Make sure you read the directions on your fabric painting medium to find out how to finish your shirt--you'll probably need to let it air dry for 24-48 hours, then iron it to set the paint. You can just turn the shirts inside out and toss them in the washing machine, and the paint holds up just fine.
 

Tuesday, October 2, 2012

DIY: Dissolvable Shower Discs

 
Saw this awesome tutorial for quick and easy dissolvable shower discs!
Here are pics of the end product - they aren't the prettiest things ever, but I promise they work great!
Add some food color if you wanna jazz them up.


Thursday, September 13, 2012

DIY: Autumn Lunch Bag Trees

Here is another Autumn / Fall time tutorial for your pleasure.  We think these are just adorable, and would be an amazing addition to any household or office desk perhaps?  What do you think?

These come from Matsutake's blog and the step by step instructions sound like they couldn't be any easier to implement.

Made of three of my favorite things: Mod Podge, yarn pom poms, and trash. Yay! They're little Autumn trees made out of old crumpled lunch sacks.
First, cut off the bottom of the bag, then cut it open so it's a flat rectangle. Next, cut slits where I drew the dotted lines.
Now brush the entire surface with a layer of Mod Podge. I watered it down just a tiny bit.
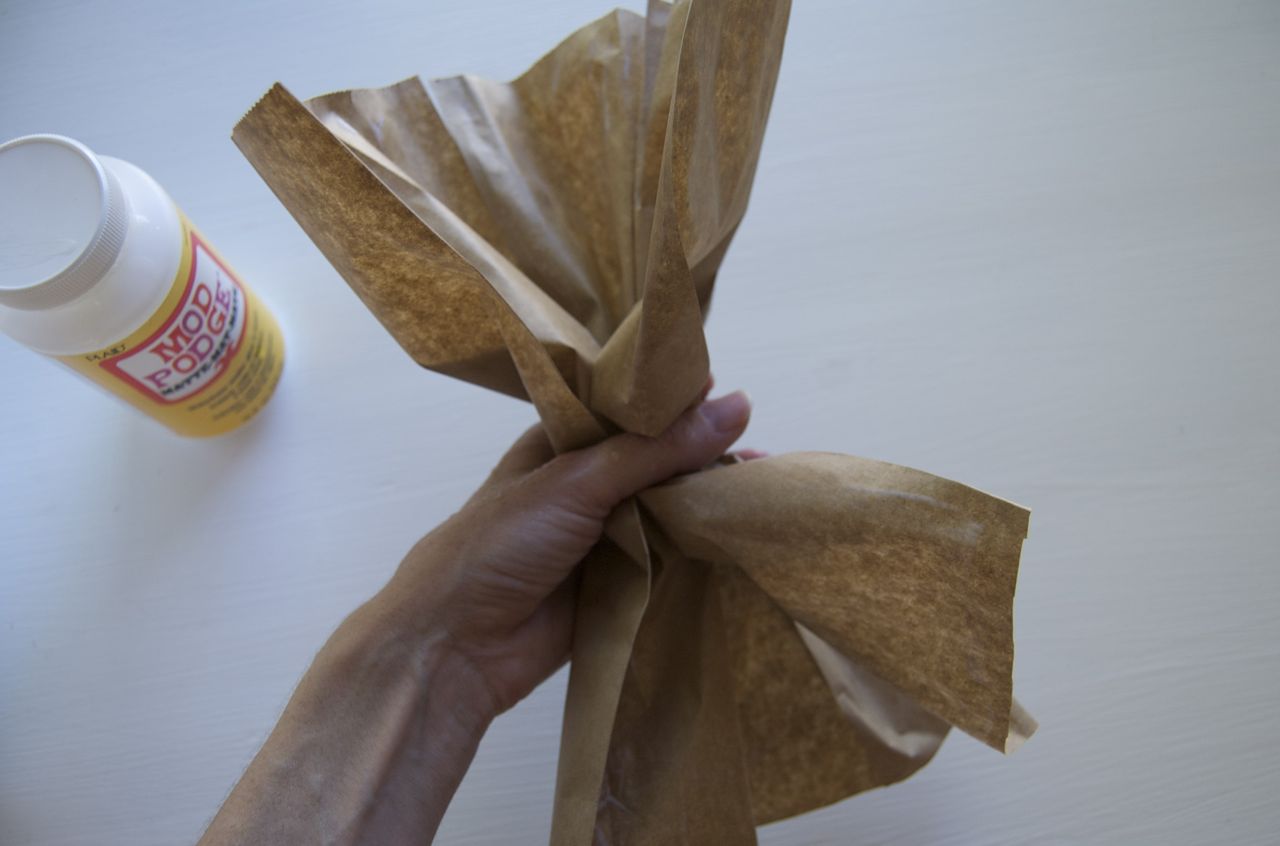
Now sort of bunch it up in the middle. And separate out those strips at the top where you snipped it. Gently start twisting.
And twisting. Twist the trunk. Twist the branches. Twist the roots.
Keep twisting until it looks like a tree.
Let the Mod Podge dry. You can snip the roots and branches with scissors if you want them a bit shorter.
Plop some yarn pom poms into the trees. Add a dab of Mod Podge on the branches to hold them in place. And then photograph them all over your house.

Saturday, September 8, 2012

DIY: Dollar Store Party Favor Makeover

So, sometimes we see things at the Dollar Tree that we love but can't figure out what to do with other than the way that it comes.  This is what Crafting Rebellion has helped us see past with their great blog on making over party favors from the dollar store.


When I was at the dollar store I noticed a package of wedding dress party favor boxes. 10 for a dollar, what a deal!  All you need is scrapbook paper, some embellishments, and a spool of inexpensive pliable wire to make the mini hangers. This project is very similar to paper dolls, you get to "dress up" your boxes. Once made they could hold chocolates, almonds, mints, M&M's, little nail polish or a small gift.  Add tulle to the front of the dress and it could be a little girls princess dress. Use leopard print and hot pink for a bachelorette party, or shower.


You will need:

Wedding dress Favor Boxes (I found mine at the Dollar Tree store. They come 10 boxes for $1). I have the link to Dollar Tree at the bottom of the page but they also include the groom boxes online. 

Scrapbook Paper

Spool of pliable inexpensive wire (I used what I had on hand so I am not sure of guage. Just look at the inexpensive wire in the jewelry section at the craft stores and find one that is thick enough to make a small hanger)

Embellishments of Your Choice (I used bling on a roll for the gem sashes, and ribbon flowers).

Taper Runner and Glue Dots

Thin ribbon to tie the box together (optional) you can use the sheer white ribbon that comes with the boxes. 

Scissors 

Wire Snip (optional, you can use scissors)

ColorBox Chalk Inkpad (optional) if you want to distress your box edges.


The "before" box...cute design but pale printing.

Start by opening your package of dress boxes. Take one out and cut off one of the dress sides. 

This is now your "template" to cut the scrapbook paper dresses. (Remember you will need to use just one of the boxes to cut apart for the template when you figure your total favor boxes to buy). 


Use the dress template and cut two pieces of scrapbook paper. I held my template and trimmed around it. You can be more precise and also trace the template onto the back of the paper.


Attach the scrapbook dress pieces with tape runner by matching them up to the dress on the box.

Distress your edges if you prefer. If you aren't totally exact, trim your excess edges.

If you want to get fancy you can also cut a top in a different paper, and attach. (I chose to keep it simple using a full dress).

Now create your wire hanger.

Cut a piece of pliable wire approximately 9" long.

Centering the wire bend the sides into a triangle at 2 1/2" wide.


Wrap the wire around at the top of the triangle. The wire is very soft so you do not need to use pliers.


Snip the extra from the wrapped end off with wire snips or scissors.

Bend the hook at the top and snip to the desired length. I smooth out the hanger to shape it with my fingers.


Put your dress box together and tie it shut with a ribbon of your choice. You can use the ribbon they provide, but I liked a longer piece of ribbon.

Now attach the wire hanger to the "inside" of the front of the dress box by putting some tape runner in the middle and bottom part of the hanger wire. Press onto the inside of the dress. 

Have fun embellishing your dress to match your party theme. I cut little pieces of "Bling on a Roll" and stuck them to the front of the waist ribbon. I also added fabric flowers to some of the dresses using glue dots.

Make a batch of dresses in the same style and fill with candy, jordan almonds, mints, or other little treats.


Thursday, September 6, 2012

DIY: Upcycled T-Shirt Belt

We love all the ways that people have come up with to upcycle old t-shirts.  This tutorial from Delia Create's blog is no exception! She even shows you how to use this technique to make a headband as well. So, check her out!

It's pretty easy. The part that takes the most time is the braiding really.

To start you just cut four strips of T-shirt. I cut mine 2.5 inches wide.

Pin the ends together and hold it down with a can or a book.


 Now braid. This is a four strand braid. I like that it makes it a little thicker and belt like.


And this is what it looks like after several rounds.

When you are done braiding knot the end.


 Now sew the ends.


You want one end sewn just once so you can wrap it around the D-rings and sew it there a couple of times. It is quite thick so it can be tricky.


For the other end sew it several times.


I didn't have matching thread for the orange but I did for the green. It makes it look a bit nicer.

And that's it!