Friday, August 31, 2012

DIY: Felt Poinsettia Hair Clip

Projectville has a fantastic tutorial that we found just in time for the upcoming holiday season!  This stunning Poinsettia Hair Clip would be the perfect accessory for any wardrobe in the winter time and beyond.  Not to mention she is stunning herself...


Here's what you'll need:

• felt
• yarn
• scissors
• hot glue gun
• glue sticks for said gun
• hair clip (optional)


Follow the picture tutorial and pattern. The larger circle in the pattern is used to glue all the petals to. Start with the biggest petals around the outside, then medium sized, then smallest in the middle. The smaller circle is for after you glue the top of your clip to the flower. Open the clip, glue it to the back of the flower, then glue the small circle over the top of the open clip to clean up the look. Tah dah!

Thursday, August 30, 2012

DIY: Dandelion Blowing Shirt

This is another wonderful dollar store craft project.  We look forward to making this and wearing it in the very near future!

Be sure to check out their blog to get more!
 Dandelion t-shirt
Project Materials:
  • T-shirt, on hand or $1 and up
  • Piece of recycled cardboard, on hand
  • White, Black, and Green Acrylic or Fabric paint, on hand or $1 each
  • (Optional) Fabric Medium for acrylic paint, about $3
  • Shower pouf, $1
  • Thin-tipped paint brush, on hand
  • Paper plate for a paint palette, on hand
Total: $1 and up

About the supplies:

T-shirt: any color but white is fine, so choose what you like (reclaimed from your closet, purchased on clearance or even Goodwill like mine was).
Cardboard: Flat piece of cardboard large enough to fill the inside of your shirt (cereal boxes work perfectly)
Paint: White, black and green paint (fabric paint is great, but you can add Martha Stewart’s Fabric Medium to any acrylic paint to keep it from being stiff and un-wearable)*
Shower pouf: You can get these at the dollar store, or pretty much any other store for $1 or less. I got 2 for $1 at Wal-Mart.
Paint Pallet: I used a left over paper plate or two, but if you don't have one, you can use a piece of recycled cardboard (the rest of your cereal box?).
*Note: Be sure you are using paints with the same curing process.

How to Make a Dandelion Shirt:

1. The first step is to put the cardboard inside the shirt, to keep paint from seeping through to the back, which is not attractive.
mix the paint
2. Next, you want to squirt a generous amount of the white paint on to the plate. If you are using regular acrylic paint and fabric medium, follow the directions for mixing on the bottle. As you can see, I added some glitter paint, but it didn’t give it noticeable sparkle, so I don’t recommend the extra step.
pounce the pouf
3. Then comes the fun part – pounce the shower poof up and down in the paint and then gently pat it on the shirt where you want the head of the flower to go. I recommend starting with as little paint as possible, gently tapping most of it off on a scrap paper towel before you touch it to your shirt. You can always add more.
paint the stem
4. Next, squirt a bit of the green paint on your plate and using the thin brush, paint your stem. Perhaps you want to give it a slight curve so it looks like it is bending in the direction of the wind.
Blowing seeds
5. Next, we added some seeds to look like they were being scattered by the wind. We used two methods with the same white paint mixture:
  1. Ever so lightly sweep the poof out and up from the head of the flower, or
  2. Paint each individual seed with the thin paint brush, making little crosses. Then rinse the brush and dip it in the black paint to put a tiny stem on each seed.
Either method seems produces pleasing results, it is just a matter of whether you want fast and abstract or painstakingly real. After much deliberation, we decided that the seed band started at the same width as the head of the flower and then scattered and broadened as it moved upward. I think a few blowing over your shoulder and onto your back would be fun, too.
Now you just have to be patient while your creation dries (generally for 24 hours), heat set with an iron as directed (mine was 3 minutes on as hot a setting as the shirt fabric allows), wash and wear!
Dandelion t-shirt

Wednesday, August 29, 2012

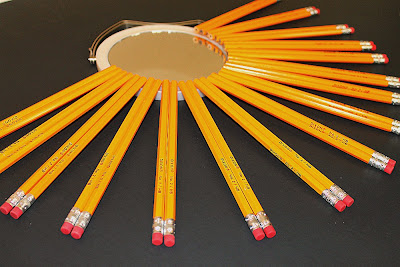
DIY: Pencil Starburst Mirror - Dollar Store Crafts

We love both color variations of this wonderful dollar store craft - we would be hard pressed to pick just one to make...so maybe we'll make both??  This would be a great Christmas / holiday gift for a teacher!

Check out Tatertots and Jello's blog for more cheap and easy DIY!


Tutorial: Penciled Starburst Mirror


You’ll use about 54 pencils, depending on your spacing


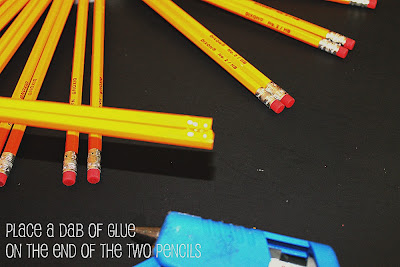
Hot glue, stick ‘em on, repeat:)


(The ribbon part is optional)


If your silhouette is behaving, (mine wasn’t), you can use transfer paper to make the placement of the vinyl much easier


Personalize your gift with a cute lil tag…


Tuesday, August 28, 2012

DIY: Giant Paper Sunflower

Aunt Peaches' Blog has this excellent tutorial on a giant paper sunflower that we could see hanging on our door in the near future...check out her page for more DIY!


Materials
  • Thick brown craft paper
  • Multiple colors of latex paint (leftover house paint does just fine)
  • Hot Glue Gun
  • One platter size lightweight/paper plate
  • One dinner size  lightweight/paper plate
Start by painting the craft paper –make it good and thick. For a flower this size you will want to paint at least three large sheets about the size of your dining room table. Make them nice and colorful and enjoy the painting process. You can smear down a decent base coat with a cheap sponge or roller. Go out of your way to be messy. Eat some chocolate while you are at it. I painted my petals shades of yellow pus some brown scraps to insert in the middle, but you could do any color. Or all colors. Oh please, somebody hurry up already and make a giant rainbow sunflower and send me a picture.

The amount of craft paper you will need depends on how many petals you want--I estimate I covered my dining room table with painted craft paper three times for this project.


For the center of the flower, cut three circles with painted edges. Again, no template here. Just cut the edges nice and jagged then fringe the perimeter. Do this on each circle, fold up the edges, then stack them inside of each other. This could be a small flower all by itself.


For the center, cut a small circle of a lighter color, fringe the perimeter, and fold all the petals  in on each other.


Assembly
The critical base of this whole project is a lightweight bamboo/wicker/basket platter thing from the thrift store. If you have ever had cause to order catered food, chances are the food came delivered on one of these, but if you do not have one laying around in your garage already, I guarantee you, every thrift store in the country has a lightweight platter basket laying around on a shelf for 99cents or less. Yes, you could substitute with a big circle of cardboard but then you won’t get the lip around the edge that helps the petals curve inward a bit like a real flower.


For the bottom tier, adhere half the petals to the platter with hot glue. Now that I think about it, staples might work as well.


For the  second tier, glue the remaining half of the petals to a reasonably sturdy paper plate and then glue the back of the paper plate to the center of the first tier.


For the center of the flower, stack the three brown circles, hot glue, then fluff the fringe to your heart's desire. Finish off with that fringy thing you made seven steps ago. Tada!

Monday, August 27, 2012

DIY: Funky and Modern Apothecary Jar

Dream a Little Bigger has a tutorial on how to create a Funky and Modern Apothecary Jar that we think could be found in any expensive furniture or home decor store - and it's crazy cheap and easy to make!  Can't you just see this on a mantle in your house??


For this tutorial you will need: Apothecary or similar jar, spray paint, spray polyurethane, masking tape, heavy grit sandpaper, alcohol, paper and/or plastic to help tape off.


STEP 1: My jar had been sitting on my counter for probably 5 years. I clean it regularly but it’s still got to be heavy with finger grease and who knows what other kitchen gunk. I first gave it a wash in the sink and dried it with a towel. Then, I went over the whole thing with alcohol and let it air dry.
Next, take your sand paper and give your glass a nice go over. You want to rough up the surface so that the paint sticks. Especially if your jar is going to be in a high traffic area like the kitchen and be handled often as a cookie or treat jar (as mine is).

STEP 2: Using your masking tape, start making lines all over the place in crazy diagonals. Connect the lines with smaller lines. Make some big geometric expanses of glass and small ones for some variety!
Complete taping off by covering the top with a plastic bag, the bottom with some paper so that anything you don’t want spray painted stays clear glass. If your jar has already been in use, check out the bottom. There are going to be ‘scratches’ around the bottom in the shape of the jar. This is where it makes contact with surfaces and it will continue to wear – so tape it off and avoid painting in this area.

STEP 3: Take your jar over to wherever you spray paint things (I call my little patch of garage floor that I continually spray paint in – SprayStation) and get to getting. I wanted to have some contrast, so I first painted mine a medium gray and then covered that with my fluorescent red. You can do one color or you can do two. Just remember that the first color will be visible through the glass, so make sure you’re happy with the color combination. Repeat coats until you are happy with the coverage.

STEP 4: When your jar is no longer tacky to the touch, start removing your masking tape. One of the best things you can do, in my opinion, at this point, is take a razor blade or x-acto knife and travel along the edges of the tape with it. This will give you nice, clean sharp lines when you’re pulling off your tape.

STEP 5: Go around and clean up any stray spray of paint in areas that should be clear. I used a razor blade and scratched it off.

STEP 6: Spray with polyurethane to finish and protect your paint job. I used high gloss and it gave my glass a super sharp, almost etched looking effect.


Sunday, August 26, 2012

DIY: Dipped Votives - Dollar Store Craft Idea

Nest of Posies made one of those dollar store crafts you know we like - since it's pretty and it's cheap!  We know she made them in bright summery colors (which are stunning), but we could totally see these in holiday colors - autumn, Christmas, etc. - with glitter or other funness!!

Check out her blog for more DIY!!


I used some votive candle holders I had from the Dollar Store & some craft paint.
Plastic bowls for dipping, newspaper & parchment paper for drying.
The only instruction I'll give, is once you start turning your votive around in the paint, don't pick it up until you are done.  
*Keep the votive against the side of the bowl that has the paint & continually move in circular motion until it is covered.*


Saturday, August 25, 2012

DIY: Party Animal Necklace

These are whimsical, creative, and we adore Flamingo Toes blog for putting them together!  What do you think?  Do you love them like we do??  We must find an occasion to wear one of these bad boys...

Here is what you’ll need:
• Animals (I got these at Michael’s – and I think they are the same animals they used. They were in a tube – take your 40% off coupon)
• Beads, chain, ribbon, fabric, rhinestones, wire, etc for embellishment
• 22″ chain and closure findings for necklace
• bails (to make the animals into pendants)
• Glue (I used E-6000)
We’re going to start with the elephant so you can see what I did, then I’ll show you closeups of all of them.
The beauty of these though is that you can dress them up any way you want!
Start by gluing a rhinestone spacer to the top of the elephant’s head.
Add a colorful bead on top of that.
I think he likes his hat. :)
Cut a piece of ribbon for his blanket.
(I got this gorgeous jacquard ribbon from my lovely sponsor, The Ribbon Retreat. I have a nifty project planned with it but this little scrap made a perfect blanket piece.)
Glue to the back of the elephant.
Trim the blanket with a small piece of chain.
Add a strip of rhinestones between the blanket and the tail.
Wrap a bit of wire around each foot.
Glue a bail to the elephant’s back, towards the top.
Let everything dry thoroughly before you add your chain.
Cut a piece of chain the length you want your necklace to be (I cut mine 22″).
Feed the chain through the bail.
Add the closure pieces to the ends of the chain. I used a lobster clasp on one side and a jump ring on the other.
Now you have a super cute Party Animal Necklace!!
Here are some shots of the others so you can see how they’re dressed up.
Our zebra has a crown (lucky him!) and a fabric blanket.
Our giraffe likes rhinestones and sequins. Snazzzzy.
Our tiger is wearing a pompom collar (all the cool tigers do) and some chain around his middle. He has a flat bail, which was easy to cover with the chain.
Here’s a pic before I wrapped it.
Aren’t they fun??