Showing posts with label fashion. Show all posts

Saturday, November 17, 2012

DIY: T-shirt Pom Poms

Lebenslus Tiger's blog is a fun DIY site for a litany of crafts!  We love t-shirt crafts and this one is definitely one we'll be doing.  Don't fret if you were hoping for another ornament tutorial today - we'll be doing two blogs today (the next one being an ornament tutorial)!  Check out their blog for more fun DIY if you need even more!


Don't they look like hundreds of little rosebuds bound together?
I did them traditionally with two cut out cardboard discs and gave them a little haircut afterwards...

Monday, November 12, 2012

DIY: Upcycled Scarflette

I am Momma Hear Me Roar (how cute is that name?) has a quick and easy upcycled sweater DIY.  Even we can't screw up this little sewing!  We love this and love her blog - so check her out!


I took this long sweater and cut out a long rectangle.  (My dimensions were about 8 inches by 29 inches.)


I flipped the nice finished sides together and sewed around the edges.  I left the bottom end open (the one with the ribbed edge).


I inverted it and sewed on two large buttons.  I didn't make real buttonholes, since the scarflette can easily be pulled over my head.  I also didn't bother to sew the end shut, since the buttons keep it in place.


Super easy, super cute, and super warm.


Friday, November 9, 2012

DIY: Upcycled Sweater Scarf Embellishment

Grosgrain blog has a great upcycled sweater blog that keeps us on our theme from yesterday's sweater tutorial for vase covers.  We love this scarf and can totally see it keeping us warm on those cold winter days!

Be sure to check out their blog for even more DIY!
I tried to add the leaves on the sleeves as well but it looked too bulky against the thin sweater. I might suggest a looser or thicker sweater to add the sleeve embellishments. Or using a thinner wool, like craft felt to make the leaves.
Doing the sweaters late in the day has really helped to make me look sharp when picking up Lily. People must think I dress this way all the time.
1. Cut out some 3" leaves from felted wool.
2. Overlap the leaves and sew them together.
3. Once you have a chain long enough to line your neck sew it to the collar.
4. Make another chain of the same length and sew to first chain.
5. Make another chain and sew it to the front of your cardigan. To hide the buttons on my cardigan I sewed the leaves on one side but overlapped it over the edge.

The cardigan is still able to be buttoned and unbuttoned.

Thursday, November 8, 2012

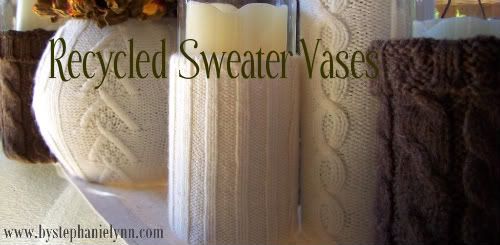
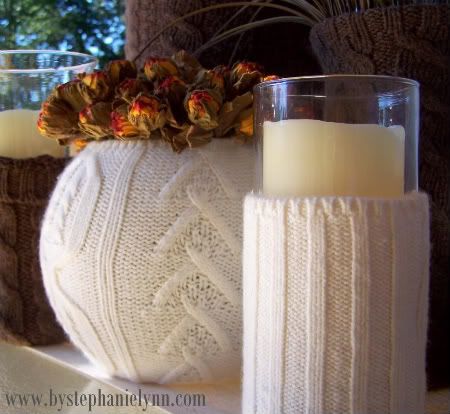
DIY: Upcycled Sweater Vases

Under the Table and Dreaming has such a unique DIY we just couldn't pass it up!  This is such a brilliant idea for upcycling an old sweater.  Check them out for more!

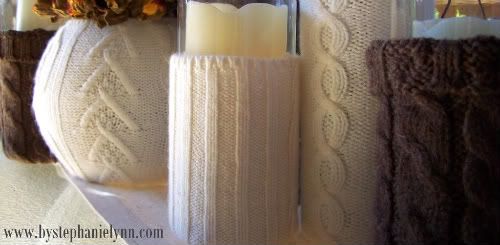
I have a little thing for cable knit sweaters {the chunkier, the better}. Now that I can feel the crisp chill in the air...it's the perfect time to re-visit this incredibly easy craft that I'm sure most of you already have the supplies to make.


The original March tutorial {here} was nothing short of cutting off the sleeve of a sweater and sliding it onto a glass vase. So easy peasy anyone armed with a glue gun could handle it. You can easily get two covered vases using both of the sleeves from one sweater. So what do you do after that; well here are a few options for the scraps before you go searching for another sweater to recycle.

The body portion of any sweater can be easily cut and sewn to cover larger vases that do not fit into a sleeve.

Larger Vase How to:
{1} Cut a sweater just below the arms, turn inside out. {2} Slide over the container you are wishing to cover; finished edge on the top side. Pull the sweater taut until the ribbing starts to curve in {as shown in the picture - You want this to fit snug} Pin in place. {3} Sew a straight seam {very easy, just a straight line - backstitching at each end} Flip right side out. {4} Slide over your container, hot glue the bottom edge down and trim off any excess fabric on the bottom.


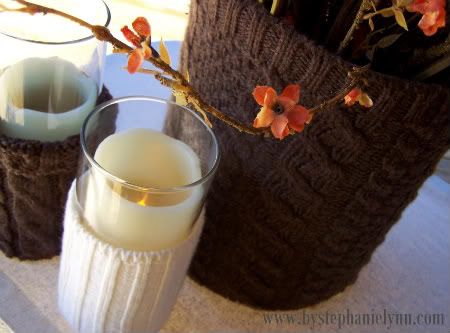
The left over sections of sleeve that are too short to cover a full vase can simply be slid over a tall glass vase and folded at the top, leaving half of the vase exposed.


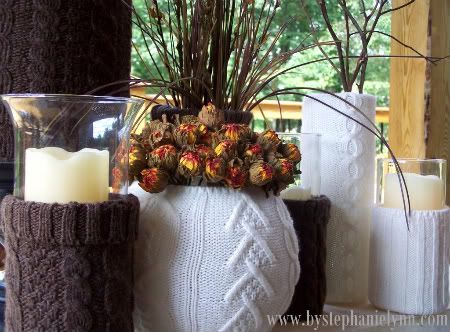
I used a few flameless candles to fill these vessels, as the candle light is so pretty shining through the cable knits.


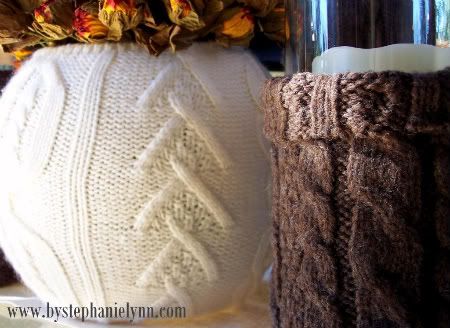
The round vase looks like a challenge but it is just as easy as the rest.


Round Vase How to:
{1} Cut a single piece of sweater to fit around the desired round container. {2} Hot glue the finished edge of the sweater around the top of the vessel. {3} Work your way around the entire top, until you reach the beginning; leave the edges hang. {4} Flip the container over and begin to hot glue the bottom in small sections. {See the March tutorial {here} for tips} Be sure to keep the bottom as flat as possible.


{5} Work your way around the bottom leaving the 'open' seam section undone. {6} Using hot glue, glue one of the 'open' sides down. Trim the other sweater side so you have a nice clean edge. {This is super easy to achieve with cable knit as the guide lines are already there}. {7} Pulling the sweater taut, start to hot glue the remaining side; overlap to make sure you have the container completely covered. {8} Finish the bottom as shown in the March tutorial {here}.


I really like the unique round shape...and of course the variety of adding different cable knits.


Using these simple covering techniques you can instantly transform any type or sized container into warm and cozy fall decor.


I think I have found a start to my fall centerpiece.

Saturday, November 3, 2012

DIY: Embellished Resin Rings

We love Mod Podge, and are actually obsessed with Mod Podge DIYs.  We think it was made just for us since it's easy to use, quick drying, and pretty fail proof (which we have put to the test).  

Thanks to Tatertots and Jello for helping to keep our addition alive with this wonderful resin ring DIY!! 

Hey Jelloheads!  That’s totally what a follower of Jen’s is called, and I am one too.  It’s Amy from Mod Podge Rocks – your guest host today.
If you don’t know me, I blog about Mod Podge and everything that you can do with it.  I also love the color blue, garden gnomes and pugs.  In my spare time I’m writing a book (that Jen is going to be in!) and I’m training for a 1/2 marathon.  Nuts?  Maybe.  Loveable?  I hope so.
Jen has been obsessed with Mod Podge Dimensional Magic lately, and I can’t blame her.  It’s completely awesome.  I made these rings, one of my favorite (and easiest) Dimensional Magic projects, and I’m going to share with you the three step tutorial. 
YES, it’s that easy.  

T
hey are so inexpensive, you can use existing supplies that you have and they make great gifts.  Here we go.
Supply list:
Ring blanks – purchased at Michaels
Mod Podge Dimensional Magic
Martha Stewart Microbeads – shown in Peridot and Blue Topaz
Embellishments – I used Making Memories Deco Brads – Shimmer and With Love Flower Brads
Keep in mind that if you don’t have the microbeads, you can use paper – just cut it to fit and stick it down in there with Mod Podge.  Okay, so here we go.
Get some ring blanks from your local craft store.  They are pretty inexpensive.
Find a place to secure your ring blank and add a thin layer of Dimensional Magic to the bottom.  Note – never shake your Dimensional Magic bottle.  It adds bubbles.
Shake some beads into the Dimensional Magic.  Let it dry and then dump off excess beads.  If you haven’t filled the ring blank, repeat (you can layer Dimensional Magic).
Add another layer of Dimensional Magic on top of your beads and then stick in the embellishment.  Let dry in a warm place (NOT under a fan) for several hours.  You’re done!  Repeat with as many rings as possible.

Wednesday, October 31, 2012

DIY: Chalkboard Necklace

Henry Happened blog is great for easy, quick, and inexpensive DIY tutorials!  We particularly like this one that shows how to make a chalkboard necklace.  This is a great accessory because you can change the way it looks based on your mood!

Check out their blog for more quick jewelry DIY!

chalkboard necklace diy - finished!

What you’ll need:
  • Rust-oleum specialty Chalk Board spray
  • a bezel pendant (you could find one at your local bead store or even purchase one through Etsy…this or this would do nicely)
  • finished chain
  • a scrap of satin ribbon
  • glue (I highly recommend a tube of E6000, it is inexpensive, amazingly strong and long lasting!)
  • painter’s tape
  • newspaper
  • basic white chalk
chalkboard necklace diy - supply roundup
STEP 1:  Using the painter’s tape, tape your pendant down onto your newspaper being careful to cover any areas you don’t want “chalk boarded” with the tape.
STEP 2:  In a well ventilated area (i.e. outside) apply 2-3 light coats of “Chalk Board” spray to the exposed surface of the pendant (wait approximately 3-4 minuets between coats).  Let dry.
chalkboard necklace diy - taping & chalk spray application
STEP 3:  Once the “Chalk Board” finish has had time to thoroughly dry (a couple of hours or so should be suffice), carefully remove the protective painter’s tape from the pendant.
chalkboard necklace diy - removing the painters tape
chalkboard necklace diy - fchalkboard application applied and dried!
STEP 4:  Tie a bow with your ribbon.  Trim ends to desired length.
chalkboard necklace diy - making the ribbon bow
chalkboard necklace diy - trimming the bow
STEP 5:  Using your glue, secure bow to top of pendant.
chalkboard necklace diy - attaching the bow
STEP 6:  Attached pendant to chain.
chalkboard necklace diy - pre message (a blank slate)
STEP 7:  Using your chalk write the message of your choice onto the pendant (using the edge of a brand new piece of chalk will help you write small and clearly).
chalkboard necklace diy - finished!
STEP 8:  If you are giving as a gift, place pendant and a piece of chalk into a gift bag (I chose an organza gift bag with a bit of a shimmer in a fun, bright color).
chalkboard necklace diy - finished!
Voila, a sweet chalkboard necklace!
chalkboard necklace diy - finished & modeled