Saturday, July 14, 2012

DIY: Security Envelope Sparklers

We love these versatile designer sticks from The Ravenna Girls blog!  Make them for cupcake toppers, drink stirrers, appetizers picks, or anything else you can think of!

Sparkler Cupcake Toppers 6 Security Envelope Sparklers
Sparkler Cupcake Toppers 1 Security Envelope Sparklers
All you need is one or two security envelopes, scissors, bamboo skewers (cut down in length) and double sided tape. Glue stick would also work, as would toothpicks if you don’t have skewers around.
Sparkler Cupcake Toppers 21 560x374 Security Envelope Sparklers
Cut down your envelope so you have one large rectangle of pattern to work with, then just cut on the diagonal into long thin triangles. You can also cut along the long length for a little variety.
Sparkler Cupcake Toppers 3 Security Envelope Sparklers
Put some double sided tape or glue on the back side of the paper (the white side). I put about 1/2″ of sticky to get an attachment that held. Then, wrap the full triangle tightly around your skewer or toothpick.
Sparkler Cupcake Toppers 4 Security Envelope Sparklers
Hold in place for 10-15 seconds, then gently unroll the paper and pull it away from the skewer. Voila! A little blue paper “sparkler” for your holiday decor.
Sparkler Cupcake Toppers 5 Security Envelope Sparklers
Play around with the length and size of your triangles for a little varied effect. Then go to town!
Sparkler Cupcake Toppers 7 Security Envelope Sparklers

Friday, July 13, 2012

DIY: Workout Shirt!

Falling behind on that New Year's Resolution for a healthier life?  Want to just hit the gym more often?  Tired of spending money on gym clothes??  Here is a fantastical tutorial from Rabbit Food for My Bunny Teeth that will get you back on track or just more budget friendly!

DIY Workout Shirt
Makes 1 sexy little tank
Ingredients:
1 old T-shirt
1 pair of scissors
20 minutes
1. Start with a pre-washed T-shirt. Any old shirt will do! The bigger the better.
2. Cut away the ribbed neckline and bottom hem. For the sleeves, cut downwards starting from the shoulder, determining how thick you want your straps. Cut straight down and then begin to curve down below the armpit seam.
3. Determine how low you want your front neckline, and cut away.
4. Flip the shirt over and make a narrow racerback, curving inward from the armpits.  Then cut a deep “V” shape from the top neckline.
5. Using the excess bottom hemline, stretch it out until it becomes one long string of fabric. Knot the string a couple of inches above the bottom of the “V” shape.
6. Wrap the string all the way down around the center of the racerback, and back up to meet the other ends. Knot the ends together tightly. Trim the loose ends.
7. To give your tank a high-low look, lay your shirt sideways, flattening it out evenly. Starting a few inches up at the front of your shirt, start cutting diagonally until you reach the back.

Thursday, July 12, 2012

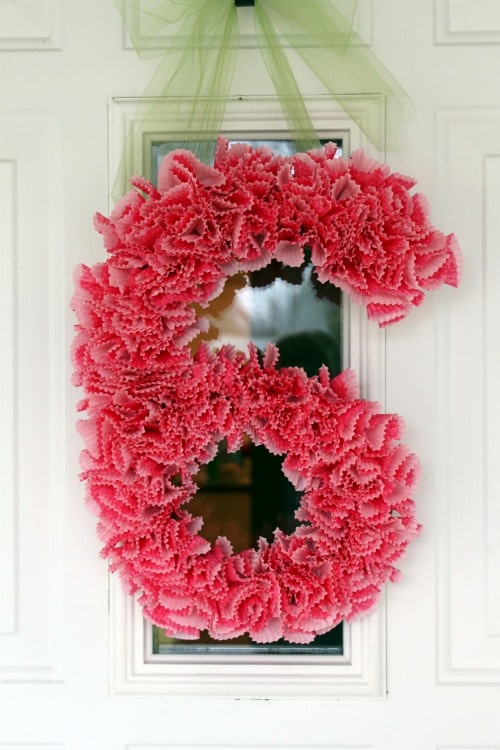
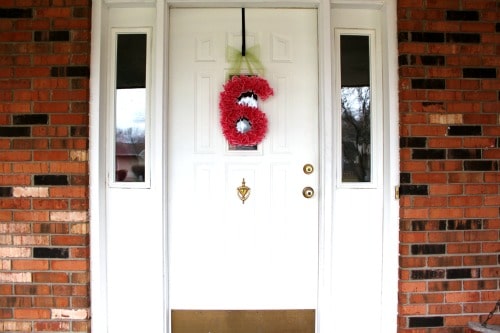
DIY: Cupcake Wrapper Door Number

How fun is this tutorial from All Things Mamma??  You can get cupcake wrappers from Michaels for pretty cheap, and there are so many fun ways to revamp this idea it's almost mind boggling!  Almost... ;)

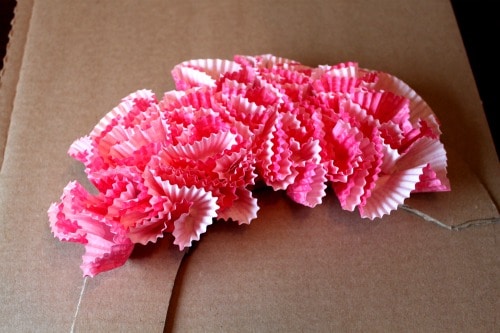
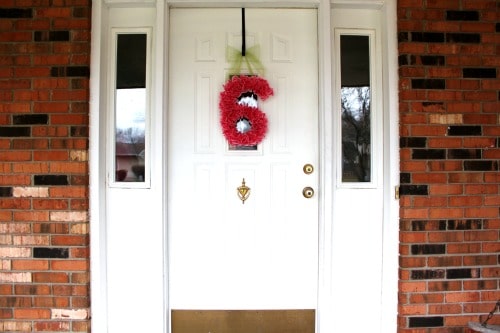
cupcake wrapper number


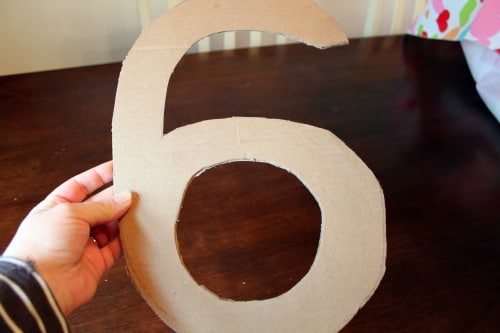
First, take a piece of cardboard and using a pencil draw the number or letter you’d like to use.  Next, using an Exacto knife or scissors, cut out your number or letter.

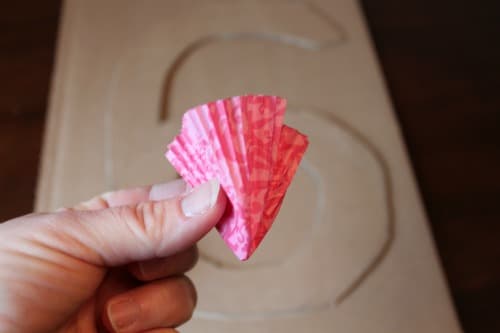
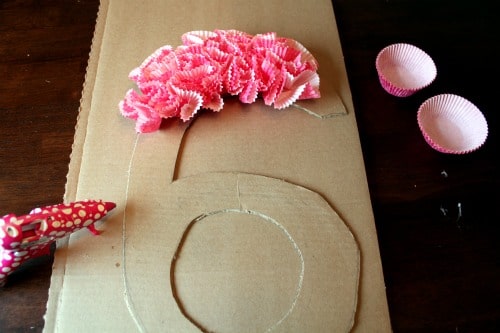
Take cupcake wrappers (Meri Meri Owl & Daisy Bake Cups, Set of 48) and gather them together at the bottom, like in the form of a flower.  Use a dot of hot glue and glue it onto the cardboard.  Hold for a few seconds to hold in place.

Work in small sections around your cardboard so that the glue has time to harden a firm up.

After you’ve filled the entire space, use tulle or ribbon and glue onto the back of your number and tie a bow and hang up! That’s it!
cupcake wrapper door number


Wednesday, July 11, 2012

DIY: Upcycled Hair Comb

This is a super simple project from Lemon Jitters!
All you need is a hair comb and embroidery floss. 
Doesn't get much easier or budget friendly, now does it?

Wrap in a V-shape pattern. Tuck ends under the next color and tie off the last piece.

Tuesday, July 10, 2012

DIY Butterfly Rice Tosser by Posh Paperie + Jackie Wonders

Check out Posh Paperie for this fantastic tutorial on how to make Butterfly Rice Tossers!  Super cute, and super easy - we can think of other ways to use these great paper wrappers, can you??

Photography By / Jackie Wonders
Design By / Posh Paperie
Photography By / Jackie Wonders
Design By / Posh Paperie
Supplies needed to make these pretty, pretty Rice Tossers:
Butterflies (found at a craft store)
Cardstock: different colors and patterns (thinner works best!)
Photocopy of “Tags”
Hole Punch
Red Tape
Scissors
Photography By / Jackie Wonders
Design By / Posh Paperie
Photography By / Jackie Wonders
Design By / Posh Paperie
Photography By / Jackie Wonders
Design By / Posh Paperie
Photography By / Jackie Wonders
Design By / Posh Paperie
Photography By / Jackie Wonders
Design By / Posh Paperie
Photography By / Jackie Wonders
Design By / Posh Paperie
Photography By / Jackie Wonders
Design By / Posh Paperie

Monday, July 9, 2012

T-Shirt “Yarn” Tutorial

Thanks to Gracious Rain's blog we now know how to make T-Shirt Yarn!  Go forth and make beautiful things with it and who us what ya got! 

Oh, yeah…it’s cotton “yarn” made from a spiral cut T-shirt.
does everyone on earth have a huge pile of orphan T-shirts that nobody wears, but they can’t seem to part with…
or is it just me?
So let’s get real green and do something useful with some of them…shall we?
Start with a regular t-shirt that has lived a good life…no guilt now. It’s going on to a better place…really.
Cut off the bottom hem.
Now cut the top off just under the sleeves…
so you have a tube of fabric.
Fold it nearly in half, leaving the under side sticking out about an inch.
Now cut from right to left all the way up to and just past the top fabric, but leave the one inch margin of the lower fabric uncut. Repeat about 1 inch apart. Now unfold the fabric…
it should look like this.
The easiest way for you to hold the fabric and cut it into one continuous strip is to slide your arm through the two layers of fabric 1 inch uncut margin running along the top of your arm. I drew dotted lines  showing where you’ll cut your fabric–but you don’t need to draw the lines. You’ll be amazed at how fast you can figure this out and it’s really fun too, and for some reason deeply satisfying.
If you need more instructions click HERE for a sweet little diagram and bag pattern.
When you’re finished cutting, you’ll have one long, long, strip of fabric. Are you ready to make it more “yarn” like? Here goes!
Going down the entire length of your fabric, take a hold of it by one end and gently stretch it. It will magically curl up and behave it’s self just like it should. Very obedient stuff, I tell you.
Next, roll it into a ball and think of the stuff you can knit or crochet or weave with it. I’ve seen trivets, handbags and rugs…

Sunday, July 8, 2012

DIY: Colored Pencil Jewelry

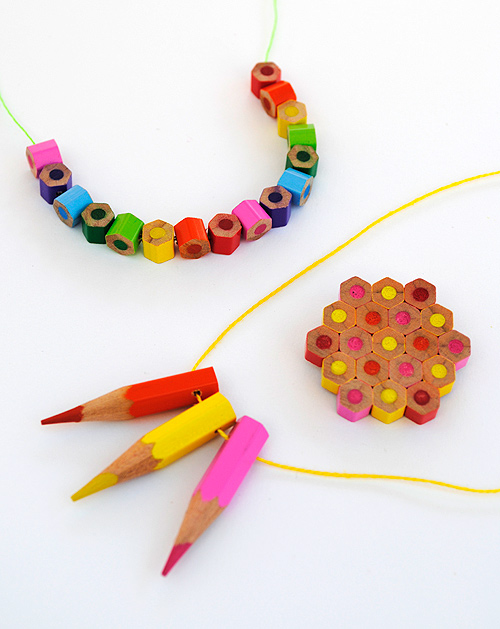
Not just one - but THREE easy DIY color pencil jewelry pieces!!  Thanks to Design Mom's blog for posting this excellent and easy to follow tutorial.


Note from Design Mom: I asked Kate of Mini Eco to create a Back to School themed project for us to try. I think making beads out of colored pencils is brilliant! Wouldn’t these beads be fun for your elementary school-ers to string for a class project? It would also be a fun activity at an art-themed birthday party. Here’s Kate:
Lately I have become a little addicted to making (and wearing) colored pencil jewelry. The items pictured are really easy to make and only require a few basic tools. You don’t even need to buy any materials, simply chop a few centimeters from the end of your kids crayons…if you do this neatly then they will be none the wiser!!
I think the results look great and you, or your child, will definitely stand out from the crowd wearing them!

You will need
  • Colored Pencils
  • Junior hacksaw
  • Fine sandpaper
  • Drill and small drill bit
  • Thread (for the necklace)
  • Superglue (for the brooch and earrings)
  • Brooch back (for the brooch)

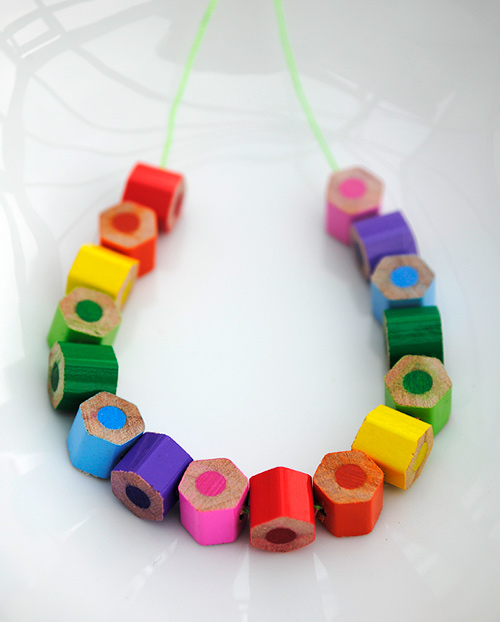
How to: Basic Bead Necklace
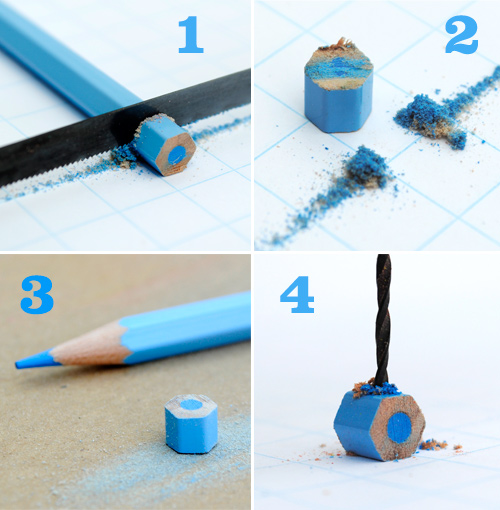
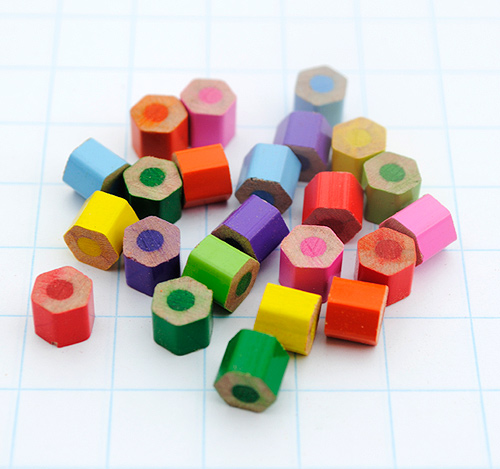
1. For the basic necklace you will need to begin by making your beads. You can use either hexagonal or round crayons. The beads I cut were 7mm long. To cut your beads use a small, sharp, hacksaw blade. (In the UK you can pick up a junior hacksaw for a pound or two in most hardware shops). Take your time when cutting the crayons and try not to apply too much pressure…that way you are less likely to chip the paint off the outside.
2 & 3. Don’t worry if the cut surface of your beads look a bit scruffy…all they need is a quick rub with some sandpaper. I found it easier to lay the sandpaper on a flat surface and rub the bead along it.

4. Now drill a hole in the side of each bead using a small drill bit. Make sure you place a scrap piece of wood underneath. It’s not a good idea to get holes in the kitchen table!
Once you have cut a number of beads simply string them onto a length of thread…job done!
Tip: These little beads are also make lovely bracelets. If bright colours aren’t your thing then try some more subdued shades. White colored pencil beads look especially nice.
How to: Pointy Necklace
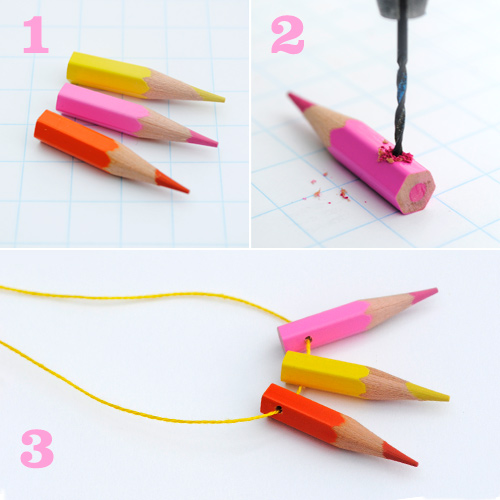
1. Begin by sharpening your colored pencil, then cut the end off as before. My beads measured about 3.5cm in length.

2. Drill a small hole through the end of your beads

3. String the beads onto some thread. You can add some co-ordinating beads if you wish.

How to: Brooch
If you fancy a bit more of a challenge then why not have a go at making the colored pencil brooch?

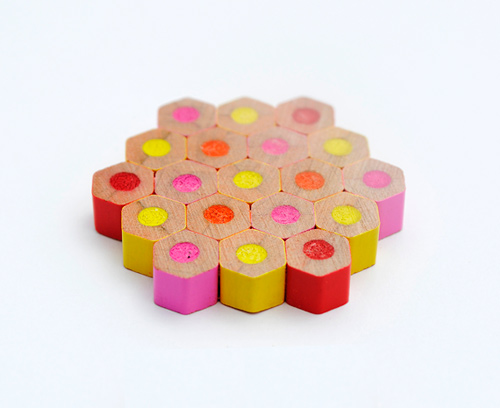
 1. You will need to use hexagonal pencils for the brooch. Cut your beads as before. Mine were 6mm in length. You need 19 beads to make the brooch pictured.

2. Put some sandpaper on a flat surface and sand the beads so they are nice and smooth.

3. Work out how you want the beads to be arranged before you being gluing. Once you have decided simply start sticking the beads together using superglue.

4. Once your beads are all stuck together sand the underside of the brooch until it is flat and smooth.

 5. Superglue a ‘brooch-back’ to the back of the brooch.

Tip: The best way to avoid making a wonky brooch is to assemble it on a flat surface. The underside of the brooch will be the most even so make sure this becomes the front of the brooch.
Make sure you only use the tiniest dab of superglue on each bead….and don’t stick your fingers together! I have done this before and was reminded how powerful superglue is!

Finally, remember these necklaces are not recommended for under three’s. I would also avoid making the pointy bead necklace for any child…for obvious reasons.