Showing posts with label plant. Show all posts

Wednesday, January 30, 2013

DIY: Gumball Candy Dish

Who doesn't love candy?  We certainly love candy and that makes this Gumball Candy Dish from Wrapcandy Crafts right up our alley!


Materials:
1 (one) 4″ Terra Cotta Pot
2 (two) 4″ Terra Cotta Saucers
1 (one) Bubble Bowl...Found at Walmart sku# 3100927117
1 (one) Wooden Ball – 1 1/4″
1 (one) E-6000 GLUE  
1 (one) Spray Can Clear Gloss ( Triple Thick – Rustoleum , your choice )
Acrylic Paint

 
Assembly:
1. Paint Both Terra Cotta pot and saucers –and knob- let dry overnight..
( if you were going to add a graphic and/or face plate , you would do this after the paint has dried overnight )
** Note – Face Plate directions below **
2. Place Terra Cotta Pot upside down…apply E6000 to the bottom rim of the pot..
apply Saucer-  let dry OVERNIGHT.

Add Wooden Ball to Saucer number 2, with the E6000 (let dry overnight)

4. Add lid to top of Bubble Bowl
 
FACEPLATE:
The face plate size is pretty much up to you… I use the dimensions either
2 1/4 x 2 1/4″… choice is yours…

Monday, January 28, 2013

DIY: Plantable Paper

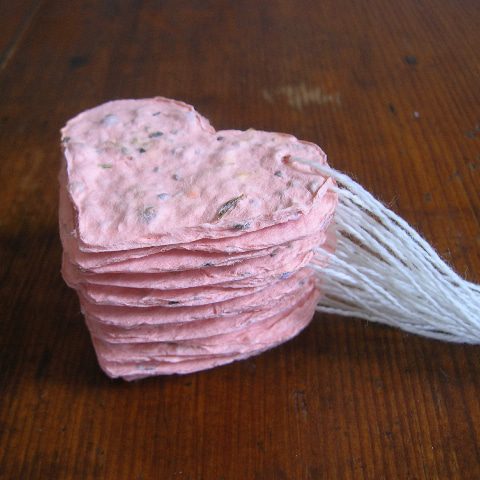
Hill City Bride has a wonderful DIY that incorporates plantable paper and Valentine's Day tags / cards!  We love the eco-friendliness of this idea and also how adorable these little hearts are - so head on over to their blog for more!!
To make your paper, gather everything you will need: a blender, a packet of seeds, a heart-shaped cookie cutter, paper scraps and a mold. A mold is a piece of professional papermaking equipment: a screen is pulled very taught across a wooden frame. You can make your own with an old picture frame without the glass and some screen from the hardware store (you can find directions on the internet) or you can buy them through papermaking suppliers. A mold must have a very tight screen so that there are no sags where water might puddle and create uneven thickness in your handmade paper.
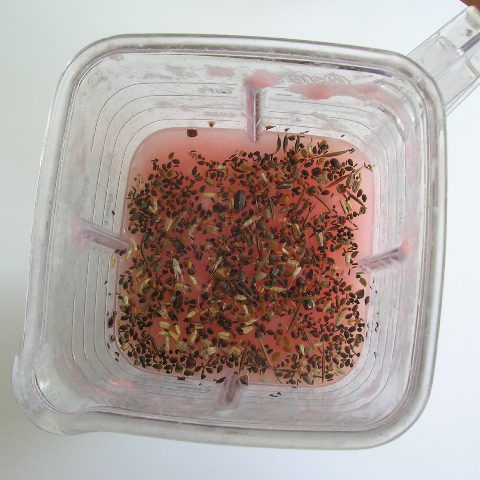
Begin by tearing your paper scraps into small pieces. Make sure to remove any staples, plastic windows from envelopes and any other non-paper materials. Soak them briefly in water to soften the paper so that your blender motor doesn’t have to work too hard. (Make sure to use a blender that is dedicated to papermaking. Because paper is made with chemicals, you will want to buy an inexpensive blender at a yard sale that will never be used for food preparation.) Toss the scraps into a blender with some water and pulverize. You can make a fine pulp or keep the paper in smaller chunks. Once you are happy with the consistency, add a handful of seeds to the blender, and give it a quick pulse to blend the seeds throughout.
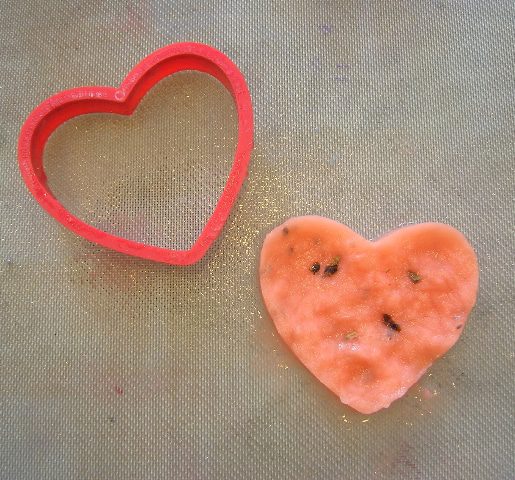
Place your cookie cutter on top of the screen, and place in a sink. Slowly pour the pulp into the cookie cutter, using your finger to push the pulp into an even layer as the water drains into the sink. When most of the water has drained off, lift the cookie cutter, move to another part of the screen and repeat. When your screen is full, place the screen in a warm place or outside in the sun until dry. As the paper dries, the individual fibers will start to lock together and get stronger. To dry the paper more quickly and make a stronger paper, put another piece of screen on top of the heart and press the water out with a sponge. Once dry, lift the paper off the screen, punch a hole in it and thread a piece of string through the hole.
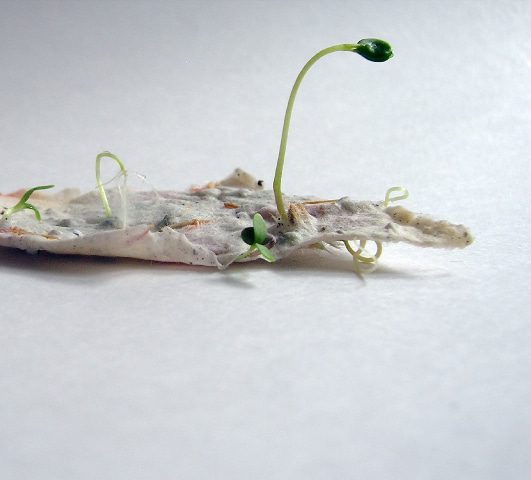
Remember to give your guests directions on how to plant their paper: place the paper into raked ground, cover with a quarter inch of soil then water and keep moist until germination, about 6 to 8 weeks. Take a look at the last photo to see seedlings popping out of some white plantable paper!
I love this idea, and the little seedlings bursting through with life convince me that this indeed is a darling little project. If you love the thought of doing something “green” for your wedding, but you do not want to tackle a project, be sure to visit Pulp Art and check out what have for your wedding day! They make place cards and rectangle hang tags in addition to the heart shaped ones featured today. Thank you again, Pulp Art, for inspiring us to make some plantable paper of our own!

Wednesday, October 17, 2012

DIY: Jeweled Planters

Centsational Girl has been one of our favorite blogs for a long time now.  We love her sense of home design and fashion on a budget!  Check her out!  Today we are featuring her blog on how to fancy up your planter.  These would be fantastic for a garden party or an outdoor wedding perhaps?  What do you think?
This planter makes a gorgeous statement, on a wedding table, surrounding your orchids, or adding glamour to your outdoor table.
How to Make a Jeweled Planter:
Supplies:
  1. Inexpensive terra cotta planter(s)
  2. Outdoor spray paint
  3. Glass marbles (with flat side) from craft store
  4. Silicone rubber sealant or epoxy glue from hardware store
Step One:  Spray paint your terra cotta planters with some outdoor spray paint and allow to dry.  I use a beautiful shade of cream by Rustoleum called ‘Heirloom White’.
Step Two: Attach your glass marbles with silicone rubber sealant.  This product is waterproof and will withstand outdoor abuse.
Silicone sealant takes about 24 hours to cure, but after that, your ‘jewels’ will stay on regardless of moisture.
This DIY project makes your planters look like they’re wearing jewelry!

Tuesday, October 9, 2012

DIY: Party Streamer Seed Tape

Thanks to Mad in Crafts for such an easy and useful craft!  We love the idea that this will make gardening easier, and more efficient.  Just imagine you, but with a stunning garden in the background with upcycled materials from your latest party! 

homemadestreamerseedtape graphic

The old becomes new: You can prepare useful seed tape from leftover party supplies!

homemadebirthdaystreamerseedtape

Why make seed tapes instead of just planting the seeds directly in the ground, you ask?  Seed tapes:
  • ensure that your seeds are spaced correctly, reducing the need to thin your mature plants.
  • eliminate wasting seeds.
  • make planting tiny seeds much easier.
  • allow you to sow seeds from the comfort of your kitchen chair, instead of on your hands and knees!
With a items you may already have in the house, you can make your own inexpensive seed tape with your kids. 

seedtapematerials

To make party streamer seed tape, you will need:
a small saucepan,
water,
cornstarch,
white party streamers (dollar store),
a measuring tape,
a washable marker,
and seeds.

NOTE: I recommend using white streamers, not colored, just because I am not sure how the dyes would affect the plants as they grow.

Let’s begin!  First, the responsible adult will need to cook up the “glue” for the seed tape.
SEED TAPE GLUE
1 cup water
1 tablespoon cornstarch
Cook over medium heat, stirring constantly to prevent lumps. Once it starts to boil and make a gel, remove it from the heat. Cool to room temperature.


seedspacing

While the glue cools, roll out the streamers to the width of your garden plot.  Lay the streamer next to an extended measuring tape.  Using a  washable marker or felt pen, make marks on the streamer at the intervals recommended for your seeds.  We spaced the dots for our cucumber seeds at 3 inch intervals.

cucumberseeds
seedtapeglue

Drop a small amount of cooled “glue” on each dot and have your child place one seed on each dot of glue.

birthdaystreamerseedtape
Continue until all of your dots have seeds.

homemadeseedtape


Fold the streamer in half and press to stick the streamer to itself, enclosing the seeds.

If you are making seed tape from more than one variety of seed, I recommend labeling the end of each roll of seed tape so you don’t mix your cucumbers with your zucchini.

homemadestreamerseedtape

After the streamers are dry, the tape can be rolled up and stored for whenever you decide to head outdoors to plant them.  Just create a trench in your garden at the depth recommended for your seeds, unroll the seed tape, and cover with dirt.  Water as you normally would and watch them grow!