Thanks to Mad in Crafts for such an easy and useful craft! We love the idea that this will make gardening easier, and more efficient. Just imagine you, but with a stunning garden in the background with upcycled materials from your latest party!
The old becomes new: You can prepare useful seed tape from leftover party supplies!
Why make seed tapes instead of just planting the seeds directly in the ground, you ask? Seed tapes:
-
ensure that your seeds are spaced correctly, reducing the need to thin your mature plants.
-
eliminate wasting seeds.
-
make planting tiny seeds much easier.
-
allow you to sow seeds from the comfort of your kitchen chair, instead of on your hands and knees!
With a items you may already have in the house, you can make your own inexpensive seed tape with your kids.
To make party streamer seed tape, you will need:
a small saucepan,
water,
cornstarch,
white party streamers (dollar store),
a measuring tape,
a washable marker,
and seeds.
NOTE: I recommend using white streamers, not colored, just because I
am not sure how the dyes would affect the plants as they grow.
Let’s begin! First, the responsible adult will need to cook up the “glue” for the seed tape.
SEED TAPE GLUE
1 cup water
1 tablespoon cornstarch
Cook over medium heat, stirring constantly to prevent lumps. Once it
starts to boil and make a gel, remove it from the heat. Cool to room
temperature.

While the glue cools, roll out the streamers to the width of your garden
plot. Lay the streamer next to an extended measuring tape. Using a
washable marker or felt pen, make marks on the streamer at the intervals
recommended for your seeds. We spaced the dots for our cucumber seeds
at 3 inch intervals.
Drop a small amount of cooled “glue” on each dot and have your child place one seed on each dot of glue.
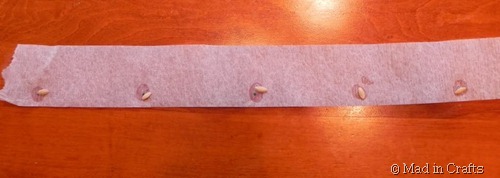 Continue until all of your dots have seeds.

Fold the streamer in half and press to stick the streamer to itself, enclosing the seeds.
If you are making seed tape from more than one variety of seed, I
recommend labeling the end of each roll of seed tape so you don’t mix
your cucumbers with your zucchini.
After the streamers are dry, the tape can be rolled up and stored for
whenever you decide to head outdoors to plant them. Just create a
trench in your garden at the depth recommended for your seeds, unroll
the seed tape, and cover with dirt. Water as you normally would and
watch them grow!