Showing posts with label crafting on a budget. Show all posts

Friday, January 11, 2013

DIY: Valentine's Day Wrapping Paper

Thirty Handmade Days has a very fun paper design that they are sharing with the rest of us!  Head on over to their blog for some fancy pants paper!


At Christmas my genius friend Jaimee posted some beautiful wrapping paper.  I LOVED the idea and decided to make some for Valentine’s day.  I honestly ADORE the results and am working on more projects similar to this.

I made one traditional subway art type of wrapping paper.  And then I had a little fun with another sheet.  I made paper that had lyrics from what Josh and I call “Date Me” songs.  These are songs that we hear and immediately think of each other and when we were dating (14 yrs ago!).  Most of the time it’s when I’m listening to 90′s on 9.  ;) Try really hard not to laugh at the lyrics because most of them are not mushy!
Follow Me on Pinterest

Thursday, August 23, 2012

DIY: Autumn Leaf Luminaries


mla103665_1008_luminaria.jpg

We are either hit of miss with Martha Stewart's crafts - but this one we love!  Sometimes they can be just too detailed and complicated for our liking, but this one is just up our alley with simple materials and even more simple instructions.  You can get everything you need for cheap, and they look expensive - bonus!

Tools and Materials
- Fallen leaves
- Colored paper treat bags, matte-colored SOS in Sunbrite size No. 6, and Orange size No. 4, $10.10 to $11.19 per 100, from Paper Mart
- Acrylic paint (in colors that contrast with bags)
- 2-ounce misting bottle (176062), $1.29, from The Container Store

Autumn Luminarias How-To:
1. Collect fallen leaves, and arrange them on top of colored-paper treat bags.

2. Put 1 teaspoon acrylic paint (choose colors that contrast with bags) in a 2- to 3-ounce misting bottle. Fill halfway with water and shake to mix. Mist bags and leaves. Let dry 20 minutes. Remove leaves. Repeat on other side. Fill bottom of each bag with sand.

3. Illuminate: For safety reasons, use either glass holders that are three times as tall as candles or substitute battery-operated lights.

Wednesday, August 22, 2012

DIY: Faux Braided Bangle Bracelet

How gorgeous are these?  We love, love, love dollar store crafting!  Thanks to Studs and Pearls for making this fabulous tutorial.


Supplies:

- 4 thin metal bangles

(or less/more, depending on the thickness of each bracelet and your desired look)
- Measuring tape, scissors, Scotch tape
- Any kind of flat fiber of your choice, such as ribbon or leather cord.
I used this interesting ribbon yarn, Lion Brand Incredible® Yarn in City Lights. (c/o Lion Brand)
- Clear nail polish (optional)


I love the colors of this yarn. So bright and fun.


1) If you're using more than 2 bangles, loosely tape 2 and 2 together. You'll be working with each pair of bangles separately, wrapping the yarn around each pair and weaving in between them. The tape will help hold the bangles together while you do this.


2) Measure and cut about 200 inches of yarn/ribbon/etc. This will probably be more than enough, but it's always better to have too much than too little!


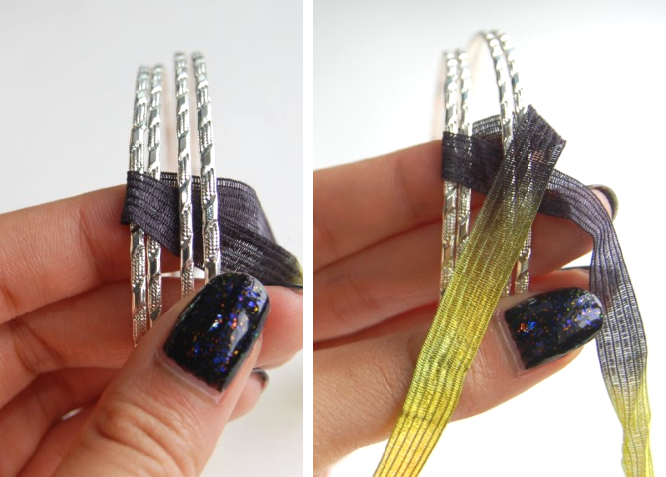
3) Insert the yarn through the bangles, positioning it so that there is an equal amount of yarn on either side. (ie: Fold the yarn in half, and let the bangles drop to the center of the fold).


To make this easier to follow, start with the same side I did and follow from there. Holding the yarn in place underneath the bangle, take the yarn on the left side and bring it over the left pair of bangles.


4) It may be a little awkward to hold the bracelets at first, but everything will start to take shape as you go along. Take the yarn on the left side, and bring it over the left pair of bangles and under/through the right pair (first photo). Next, take the yarn on the right side and bring it over the right pair of bangles.


5) Bring the right strand under/through the left pair of bangles. This completes one "weave". Gently pull on the strands to slightly tighten it. Continue from there, with the left strand going over the left pair of bangles (as seen in the second photo).


6) This strand will then go under/through the right pair. The right strand will then go over the right pair...


7) ... and under the left pair of bangles. You'll start to see the "braided" look form, as you can see in the first photo above. Continue with this same method the entire diameter of the bangles. Left strand over the left pair, under/through the right pair, right strand over the right pair, under/through the left pair. Don't forget to pull gently so that the "braids" stays in place.


8) Whenever you come across the tape, simply remove it and continue braiding.


9) The braided look will start to emerge as you work along the bangles. Be sure to keep the tightness of your weaving consistent.  Between this method and the type of ribbon yarn I used, I really like how the colors stood out in this bracelet!


10) Keep working around the bracelet...


Eventually, you'll reach the point where you started.


11) Tie both strands into a tight double or triple knot. Cut away the excess.


12) If you'd like, dot some clear nail polish onto the knot for some extra security. 


Monday, August 20, 2012

DIY: $12 Pendant Lamp Makeover!

We love Ikea, and we love this wonderfully done Ikea lamp makeover!  This tutorial comes to us from Apartment Therapy's blog, and we can't wait til this weekend when we can hit up Ikea and give this a shot.  This looks like a show piece - but for only $12 (including the price of lamp)!
010609-lamp2.jpg A
010609-lampthumbs.jpg
010609-lamp1.jpg
Ashley let us in on a few of her secrets ....
"After some experimentation I found that the best way to attach the petals was with 'shiny' scotch tape (the type that looks like packing tape) rather than the matte scotch 'magic' tape (which gave obvious seams/shadows that looked less than stellar). The 'petals' were cut in various lengths (I would cut a sheet of wax paper and fold it over several times so I was cutting 8 petals at a time) and attached from the bottom-->up (with shorter petals at the top)...don't be discouraged if you can see a subtle shadow cast by the tape initially as lots and lots and lots of layers are key! The petals curved naturally from the wax paper coming on a roll, and I placed most of them with the curl flipping out. Also, in lieu of wax paper I might use parchment paper for the next go-round as it has a more matte appearance when the light is off."
010609-lamp3.jpg
$1.19 (wax paper)
$0.50 (tape)
$6.00 (23.5" paper lantern from IKEA)
$3.99 (electric cord form IKEA)
---------
$11.68

Tuesday, August 7, 2012

DIY: Upcycled TetraBox Lamp

"Demilked" has a wonderful tutorial that we are pretty sure is just this side of awesome-sauce.  We may never have the energy / time to put this one together, but we are hoping to!!  Maybe a smaller version?  What do you think??

People are so creative, no?

Wednesday, August 1, 2012

DIY: Scallop Wall Art

I love my 1" circle punch and am always seeking new and fun ways to use it - so "You are my Fave"'s blog is ideal for my crafting desires!  Check out their blog and see what other DIYs you fall in love with and want to try!

DSC_0570
To make your own, you’ll need:
- thin pieces of wood
(the kind I use is called an MDF handy panel, and if you bat your eyes the men at Home Depot will cut it to whatever size you ask)
-colorful cardstock
-a circle puncher
-glue
DSC_0415
Punch lots of circles from your colorful cardstock.
DSC_0418
Then, mark your piece of wood along the edge at half the size of your circles. For example, my circles were two inches, so I made one inch marks along each side. Then connect the dots and make lines across the wood to guide you.
DSC_0420
Using your lines to guide each row, get to gluing! DSC_0422
Let each rows of circles hang on top of the row below – that creates your scallops.DSC_0526

Saturday, July 28, 2012

DIY: Packthread Wrapped Vase

A wonderful upcycle tutorial from Sheepy Me!

Supplies:
1.) Double Sided Tape
2.) Packthread
3.) Scissors
4.) A used bottle!