Showing posts with label door wreath. Show all posts

Friday, November 23, 2012

DIY: Burlap Bubble Wreath Tutorial

Today's Fabulous Finds - Tomorrow's Treasure's blog is really amazing at taking step by step pictures and explaining everything she does no matter how seemingly small.  This makes it incredibly easy to duplicate her stunning results!!

Supplies Needed

1-10" foam wreath
(check your dollar store)

1 1/4 -1 1/2 yds. burlap, or other fabric

@100 pins with large heads
(You can use small headed pins for fabrics with a tighter weave. 
I used my old sewing pins and then bought a new package to replace them, now I have new pins for sewing.)

How to Make A Burlap Bubble Wreath


I used a white pin in the pictures to show where you will hold the fabric with your thumb and index finger when folding it.  You don't need to pin it until step five.

1. Cut your fabric into 4" x 4" squares (or close to that).   I cut one square first to make sure it was the size that I wanted and then used it as a guide to cut the rest of the squares.  

Cut the fabric into 4" strips and then cut each strip into 4" squares.  The squares don't need to be measured and cut precisely if you don't want to take the time, but should all be cut pretty close to the same size. 

2.  Fold the square in half to form a triangle.  Take the right hand corner (pinch one layer of the fabric on the very tip) and bring it to the front.  Line up the corners.

3.  Take the left hand corner (pinch one layer of fabric on the very tip) and take it to the back.  Line up the corners.

4.  All four corners should be lined up at the bottom.  It should look like a bubble now.

5.  Pin through all four layers of fabric.

6.  Pin the 'bubbles' to the wreath.  Pin one bubble on and then place the next one close to it so that it hides the pin on the one that you just added.  The bubbles should be just close enough so you don't see any of the foam wreath or the pins.


This pic of the back will give you a better idea of how it all goes together.  You'll want to bring the bubbles around the edge just far enough so when the wreath is against the glass/wall the green doesn't show from the side.  (You can cover the back with fabric first if you'd like.)

To give you an idea of how many it will take, I used just over 90 burlap squares for this wreath.


Thursday, November 15, 2012

DIY: Tea-Stained Coffee Filter Wreath

Design Dining + Diapers Tea-Stained Coffee Filter Wreath is just breath taking.  We love this idea for our decorations for the holidays!

Coffee Filter Wreath
Tea Stained Coffee Filter Wreath

Instructions:
1. Place 5 dark color tea bags into a large pot. Bring to boil and then place on low-medium heat.
2. Place 20 coffee filters into the pot and use a spoon to make sure they are fully submerged. Soak them for 10-20 minutes or until you get the color that you want. Repeat until all of the coffee filters are stained ( I used about 100 for this wreath).
I clipped the coffee filters onto pant hangers and hung them in the laundry room to help them dry faster. I also spread a few out on top of paper towels and that worked too.
3. Let the coffee filters dry completely so they are not as fragile.
4. Wrap the coffee filter around a screw driver and push it into the wreath. You may need to do a few extra jabs to really get it secure in there.
5. Place the coffee filters about 1-1 1/2″ a part (to get the fullness of this wreath).
Repeat until the wreath is completely covered and add some bling of your choice!
Tea Stained Coffee Filter Wreath

Saturday, November 10, 2012

DIY: Acorn Wreath in Any Color!

Made has a tutorial that is completely customizable to your taste and home decor!  This seems like it may be a little time consuming, but we bet that if you get a few friends together and perhaps have a coffee or a glass of wine together, this will be together in a jiff!  

Sewing is a love to me. In fact, it may be addiction. But crafting is a new-found interest. Until we moved into a house two months ago, I had kept the crafts at a minimum. Our old 2-bedroom apartment felt like piles of projects were caving in on me. The last thing I needed was more decor. But now that I have bare walls that can breathe, I’m exploring all those wonderful craft projects I’ve admired from afar in the blogging world. And this one caught my eye.
I love the simplicity of it and monochromatic color. And better yet, it was made from acorns!….something the kids and I see everywhere at the park. So last week, with empty bread bags (from feeding the ducks) the kids and I loaded our bags as full as we could with brown acorns. I felt like one of my toddlers, gathering treasures, slightly giddy with craft excitement. And I loved that we were working on a project together.
Though my acorns are not as cool looking as hers, I hope you enjoy my acorn wreath adventure. Let’s get started!
Skill Level: Beginner
Needed:
* Acorns (or nuts or wooden beads)
* Floral wreath
* Hot Glue-gun

1. Gather acorns. If you can find the ones with the little hats on top, totally cool. I just had these to work with. But in the end I still liked the result. If you don’t have acorns in your area, you might try what the woman in the above link did. She posted on her blog, asking readers to send her some and four boxes showed up on her doorstep! What an amazing network this blogging place is.
2. Clean and BAKE your acorns. Oh my, this is an important step. At first we brought the acorns home and since they had been outside, I washed them and just laid them on a towel to dry. Then I read the post above in thorough detail. And when I got to the part about her dormant box of acorns festering with little maggots, I freaked out and threw my acorns in the oven for 15 min at 350 degrees to make sure any little creatures living within had croaked. (for more info read here).
3. Gather a wreath and glue gun. I purchased one of these very inexpensive straw wreaths (only because we were at the end of our budget for the month and I was trying to be a responsible wife). You can also use floral or wooden wreaths.
4. Start glue-ing! I chose to do mine in a diagonal wrap-around pattern. So first I drew one line with a marker around the wreath, put some hot glue on that line and laid the acorns on top.
5. Glue acorns all around the wreath (But don’t bother glueing them on the back. No one will see it and it will lay flatter on your wall or door. ) As you go around the wreath, it may be hard to keep each line curving with the same degree as the previous one. I continually adjusted here and there as I went.
6. Add a ribbon, admire your (tedious but exciting) work, and hang it up.
Total cost for the project:
Wreath: $2.50
Spray Paint: $1
Acorns: FREE!
This ribbon was made of braiding three strips of white gauze fabric together:
Of course, if you’re anything like me, it’s hard to decide which color you like best. So, I spray painted it white. And I love this version even better. Jordan Almonds anyone?
Next to the charcoal gray door, white adds perfect contrast. And it works for most seasons! When Thanksgiving is over, tie a red, green, or gold ribbon on there.
Or better yet, paint it green!
Raspberry pink for Valentine’s Day:


Wednesday, November 7, 2012

DIY: Fall Glitter Wreath Tutorial

Homemade by Jill's blog has a great and very very easy DIY on how to make a glitter leaf wreath just in time for Thanksgiving!

As seen on So You Think You're Crafty, Week 2!  Thanks to everyone who voted for this project.  I know autumn is behind us, but it is so easy to customize this wreath in seasonal or holiday colors.  It would be a great last minute (not to mention inexpensive) Christmas project, if you still need some decorations.

Supplies Needed:
  • Cardstock
  • various shades of fine glitter (do I need to mention that the Martha Stewart glitter is the best?)
  • spray adhesive
  • a wreath form (mine is 10 inches, and I found it at the dollar store)
  • wire for hanging
1.  Cut out a basic leaf shape to use as your template.  Cut out approximately 60 leaves out of cardstock.  I used a 10 inch wreath form.  If you are making a bigger wreath, you will likely need more leaves.

2.  Divide your leaves into groups for glittering.  Spray each group with spray adhesive and coat in glitter.  Shake off the excess.  I used the following colors of Martha Stewart Crafts glitter for this fall wreath:  Smokey Quartz, Yellow Gold, Cinnibar, and Fire Opal.

For a holiday wreath, a selection of green glitters would look nice, especially with a big bow and some red jingle bells. 

For a wreath to last all winter, I'd choose a variety of white and silver glitters for a snowy effect.

 
3.  Add a wire loop to your wreath form for hanging.

4.  Begin hot gluing the leaves to the wreath form, overlapping the bottom tips.  The hot glue gun will melt a styrofoam wreath form a little bit, but it holds well.
 
5.  Continue gluing leaves around the wreath form.  I changed the direction of the leaves at the bottom, but you may want to continue placing them in the same direction all the way around the leaf.

 
6.  Attach a bow.  My secret weapon for attaching bows to wreaths is a paper clip (or maybe everyone does this and it's not such a secret?).  Slide the small end of the paper clip though the back of the knot in your bow.  Then use the large end of the paper clip to attach the bow to your wreath.  This works especially well on a paper wreath like in this project, but I use this trick on all of my wreaths (it also makes it really easy to switch out your ribbons).

Need a bow-tying lesson?  You can find some tips at Martha Stewart.


Saturday, October 27, 2012

DIY: FallBook Page Paper Wreath

Design, Dining + Diapers blog has a step-by-step tutorial on how to make these wonderfully gorgeous book page paper fans and put them together into a wreath.  You probably have most of these supplies already in your house! 
book page wreath, diy, fall wreath, paper projects
I started out by cutting a circle out of an old box we had laying around and then covered it with book pages to create the base for the wreath.
book page wreath, diy wreath, paper projects
Then, I made these accordion style flowers out of book pages (each flower has 3 small accordion pieces) and layered the flowers until they covered the entire wreath. I love how layering the flowers gave it some depth.
After the wreath was complete I accessorized it with some old buttons that my grandma recently gave me.
After trying out the wreath in several rooms in the house, I finally found it a home on a shelf in our family room! I’ve been all about big pops of bold color lately so I added some ribbon to top it off. The colors might not be for everyone but it works in this space.

Friday, October 12, 2012

DIY: Autumn Leaf Wreath

If you've been keeping up with our blog, you know that we just love dollar store crafts.  We enjoy the idea of taking inexpensive items and turning them into stunning expensive looking pieces that we can put all over our home!

The Paper Pony blog seems to have people like us in mind with this tutorial for a fun fall wreath!  Check out their blog for more DIY.

This one is another super-simple project. I just took the foam form, a package of leaves (also from the dollar store) and some cheap-o push pins. The process was so easy: just stick the leaves onto the wreath form using the pins being sure to hide the pin heads by overlapping the leaves. I didn't put any on the back because it wouldn't show and it would hang better without them... and I was too lazy and impatient, of course. This whole project took minimal effort, two dollars and very little time (about a half hour)... and the result was fantastic. Yay! Now for Christmas...

Sunday, September 23, 2012

DIY: Halloween Wreath

Delia Creates' blog has a great Halloween tutorial and we want to showcase it now so you'll have plenty of time to get on it for the upcoming holiday!  We love Halloween and all the fun things you can do, so we'll be showcasing more DIY that has Halloween themes - so get those party themes ready to roll.

Check out their blog for more DIY!


Well today I have two more.


1. First...pack up the kids and go stick hunting. Get A LOT of sticks.


2. Then cut or break {which is what I did} all your sticks into similar lengths. It doesn't have to be perfect....at least not with this Halloween craft. The more imperfect the spookier it looks.


3. Cut a cardboard circle out of an old diaper box or cereal box. I used a medium sized mixing bowl and a cereal bowl for tracing. Cover in burlap or twine if you want. I don't think it is necessary. I added the burlap and it made gluing things more complicated. Plus you are going to paint over it so...

4. Hot glue the sticks around the cardboard circle.


5. Then spray paint it black. I had to touch it up with acrylic paint as well. You can paint the sticks before gluing. It's up to you.

6. Hang with a black ribbon and add an orange plastic spider if you have one in your Halloween stash.


Tuesday, September 18, 2012

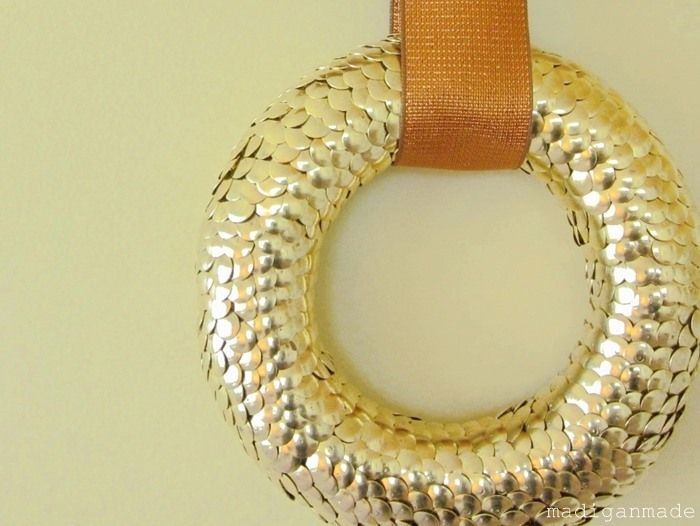
DIY: Autumn Gold Thumbtack Wreath

Madigan Made has gone above and beyond with this amazing wreath.  The materials are so inexpensive and we NEVER would have thought to do this with these things.  Love it, and can't wait to make it.  Period.  


"You made a wreath out of... thumbtacks???"

Yes, I made a wreath out of gold thumbtacks! :) 
I wanted to make a new wreath this season and gold seemed like the perfect color for a fall wreath. I think it looks great with a copper ribbon, too.

There is something about the warmth of gold and copper together that reminds me of fall.


Don't get me wrong, I love my brushed nickel and stainless steel. But I'm slowly warming up to the use of gold and brass in my home.  (pun intended!) Gold can scream terrible and tacky 1980's decor... but used thoughtfully, I think it can add a layer of coziness and brightness to a space.

To me, mixing gold and copper is a natural autumnal combination. Using a copper ribbon with my new gold tack wreath seemed perfect for this upcoming season.

Are you asking: "What on earth made you think about using thumbtacks on a wreath?"

Well, after I made my thumbtack covered globe, I knew I could cover other things with tacks for a unique texture.  I figured, why not try it on a foam wreath?

The steps to making this wreath were simple.

I used a small six-inch wreath form and several boxes of brass tacks (Tip: the dollar store sells boxes of 300). I started with a circle of tacks around one section and just kept poking the tacks in and layering them on top of each other.


I worked my way around the wreath layering the tacks. The ribbon covers the area where the two ends meet up, because it was hard to make that transition look seamless.

This wreath took a loooong time to finish (a perfect tedious job to do in front of the TV) and it used at least 2-3 boxes of 300 tacks.