Tuesday, July 24, 2012

DIY: FABRIC WALL POCKET TUTORIAL

Abernathy Crafts has taken a whole new twist on making fabric wall art by making it not only aesthetic but also functional!  This is quick, easy and financially friendly.  Just the way we like our crafts!

fabric wall pocket 8
Here’s another no-sew project for you!  This is super simple and will add color and organization to your space.  Read on for the quick and easy tutorial.

The tutorial I’m about to show you is completely no-sew, but you could easily modify it with a few straight stitches for a more personalized or practical end product.
fabric wall pocket 1

Materials needed:
  • Embroidery hoop (any size)
  • Fabric (2 coordinating)

fabric wall pocket 2

Lay out your background fabric over your inner embroidery hoop.

fabric wall pocket 3

Lay your pocket fabric, folded in half, over the background fabric.  You can place it half way in the middle, higher or lower, depending on what you plan to put in the pocket.  Just make sure there is enough excess fabric to hang over the edges of the embroidery hoop.

fabric wall pocket 4

Slip on the outer hoop and tighten.  Gently tug the fabric around the edges to make it taut inside of the hoop.  This is the part where you make sure you are happy with the placement of your pocket or how the print on your fabric is situated.  If not, do it over again, this is a very forgiving project.  If you’d like, you can add a couple vertical stitches down the pocket for pencils or one in the middle to divide the pocket into two.  This, of course, would be done before you place the fabric in the hoop.  When you are satisfied with it you can cut the excess fabric or tuck it behind the hoop.  Be sure to tighten your hoop real tight so that the fabric doesn’t slip out.

So that’s it!  Quick, huh?  And so easy, not to mention clever.  And since there is no glue involved, you could easily change out the fabric whenever your mood calls for it!

Monday, July 23, 2012

DIY: Shabby Fabric Flower Tutorial

Thanks to Ali Foster Patterns, this tutorial for how to add some jazziness to anything is just a little fabric away!

Fabric Flower Tutorial
Step 1: Cut out circles of fabric.  The number of circles you cut and the size just depends on the size of the flower you are making.  My circles are about 2.5″ in diameter.  You can use something circular for a template (like a cup) or you can just cut them without a template at all.  They don’t have to be exact.
Fabric Flower Petals

Step 2:   Take one circle of fabric and fold it from the center as shown in the picture. There is no exact way to fold it.
Fabric Flower Tutorial
Fabric Flower

Step 3: Using you needle and thread, stitch the center of the “petal” to your  fabric. Make sure you go through all the folds so you keep the shape. 
Stitch Through Petal
flower5

Step 4: Continue stitching your petals around until you get your desired look.
Shabby Fabric Flower Tutorial
flower10
 How to Make a Fabric Flower
Pretty easy, right?  For  a different look, try cutting squares of fabric instead of circles.

Sunday, July 22, 2012

DIY: Two Toned Ring in 5 Minutes!

Michele Ng has created this stunning fashion accessory in no time and with minimal cost to your bottom line!  I think we all have nail polish around somewhere that we could use for this project - and just think of all the varieties you can do...even using more than two colors, glitter nail polish, or making stripe patterns just to name a few!
easy steps to make a dual coloured ring in five minutes finished
easy nail polish ring tutorial under five minutes
Instructions:
Wrap a piece of wire around the finger you want to wear it on. It’s up to you if you want it fine or thick and how many rounds you want. Here, I used a 20 gauge wire that was leftover from a previous project.
Keep wrapping till you’re happy and wrap it round the end at the back to close the ring up.
Make sure to keep the edges pointing into the rest of the wire so it doesn’t poke you!
Take nail polish of your choice and paint half of it. Let it dry and voila! You have a duo-coloured ring in a matter of minutes

Saturday, July 21, 2012

DIY: Cork Tile Placemat from Wine Corks

Thanks to Creme de la Craft we have found another wonderful way to reuse those wine corks!  We absolutely love upcycle projects, and this one is right up our alley.  We get to drink wine AND make fun, easy crafts?  Yes, please.

Check out their webpage for more DIY! 

DIY: Cork Tile Placemat From Wine Corks


If you're a cork collector like me, this DIY project is for you. Wine drinkers know how many leftover corks you can accumulate over the years, so let's put them to use! Not only do I love wine, but I love using cork for crafting projects. It's easy to cut, naturally waterproof with a beautiful rustic look, and it has a cushion material that makes for the perfect handmade placemat.

The DIY possibilities are endless by simply gluing corks together. You can also make coasters, table runners, trivets, floor mats or cork boards, just to name a few. Make one for yourself or maybe a gift for a wine lover? The best part is, if you know how to use a glue gun, you'll be a pro at this project.


Follow the steps below to make your own upcycled cork placemat. 


Materials:

• Approximately 50 wine corks. Don't have some handy? You have some options: (a) drink lots of wine (b) ask your local restaurants, bars or wine shops or (c) buy them online
• Utility knife
• Hot glue gun

Tip:
Use as many red wine corks as possible to add some beautiful shades of red to your placemat.


Steps:

•  Cut corks horizontally into small pieces (about 5-6 pieceseach). All pieces should be similar in size so that when they are glued together, you can easily place objects on top, but don't worry about making them exact. A little contrast in size actually gives the finished product a beautiful look.
• Place the corks into your desired shape and glue each cork to one another using a glue gun (you only need a small amount). I suggest placing a large piece of cardboard underneath in case any pieces get stuck to your work surface.
• If they do, use a knife to gently scrape them off and remove.

Friday, July 20, 2012

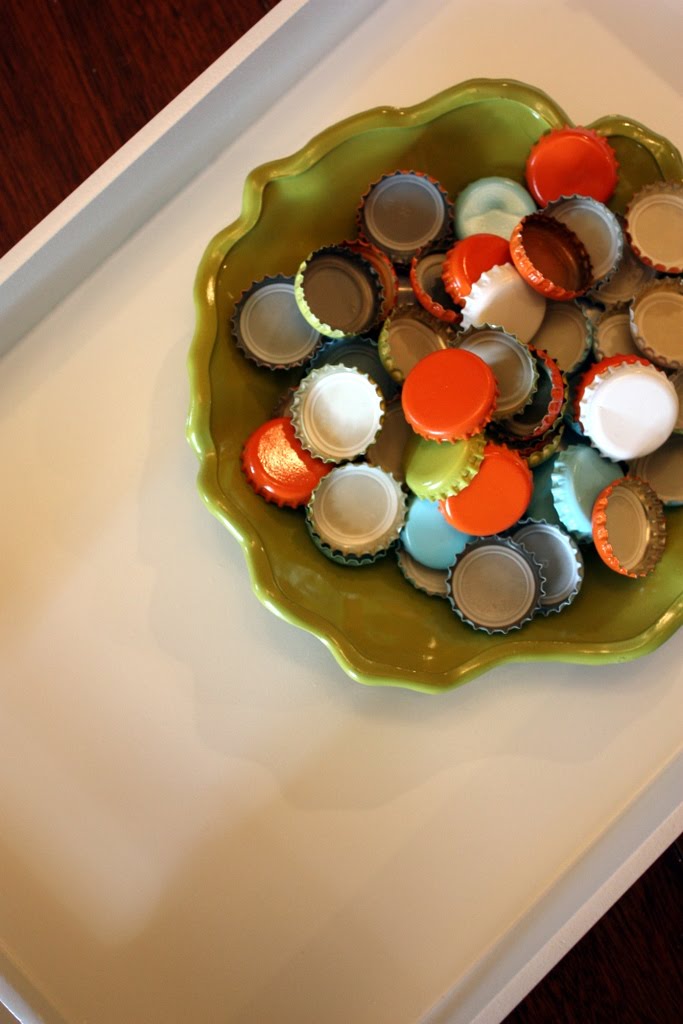
DIY: Upcycled Bottlecap Tray

We have been looking for a unique and fun way to upcycle / recycle our used bottlecap lids and thanks to Sweet Something Design's blog we found a craft we love!  These handy and detailed directions make this project all too easy.  We think we can find a cheap but fantastic tray at a thrift store somewhere and make it an every more upcycled / recycled project!

 
Spray painted a bunch of them in summertime colors: Blue Ocean Breeze, Ivy Leaf and Pumpkin Orange, and some white, all from Krylon. Make sure the handles are high enough, giving you plenty of room to contain the fluid and whatever you are submerging. At least half inch clearance. Start laying the caps in and play around with the pattern. 


Use acrylic water to pour over the caps. Now this 2 part epoxy is sold at Michael's, but I found it the cheapest at Walmart, in their Floral Dept. I followed the directions, mixing the compounds and poured it on. It's self-leveling, which is great! The tough part was waiting the 48 hours, because it cannot be disturbed at all.


Thursday, July 19, 2012

DIY: Fabric Covered Cork Boards

Sew Much Sunshine has made these adorable and loveable cork boards covered in fun and festive fabrics.  We cannot wait to make these ourselves!!  We see cork boards in our future...


You'll need a hot glue gun, scissors, fabric, cork & a pen or fabric marker.

 Trace around the cork leaving about an inch of room all the way around.

Plug the hot glue gun in and allow it to warm up. Cut fabric. Turn upside down and place the cork on the fabric. Spread a strip of glue along the edge of the cork. Pull fabric up and smoosh onto the glue with your fingers.

This is what it will start to look like. Continue all the way around.

Here's the completed cork.

Repeat with the second one.

And the third.


Wednesday, July 18, 2012

DIY: Crepe Paper Pom Poms

While we realize that the Fourth of July has passed, we feel that this tutorial is so easy and fun it's good to be used year round!  100 Directions shows you how to whip this up in a jiff, and imagine how cute this would look at a baby shower, wedding table, anniversary celebration (gold for the 50 year!), or anything really...maybe we'll just decorate the house in fun summer color just because we can!  What about you...do you love them like we do??

Paper pom pom decor

Materials you need:
  • Crepe paper streamers
  • Ribbon
  • Cardboard
  • Scissors

Step by step instructions to make patriotic pom pom decorations:

  1. Cut cardboard into a rectangle approximately 3″ x 6″. The size of this piece is directly related to how big or small your pom poms can be.
  2. Layer the colors of paper you want to use and wrap around the cardboard at least 7 times. The more you wrap, the thicker your pom pom.
  3. Slide the wrapped paper off the cardboard and tie a ribbon around the middle. Be careful to not tie to tightly to prevent tearing the paper. This ribbon can be used to hang your pom poms later, so make it long enough to tie and hang.
  4. Cut the edges of the paper, first cut the end of the loop and then cut toward the ribbon in strips.
  5. Carefully fluffy the pom pom pieces by gently pulling and moving them around until you get the desired look.
Patriotic crepe paper pom pom tutorial
make patriotic paper pom poms to decorate with