Showing posts with label wall art. Show all posts

Monday, October 29, 2012

DIY: Bird Canvas Wall Art

Blue Cricket Design has a great blog on creating your own canvas well art that looks professional and vintage.  We love the way this looks - very coffee house feeling.

Supplies Needed:
Two Canvases
Permanent Marker
Printed Birds to trace
Scissors
Paint, Wallpaper or Vintage pages to create a canvases back ground
Glue or Mod Podge


It’s easy to find images of birds online by doing an image search. Print your images on card stock or mount them on card stock to create a firm template. Cut them out and your ready to go!
To create some fun texture and interest cover your canvas in Scrapbook paper, Paint or Vintage book pages! To adhere any sort of paper mix two parts water to one part school glue or Mod Podge. Paint your paper with your glue mixture and lay smoothly on your canvas. Once the entire canvas is covered let it dry over night before moving onto the next step.
When it’s dried completely lay your two canvases next to each other.
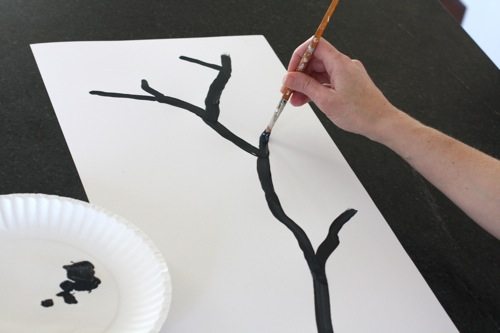
Use a pencil to free hand your tree branches. Be sure to continue your branch from one canvas to the next.
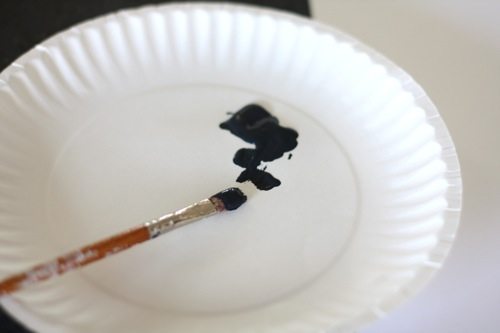
Outline your penciled sketch with your permanent marker.


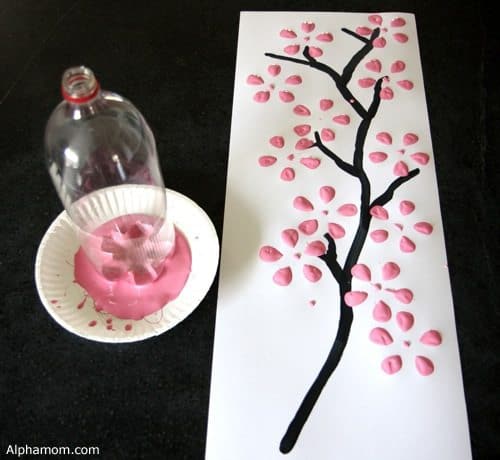
Color in your branches completely.
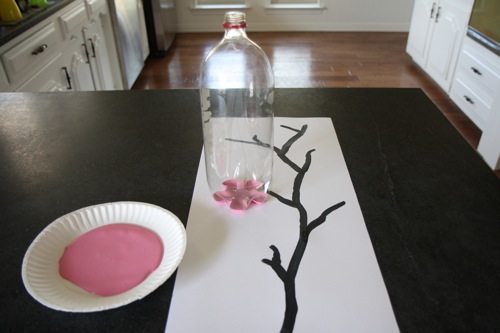
Place your bird images on the branches and trace them with a pencil. Remember you can make a bird face the other way by flipping them over!
Color in your birds.
Now we’ll add our details! Draw on leaves and smaller branches and color them in. Lastly you’ll want to color it all in one last time to insure a deep dark silhouette and to cover up any uneven marker strokes.
Hang them side by side and enjoy!

Wednesday, September 5, 2012

DIY: Embroidery Hoop Turkey

We admit the we kinda skipped over the whole Thanksgiving holiday in our mad rush to want to make Christmas DIY crafts.  So, back tracking just a tad we are putting a turkey into the mix!  We love, love, love this tutorial that comes from Gwenny Penny's blog on how to make an Embroidery Hoop Turkey!

Go to her blog to get the templates for the face and feet!!


Here's the how-to...

Materials:
  • 4" and 7" embroidery hoops
  • burlap, 7" square and 10" square
  • felt (Scraps will do for the face and feet. You'll need larger pieces for the feathers.)
  • cardboard (I used a Cheez-It box from the recycle bin.)
  • glue gun
  • scissors
Instructions:

Step 1: Print out these templates at 100% (no scaling, do not "fit to page")...

Step 2: Stretch your burlap inside of your embroidery hoops.

Trim the burlap to 3/4" from the edges of the back of the embroidery hoops. Use your glue gun to glue the edges of the burlap to the inside of the back of the hoops.

Step 3: Take your two embroidery hoops and place the smaller hoop over the top portion of the larger hoop, making sure that the screw on the smaller hoop is at about 5 o'clock. The felt snood will cover the screw. Use your glue gun to glue the two embroidery hoops together like so...

Step 4: Using the templates from Step 1, cut out the beak (yellow), snood (red), two eyes (black or dark brown), and two feet (brown) from your felt.
The red piece is called the "snood". Ignore the feet in this picture... I ended up cutting the legs shorter.
Use your glue gun to glue your felt face pieces to the small embroidery hoop, covering the screw on the smaller hoop with the red snood.

Flip your hoops over and glue the feet onto the back of the large embroidery hoop.


Step 5: Cut out your felt feathers using the large feather template from Step 1. You need five feathers. I used green, yellow, purple, red, and orange felt. Cut out 5 cardboard feathers using the smaller feather template.

Use your glue gun to glue one cardboard feather to the back of each felt feather. This will add stability to the feathers so that they won't flop over when your turkey is hanging up.

Step 6: Fan out your feathers to your liking. Set your turkey body on top to make sure you like the look of it and that it fits. Remove the turkey body. Starting with the bottom layer of feathers, begin gluing the feathers to each other everywhere that they overlap until all five are firmly attached together.

Glue the back of the large embroidery hoop of your turkey body to the feather assembly. You're done!

Sunday, September 2, 2012

DIY: Thumbtack Art!

We will take a brief hiatus from holiday crafts to show you this wonderful DIY project from Things Bright's blog!  We can see all sorts of quotes, song lyrics, or just fun sayings that could be used here.  Perhaps even a variation that could be holiday themed?  We know you can get plain white thumbtacks from Wal-Mart for $0.88 and you could paint them with any color or even use polka dots, glitter, stripes, or anything!  Have fun with it.
You Me Oui Thumbtack Art
Happy Monday, friend!
I made myself a bit of art for my wall completely inspired by Pakayla Biehn’s Neon which I featured this morning.
It was so fun!
You Me Oui Thumbtack Art
Earlier that day I had gone thrifting and found giant graph paper and vintage thumbtacks. I had no plans, but as per usual, figured I’d use them for something, or put them in my vintage shop. (I’m working on some paper ephemera kits.)
Same for the canvas.  A friend who was moving didn’t want the art she’d made for her daughters old room and didn’t want the canvases either.  Guess who knew the canvases would get used for something sooner or later?
Then, idea! What if I made some thumbtack art?
I’ve been wanting to add some metallic shine to the living room. But what to make? I thought of a compass or star…but neither felt right for the moment. And then I remembered totally crushing over Biehn’s neon sign, wishing I could have it.
I love the simplicity and cleverness of the play on words!
You Me Oui Thumbtack Art
Once that was settled, I put my new graph paper to work.  I outlined my canvas, then free-handed the words.  Me turned out perfectly sized and centered, and then I rewrote you and oui a couple times.  It took a bit to get the Y and Os the way I wanted them.
(I’m almost sure there’s some messed up psychology in there somewhere!)
You Me Oui Thumbtack Art
I also played with the idea of painting our last name in gloss along the OUI at the bottom. 
When I first realized I had to remember how to spell Drouillard, I thought, “But I took Spanish!”  But even I knew oui was yes in French, so once I realized that, I was helped immensely.  Ever since then, designs with oui in them, like this bag, have made me happy.
But I think I was complicating the design.  I couldn’t figure out how to make it look cool because putting “dr OUI llard” on there, even in a hint of gloss, brought the OUI off-center.
Besides, now it leaves something for people to figure out, since I didn’t literally spell it out for them. 
(Except you, of course.)
You Me Oui Thumbtack Art
After I spray painted the canvas olive green – because I like olive green and gold – I originally started thumbing the tacks right through the paper onto the canvas.
You Me Oui Thumbtack Art
At this point I started realizing two things….
One,  I was not going to be able to just tear away the paper when I was finished.  Those tacks held it tight.
You Me Oui Thumbtack Art
Two, those tacks needed something more to hold onto than just the canvas.
So I recycled a bunch of cardboard box pieces into the back of the canvas and taped them in with painter’s tape. 
I have nice brown packing tape somewhere that would have looked better, but I couldn’t find it.  I’m thinking my little urchins may have used it up. That is usually the cause of “lost” craft supplies for me. 
(But oh well, no one but will see the back anyway, right? Ahem.)

You Me Oui Thumbtack Art
I also took all the Y tacks back out, firmly, and then firmly but gently traced all the letters over a few times and put dents in the canvas. 
I’m sure there’s a better way to transfer these with carbon paper or something, but this is what made the fastest sense at the time.  I forgot to get a good shot of that, but you can see the rest of the M and the top of the E at the bottom of this photo if you look carefully.
You Me Oui Thumbtack Art

Thursday, July 19, 2012

DIY: Fabric Covered Cork Boards

Sew Much Sunshine has made these adorable and loveable cork boards covered in fun and festive fabrics.  We cannot wait to make these ourselves!!  We see cork boards in our future...


You'll need a hot glue gun, scissors, fabric, cork & a pen or fabric marker.

 Trace around the cork leaving about an inch of room all the way around.

Plug the hot glue gun in and allow it to warm up. Cut fabric. Turn upside down and place the cork on the fabric. Spread a strip of glue along the edge of the cork. Pull fabric up and smoosh onto the glue with your fingers.

This is what it will start to look like. Continue all the way around.

Here's the completed cork.

Repeat with the second one.

And the third.


Friday, June 22, 2012

DIY Puffy Paint Wall Art

What a great idea from Virginia & Charlie's Blog!  Using Puffy Paint on wax paper they were able to transfer a great pattern (see below) onto canvas with mod podge (be sure to check out my blog on how to make your own Mod Podge for a fraction of the cost!).  
 
You can pick any pattern or words to trace over!  We are thinking quotes from your favorite people.  You don't have to use white puffy paint either - get colorful and maybe even get the glitter puffy paint and go all out...
 
We'd love to see what you come up with for yourself!
 
I found this pattern on Pinterest.  I love the colors together, but I really love the pattern.  I decided to use this as my inspiration for a project.  I've got a lot of blank canvases around so I thought I'd use one up.

I drew my own pattern and then used puffy paint on top of wax paper to draw it out.

Thursday, June 14, 2012

Cherry Blossom Wall Art from a Recycled Soda Bottle

Here is a great wall art tutorial from Alphamom!
We like the idea of using a canvas instead of poster paper, but it really depends on it you plan to frame your art or not!  You may even want to consider adding some rhinestones or glitter for added pizazz - but it is absolutely gorgeous as is!
 
Make cherry blossom artwork with a recycled 2-liter soda bottle as a stamp! Here are the detailed instructions.
Start by using dark paint to paint a branch on poster board. Branches are easy to paint. If you can’t paint in a straight line, it looks even better.
I cut this piece of poster board in half lengthwise because I want it to look more like an art panel than a poster (or use canvas!).
Once the branch is painted, let it dry before continuing with the stamping.
Now let’s do the stamping. Pour some paint on a paper plate and dip the plastic bottle.
The bottom of 2-liter soda bottle has five points like the five petals of a cherry blossom.
Press the plastic bottle on the poster board, then lift up. Dip the bottle in more paint each time you repeat the stamp. This is really fun, add as many blossoms as you want.