Showing posts with label bridesmaid. Show all posts

Sunday, October 21, 2012

DIY: Easy Screen Print T-Shirt

We just love this tutorial from Calico Skies blog showing how to make a quick and easy (and CHEAP) screen printed t-shirt!

Be sure to check out her blog for more!!

Here's what you need:
Shirt (thrifted), modge podge, fabric paint (this was my first time using Martha Stewart's all-purpose acrylic paint and it's amazing!), design, cardboard piece, embroidery hoop, nylon or panty-hose fabric, paintbrush, and permanent pen.
1. Create a design for your screenprint. I started with something simple since it was my first time using this method. Later, I did a more elaborate design for the front of the shirt, after I did this first heart as practice. Make sure that your that your embroidery hoop is large enough for your design.
2. Stretch the nylon over the hoop so that it is taut.
3. Trace your design using a a permanent pen.
4. Using Mod Podge, paint the "negative space", or, the space that you do not want to be painted.
5. Fill in the whole area, making sure there are no holes or gaps. I was obsessive about this because I didn't want the paint to seep through. Let dry completely. It took about 3 hours for this little one to dry.
6. Lay the hoop flat on the shirt and position where you want the design to be, and place a piece of cardboard beneath the area so that the paint doesn't bleed through the back. Squirt a generous amount of paint over the design.
7. Use the cardboard to spread the paint over evenly.
8. Carefully lift the hoop off the shirt and voila!
9. Let the paint dry completely before wearing.


Saturday, September 8, 2012

DIY: Dollar Store Party Favor Makeover

So, sometimes we see things at the Dollar Tree that we love but can't figure out what to do with other than the way that it comes.  This is what Crafting Rebellion has helped us see past with their great blog on making over party favors from the dollar store.


When I was at the dollar store I noticed a package of wedding dress party favor boxes. 10 for a dollar, what a deal!  All you need is scrapbook paper, some embellishments, and a spool of inexpensive pliable wire to make the mini hangers. This project is very similar to paper dolls, you get to "dress up" your boxes. Once made they could hold chocolates, almonds, mints, M&M's, little nail polish or a small gift.  Add tulle to the front of the dress and it could be a little girls princess dress. Use leopard print and hot pink for a bachelorette party, or shower.


You will need:

Wedding dress Favor Boxes (I found mine at the Dollar Tree store. They come 10 boxes for $1). I have the link to Dollar Tree at the bottom of the page but they also include the groom boxes online. 

Scrapbook Paper

Spool of pliable inexpensive wire (I used what I had on hand so I am not sure of guage. Just look at the inexpensive wire in the jewelry section at the craft stores and find one that is thick enough to make a small hanger)

Embellishments of Your Choice (I used bling on a roll for the gem sashes, and ribbon flowers).

Taper Runner and Glue Dots

Thin ribbon to tie the box together (optional) you can use the sheer white ribbon that comes with the boxes. 

Scissors 

Wire Snip (optional, you can use scissors)

ColorBox Chalk Inkpad (optional) if you want to distress your box edges.


The "before" box...cute design but pale printing.

Start by opening your package of dress boxes. Take one out and cut off one of the dress sides. 

This is now your "template" to cut the scrapbook paper dresses. (Remember you will need to use just one of the boxes to cut apart for the template when you figure your total favor boxes to buy). 


Use the dress template and cut two pieces of scrapbook paper. I held my template and trimmed around it. You can be more precise and also trace the template onto the back of the paper.


Attach the scrapbook dress pieces with tape runner by matching them up to the dress on the box.

Distress your edges if you prefer. If you aren't totally exact, trim your excess edges.

If you want to get fancy you can also cut a top in a different paper, and attach. (I chose to keep it simple using a full dress).

Now create your wire hanger.

Cut a piece of pliable wire approximately 9" long.

Centering the wire bend the sides into a triangle at 2 1/2" wide.


Wrap the wire around at the top of the triangle. The wire is very soft so you do not need to use pliers.


Snip the extra from the wrapped end off with wire snips or scissors.

Bend the hook at the top and snip to the desired length. I smooth out the hanger to shape it with my fingers.


Put your dress box together and tie it shut with a ribbon of your choice. You can use the ribbon they provide, but I liked a longer piece of ribbon.

Now attach the wire hanger to the "inside" of the front of the dress box by putting some tape runner in the middle and bottom part of the hanger wire. Press onto the inside of the dress. 

Have fun embellishing your dress to match your party theme. I cut little pieces of "Bling on a Roll" and stuck them to the front of the waist ribbon. I also added fabric flowers to some of the dresses using glue dots.

Make a batch of dresses in the same style and fill with candy, jordan almonds, mints, or other little treats.


Wednesday, August 22, 2012

DIY: Faux Braided Bangle Bracelet

How gorgeous are these?  We love, love, love dollar store crafting!  Thanks to Studs and Pearls for making this fabulous tutorial.


Supplies:

- 4 thin metal bangles

(or less/more, depending on the thickness of each bracelet and your desired look)
- Measuring tape, scissors, Scotch tape
- Any kind of flat fiber of your choice, such as ribbon or leather cord.
I used this interesting ribbon yarn, Lion Brand Incredible® Yarn in City Lights. (c/o Lion Brand)
- Clear nail polish (optional)


I love the colors of this yarn. So bright and fun.


1) If you're using more than 2 bangles, loosely tape 2 and 2 together. You'll be working with each pair of bangles separately, wrapping the yarn around each pair and weaving in between them. The tape will help hold the bangles together while you do this.


2) Measure and cut about 200 inches of yarn/ribbon/etc. This will probably be more than enough, but it's always better to have too much than too little!


3) Insert the yarn through the bangles, positioning it so that there is an equal amount of yarn on either side. (ie: Fold the yarn in half, and let the bangles drop to the center of the fold).


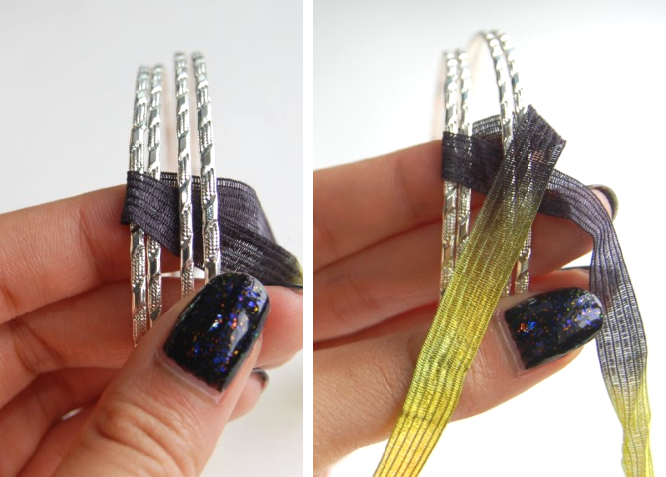
To make this easier to follow, start with the same side I did and follow from there. Holding the yarn in place underneath the bangle, take the yarn on the left side and bring it over the left pair of bangles.


4) It may be a little awkward to hold the bracelets at first, but everything will start to take shape as you go along. Take the yarn on the left side, and bring it over the left pair of bangles and under/through the right pair (first photo). Next, take the yarn on the right side and bring it over the right pair of bangles.


5) Bring the right strand under/through the left pair of bangles. This completes one "weave". Gently pull on the strands to slightly tighten it. Continue from there, with the left strand going over the left pair of bangles (as seen in the second photo).


6) This strand will then go under/through the right pair. The right strand will then go over the right pair...


7) ... and under the left pair of bangles. You'll start to see the "braided" look form, as you can see in the first photo above. Continue with this same method the entire diameter of the bangles. Left strand over the left pair, under/through the right pair, right strand over the right pair, under/through the left pair. Don't forget to pull gently so that the "braids" stays in place.


8) Whenever you come across the tape, simply remove it and continue braiding.


9) The braided look will start to emerge as you work along the bangles. Be sure to keep the tightness of your weaving consistent.  Between this method and the type of ribbon yarn I used, I really like how the colors stood out in this bracelet!


10) Keep working around the bracelet...


Eventually, you'll reach the point where you started.


11) Tie both strands into a tight double or triple knot. Cut away the excess.


12) If you'd like, dot some clear nail polish onto the knot for some extra security. 


Thursday, August 9, 2012

DIY: Plastic Spoon Rose Jewelry

This wonderful tutorial from Cut Out + Keep shows a way to recycle / upcycle your plastic spoons.  We think that this would also be beautiful with color spoons from parties, barbecues, or other events!  Think of all the fun you can have being creative with this one.

Completed Project: Plastic Spoon Rose Picture #1

Instructions 
  1. 1
    Step 1
    You can use any colour spoon you want or you can also spray paint them afterwards.
    see picture
    - cut off the handles using scissors
    - when you have 17 (10 for outer petals, 5 for petals around the 2 in the middle)

  2. 2
    Step 2
    - Light the candle
    - Take your needle nose pliers to hold the spoon.
    - Try not to keep the spoon too close to the flame as it will cause blackening of the plastic.
    - Melt the bowl of the spoon and heat the underside.
    - let it cool down a bit but while it's still warm and bendable shape the petal by pulling the tip and bending it backwards with your fingertips.

    - You could speed the cooling down up by blowing.
    Repeat- this step for all 17 petals.

  3. 3
    Step 3
    - Beginning with the 10 outer petals take two spoons and melt what's left of the handles. Fuse placing them next to each other and smooth out the melt until the handles stick together. You could use the needle nose pliers to do this since the melted plastic is incredibly hot!
    - Repeat this 4 times so that you have 5 sets of 2 petals.
    - Now melt the handles of 2 sets and stick them together.
    - Repeat this step until you have the 3 pieces of the rose.

    This will take a while to figure out which is the right way to assemble all pieces.

  4. 4
    Step 4
    - Glue the pieces together with a glue gun or by melting the bottom side of the petals.
    - Insert the 5 petals into the 10 petals and the 2 middle petals into the 5.
    See picture.
    Now that your rose is finished melt the bottom of the rose and push it flat (I used a saucer to push it flat). Once it is flat enough melt the plastic again and push a safety pin into it and secure by laying a small piece of melted plastic over the safety pin.

    Optional:
    Pendant - hang it onto a long jewellery chain.

Monday, July 30, 2012

DIY: Felt Bead Necklace

We admit that we have wanted to try a felting project forever now!  This seems like the perfect catalyst to begin a new crafting obsession!  This wonderful and straight forward tutorial from Dans le Townhouse should make you feel inspired, too!


Basically, felting a ball is super simple.  Start with a wool roving and tear it apart like you would cotton candy.  Add a bit of dish soap, a bit of water, roughly shape it into a ball and then start rolling it between your palms like you would a piece of clay.  Rinse it in hot water, then cold, to "shock" the fibres into felting (you continue doing this throughout the rolling process).  It will feel like it won't work, then it will start to felt.  Trust me.  Add increasing pressure as your felt ball becomes firmer and when it is nice and firm, set it aside to dry for a day or two.  Remember your finished ball will be smaller and denser than the rough ball you created when the roving was dry.  Once my beads were dry, I simply strung them with some heavy duty beading thread and the sharpest needle I could find.  You can fuss with a clasp or just tie a knot and slip it over your head.   

Wool Roving

Wool roving pulled apart and ready to shape
How NOT to create a felted ball - squoosh too hard in the beginning

Lay out the beads as you work to get a sense of the pattern.