Showing posts with label summer. Show all posts

Friday, July 13, 2012

DIY: Workout Shirt!

Falling behind on that New Year's Resolution for a healthier life?  Want to just hit the gym more often?  Tired of spending money on gym clothes??  Here is a fantastical tutorial from Rabbit Food for My Bunny Teeth that will get you back on track or just more budget friendly!

DIY Workout Shirt
Makes 1 sexy little tank
Ingredients:
1 old T-shirt
1 pair of scissors
20 minutes
1. Start with a pre-washed T-shirt. Any old shirt will do! The bigger the better.
2. Cut away the ribbed neckline and bottom hem. For the sleeves, cut downwards starting from the shoulder, determining how thick you want your straps. Cut straight down and then begin to curve down below the armpit seam.
3. Determine how low you want your front neckline, and cut away.
4. Flip the shirt over and make a narrow racerback, curving inward from the armpits.  Then cut a deep “V” shape from the top neckline.
5. Using the excess bottom hemline, stretch it out until it becomes one long string of fabric. Knot the string a couple of inches above the bottom of the “V” shape.
6. Wrap the string all the way down around the center of the racerback, and back up to meet the other ends. Knot the ends together tightly. Trim the loose ends.
7. To give your tank a high-low look, lay your shirt sideways, flattening it out evenly. Starting a few inches up at the front of your shirt, start cutting diagonally until you reach the back.

Thursday, May 24, 2012

Perfect Summer DIY Quote / Statement Bangle

As soon as I saw this awesome, easy, and cheap tutorial from Lumi - I fell in love with the idea.  What a great way to make a bangle bracelet and to get it to say exactly what I want it to say!  This would be ideal as a gift for a friends or loved one and you could personalize it with their name or a message.  

Be sure to check out her fantastic tutorial for full details and other amazing crafts!

Some well done photos and a little bit of the process to entice you!

Prepare. All you'll need for this project is a raw wooden bangle, a black paint marker, plastic wrap, and some Inkodye! 

Write your message on a piece of plastic wrap big enough to wrap around  the bangle.

Practice wrapping it around your bangle to see how it'll look. Once your satisfied with your message, you can put the plastic wrap aside while you move onto the next step.

Take the Inkodye color of your choice and pour it onto a plate or palet. You will need very little dye for this bangle, so don't pour too much!


Cover the entire bangle with inkodye for a nice even shade. We also painted the inside to keep things easy. 

Make sure to remove all excess Inkodye and keep wiping until the bangle feels dry. And don't worry about wiping too much--the Inkodye has already been absorbed into the wood.

Take your plastic wrap and place your message wherever you want! Once you're happy with the placement, pull the plastic wrap taut by gathering it towards the back of your bangle.

Take the gathered saran wrap and twist it towards the middle. Tape in place. 


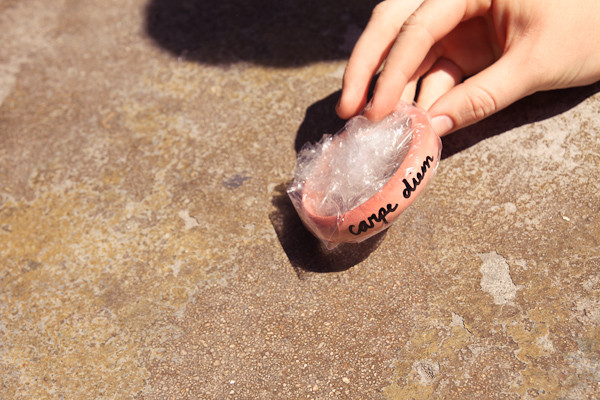
 Bring your wrapped bangle out into the sun. The color will start to appear instantly! 

Leave the bangle out for four minutes on each side. We recommend turning it front to back and flipping it upside down to ensure all areas develop fully.


 Once it's finished, bring the bangle inside and cut through the tape and saran wrap.

Peel back the saran wrap to reveal your dyed message! Once all the plastic is removed, it's ready to be washed.

We recommend preparing a very hot wash bath using dish washing detergent as soap.  Let the bangle soak for at least 20 minutes, occasionally scrubbing the printed part with a brush or a sponge.


Flaunt your one-of-a-kind summer bangle and don't forget to carpe diem!