Showing posts with label jewelry crafting. Show all posts

Saturday, November 3, 2012

DIY: Embellished Resin Rings

We love Mod Podge, and are actually obsessed with Mod Podge DIYs.  We think it was made just for us since it's easy to use, quick drying, and pretty fail proof (which we have put to the test).  

Thanks to Tatertots and Jello for helping to keep our addition alive with this wonderful resin ring DIY!! 

Hey Jelloheads!  That’s totally what a follower of Jen’s is called, and I am one too.  It’s Amy from Mod Podge Rocks – your guest host today.
If you don’t know me, I blog about Mod Podge and everything that you can do with it.  I also love the color blue, garden gnomes and pugs.  In my spare time I’m writing a book (that Jen is going to be in!) and I’m training for a 1/2 marathon.  Nuts?  Maybe.  Loveable?  I hope so.
Jen has been obsessed with Mod Podge Dimensional Magic lately, and I can’t blame her.  It’s completely awesome.  I made these rings, one of my favorite (and easiest) Dimensional Magic projects, and I’m going to share with you the three step tutorial. 
YES, it’s that easy.  

T
hey are so inexpensive, you can use existing supplies that you have and they make great gifts.  Here we go.
Supply list:
Ring blanks – purchased at Michaels
Mod Podge Dimensional Magic
Martha Stewart Microbeads – shown in Peridot and Blue Topaz
Embellishments – I used Making Memories Deco Brads – Shimmer and With Love Flower Brads
Keep in mind that if you don’t have the microbeads, you can use paper – just cut it to fit and stick it down in there with Mod Podge.  Okay, so here we go.
Get some ring blanks from your local craft store.  They are pretty inexpensive.
Find a place to secure your ring blank and add a thin layer of Dimensional Magic to the bottom.  Note – never shake your Dimensional Magic bottle.  It adds bubbles.
Shake some beads into the Dimensional Magic.  Let it dry and then dump off excess beads.  If you haven’t filled the ring blank, repeat (you can layer Dimensional Magic).
Add another layer of Dimensional Magic on top of your beads and then stick in the embellishment.  Let dry in a warm place (NOT under a fan) for several hours.  You’re done!  Repeat with as many rings as possible.

Wednesday, October 31, 2012

DIY: Chalkboard Necklace

Henry Happened blog is great for easy, quick, and inexpensive DIY tutorials!  We particularly like this one that shows how to make a chalkboard necklace.  This is a great accessory because you can change the way it looks based on your mood!

Check out their blog for more quick jewelry DIY!

chalkboard necklace diy - finished!

What you’ll need:
  • Rust-oleum specialty Chalk Board spray
  • a bezel pendant (you could find one at your local bead store or even purchase one through Etsy…this or this would do nicely)
  • finished chain
  • a scrap of satin ribbon
  • glue (I highly recommend a tube of E6000, it is inexpensive, amazingly strong and long lasting!)
  • painter’s tape
  • newspaper
  • basic white chalk
chalkboard necklace diy - supply roundup
STEP 1:  Using the painter’s tape, tape your pendant down onto your newspaper being careful to cover any areas you don’t want “chalk boarded” with the tape.
STEP 2:  In a well ventilated area (i.e. outside) apply 2-3 light coats of “Chalk Board” spray to the exposed surface of the pendant (wait approximately 3-4 minuets between coats).  Let dry.
chalkboard necklace diy - taping & chalk spray application
STEP 3:  Once the “Chalk Board” finish has had time to thoroughly dry (a couple of hours or so should be suffice), carefully remove the protective painter’s tape from the pendant.
chalkboard necklace diy - removing the painters tape
chalkboard necklace diy - fchalkboard application applied and dried!
STEP 4:  Tie a bow with your ribbon.  Trim ends to desired length.
chalkboard necklace diy - making the ribbon bow
chalkboard necklace diy - trimming the bow
STEP 5:  Using your glue, secure bow to top of pendant.
chalkboard necklace diy - attaching the bow
STEP 6:  Attached pendant to chain.
chalkboard necklace diy - pre message (a blank slate)
STEP 7:  Using your chalk write the message of your choice onto the pendant (using the edge of a brand new piece of chalk will help you write small and clearly).
chalkboard necklace diy - finished!
STEP 8:  If you are giving as a gift, place pendant and a piece of chalk into a gift bag (I chose an organza gift bag with a bit of a shimmer in a fun, bright color).
chalkboard necklace diy - finished!
Voila, a sweet chalkboard necklace!
chalkboard necklace diy - finished & modeled

Sunday, October 21, 2012

DIY: Neon Paper Bead Earrings

Plaid 130508 Mod Podge Dimensional Magic 2 Ounces (Google Affiliate Ad)
Dollar Store Crafts has done it again - another amazing and easy tutorial that we just can not wait to try!!

You must go to their blog, you'll love it.  Trust us.
Neon Paper Bead Earrings
I created some circular beads with the help of some neon paper, Mod Podge, and Mod Podge's cousin Dimensional Magic. I love the possibilities of turning a little piece of paper into a decorative bead you can use for lots of different kinds of jewelry! Read on to find out how to do it.
Project Materials:
  • Assorted paper (I used neon), on hand
  • Paper punch (I used a 3/4" round punch), on hand
  • Small hole punch, on hand
  • Mod Podge, on hand or about $5 and up a bottle
  • Dimensional Magic, about $5 a tube
  • Earring Hooks, on hand or $1 and up
  • Black thread, on hand
  • Foam brush, on hand
  • Wax paper, on hand
Total: $5 and up
Supplies: I had all this stuff on hand. If you have the Dimensional Magic on hand, this project is basically free. If you DON'T have any DM on hand, I recommend it because it is a very fun supply! What is Dimensional Magic? It's a water-based glaze that has the look of resin, but without the mess, the mixing, or the uncertainty. 
One thing you need to know about Dimensional Magic is that it takes several hours to dry, so plan on an afternoon, or overnight, for creating these beads.
neon circles made with dimensional magic

How to Make Dimensional Magic Paper Beads:

1. Mod Podge the paper you want to use, and allow it to dry. Then Mod Podge the other side.
You need to seal the paper before you coat it with Dimensional Magic, and it is easier to Mod Podge it before you punch it as well.
2. Punch the Mod Podged (and dried) paper. Make sure the paper is completely dry, or you will muck up your paper punch.
3. Lay a piece of wax paper on a sturdy surface (such as a cookie sheet), and put the punched out paper discs on top of it.
4. Put a light coat of Dimensional Magic on each disc. You might want to use the "royal icing" technique of piping around the edge of the disc, and then flooding DM inside the bead. Don't use too much DM. A light coat will do.
Allow the Dimensional Magic to dry completely - at least several hours or overnight.
5. When the DM is totally dry, turn discs over and cover with Dimensional Magic and allow to dry.
6. When completely dry, you can punch a hole in the disc with a small hole punch. You might have a little leakage of Dimensional Magic on the edges of the beads. Just trim it off with scissors.
7. String as desired.
DIY paper bead neon earrings

To Make Neon Paper Bead Earrings:

1. Tie some black thread around each bead.
2. Tie thread to earring wires.
3. Rock the earrings.
Neon earrings
4. Get kissed by boys.
neon earrings
5. Get made fun of for wearing earrings that look like they're made of garage sale price tags.
6. Yes, this blog is cheap, but it's not THAT CHEAP.

Wednesday, September 19, 2012

DIY: Upcycled Paper Beads

Mad Mim's blog by Miriam Tribe has a great tutorial on how to make homemade paper beads using recycled / upcycled magazine paper.  Magazine paper really is one of our favorite materials.  There really are so many things you can do with it once you've finished reading it.
paperbeads17 Paper Bead Tutorial
What you’ll need:
-magazines, colored paper, tissue paper, toilet paper (ok, maybe not) but really. Just get yourself some paper.
-Elmer’s glue, Modge podge, and some kind of varnish. I used spray polyurethane. One lady said she used Future Floor Finish, and another said she used nail polish.
-scissors, or a rotary blade, quilting ruler and cutting mat (way faster)
-round toothpicks
-something to stick your toothpicks in like a styrofoam tray or packing materials, or cardboard box.
-a paintbrush

paperbeads1 Paper Bead Tutorial
Before you start cutting, I’ll say a word about paper choice. For beads that are mostly one color, choose an image that is mostly one color. Ok, so that’s logical, but just play around with different kinds of images i.e. colorful, more solid, mostly solid, monochromatic etc), and you’ll quickly get an idea for what kind of image creates what kind of bead.
Cut your strips: Measure 3/8″ from the bottom edge and mark.paperbeads2 Paper Bead Tutorial
Measure 3/4″ away from top edge and mark.paperbeads3 Paper Bead Tutorial
Now cut from the very top corner to your bottom mark. This prepares your next cut to be centered and the right size.
paperbeads4 Paper Bead Tutorial
Cut from your top 3/4″ mark to the bottom corner. paperbeads5 Paper Bead Tutorial
Repeat until you have what you need. At first I just was going for an assortment of colors, but then for a subsequent project I was looking for very specific colors, and only cut out as many strips as I needed to complete that certain project. You don’t have to use the full-length of the page either, and you can measure or longer than I have to make shorter or longer beads. Not a science here. You can also make rectangle strips to create tube beads, which I am using for another project. paperbeads6 Paper Bead Tutorial
Start rolling a strip at the wide around a ROUND toothpick. You can use anything here, just as long as it’s pretty slender. Tooth picks are nice though because they’re reusable, yet disposable. Some people have special paper bead rolling machines. paperbeads8 Paper Bead Tutorial
Keep rolling until you reach the very tip, paperbeads9 Paper Bead Tutorial
and then add a dab of glue (anything type of glue will work here, I just liked elmer’s because it was easy to squeeze right onto the tip), paperbeads10 Paper Bead Tutorial
and then wind the last bit of paper around the bead and hold until it stays. I usually rolled two beads per toothpick, and rolled all my beads to this point before I started mod-podging/varnishing.paperbeads11 Paper Bead Tutorial
Coat the beads in Mod Podge,
paperbeads12 Paper Bead Tutorial

paperbeads13 Paper Bead Tutorial
and then stick into your styrafoam tray or box or whatever.  Recoat after a good 4-8 hours. Or don’t wait that long, I won’t judge you. paperbeads14 Paper Bead Tutorial
Now varnish. I just took my tray loaded with toothpicks outside and sprayed (two coats) of my polyurethane. I had semi-gloss, and wished I had high gloss. The more shine the better I say. If you use nail polish, you’d just paint again. If you use that floor finish or something that came in a tub or can you could just dip those suckers in. Just allow lots of drying time in between coats, and let them  thoroughly dry before you use them (only judging you a little bit if you can’t wait).
paperbeads15 Paper Bead Tutorial
Remove from the toothpicks

Friday, July 27, 2012

DIY: The Ten Minute Bracelet

What a great fashion accessory that can be made in no time at all!  We love this tutorial from Happy Hour Projects.  Check out their blog for more great DIY!!


I didn't invent this design or anything - I'm sure you've seen variations floating around on Craftgawker and Pinterest.  But I finally made some - there's hardly even a tutorial involved, they're such a quick thing - and I will give you some hints for keeping it as simple as possible.

First of all, my focal pieces are links from a chain I picked up somewhere along the line.  I just used a pair of wire cutters to remove a few links.

Think creatively here: you can use anything round, or anything that has two holes.  Anything that you can tie two sets of twine to.  Washers, connecting charms - just raid your box of things-you've-been-hanging-onto - you may surprise yourself at what you can find that will work!

Cut six lengths of 18" (give or take an inch or two) twine.  I have LOTS of hemp leftover from the wish bracelets and word bracelets I made, so that is what I used.  If you're low on twine you can make this with four strands, but braiding with four strands takes more time than a traditional braid for me, so to keep this *simple* I'm going to tell you to use six.  You could also use embroidery floss here, cotton twine - really, anything you like the looks of!

Take three of your strands, and double them in half, so that you have six loose ends, and three loops in the center.  Take the loops and thread them through your focal ring.

(You'll notice there are only two in the photo - when I took my photo, I hadn't yet discovered how much slower I would be at a four-strand braid.  So yours will have three loops here.)

Thread the tails of your string through the loops of the string - making a knot.  Knot people, help me out here - isn't this a square knot?  **Update** - many thanks to Salla for solving this mystery, it's a lark's head knot.  A square knot would tie two loops together.  I learned something today, thank you!!

Anyway, knot it with your lark's head knot, and do the same on the other side of your focal ring.  Like so.

Now, separate your strands for your braid.  Remember, you will have six (I fixed that below).  Just divide them up two, two, and two.  I find that clamping it into my clipboard really works the best to secure it while I braid.  And yes, my clipboard does have a giant pink flower on it. :P

Now, just braid it like normal!  If you have decided to use more or less twine, there are methods to braiding any number of strands out there.  But to keep this fast, I used a traditional braid.  It took me maybe a minute to do each side this way.  Once you get to the end, tie an overhand knot to finish it off.  That's it.  Super easy!

You could also fancy it up and attach end caps and a clasp, or even a button and loop end.  But with the twine, just tying it like a friendship bracelet really seemed the most appropriate to me.

Sunday, July 15, 2012

DIY: OIympic Necklace

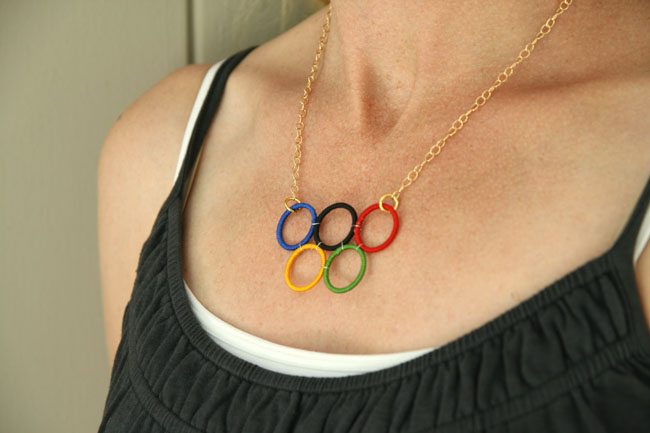
What a great fashion accessory from Remarkably Domestic's blog for the upcoming Olympic Games!  This idea is also easily adjustable to make fashion jewelry for anything!  You know you can't wait to get this started....

We’re starting to get a little excited about the Olympics over here. We aren’t a big sports family, but RD Husband has one sister who was an athlete in the Olympics in 1988 and another who has coached Olympic teams. So we have a soft spot for the games.
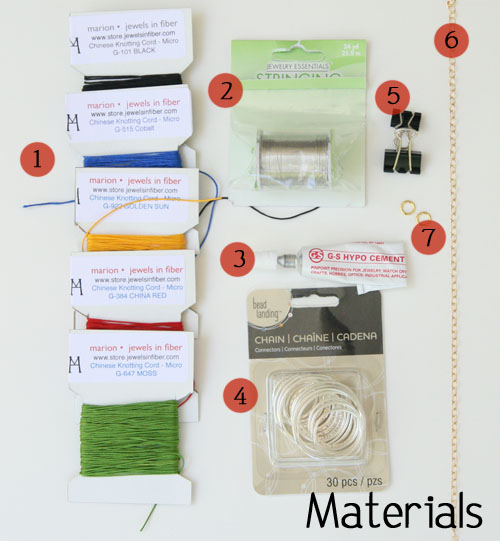
This necklace is easy and inexpensive to make. Here’s what you’ll need.
  1. Cord in 5 different colors: red, green, yellow, blue, and black. I used Chinese knotting cord in micro size G, which I ordered from here. You could also use crochet thread, embroidery thread, or embroidery floss, all of which are readily available at craft stores.
  2. 26 Gauge Wire
  3. G-S Hypo Cement, or another strong jewelry-type glue. Michaels carries Aleene’s or E-6000, which both should work.
  4. 5 rings (I actually bought a cheap Claire’s Accessories necklace and took it apart, but you can find these at Michaels in different sizes, too).
  5. A few binder clips
  6. Chain in desired length. I used about 17″, divided into two lengths of 8.5″. You could get something simple and inexpensive like this, or check out a jewelry supplier like Rio Grande or Fire Mountain Gems.
  7. Two jump rings and one clasp. (The clasp isn’t pictured. Sorry!)
Most, if not all, of these things can be found at Michaels or JoAnn Fabric.
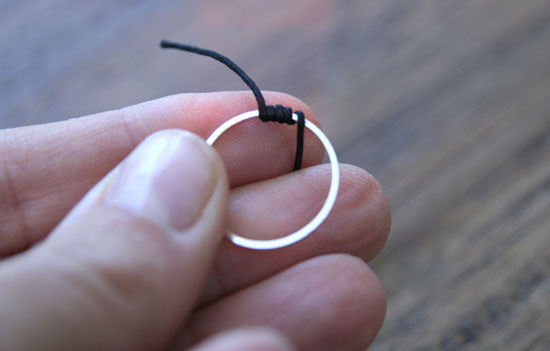
First step is covering your rings in the cord. You want to attach the cord with glue at the beginning, wrapping it a few times around.
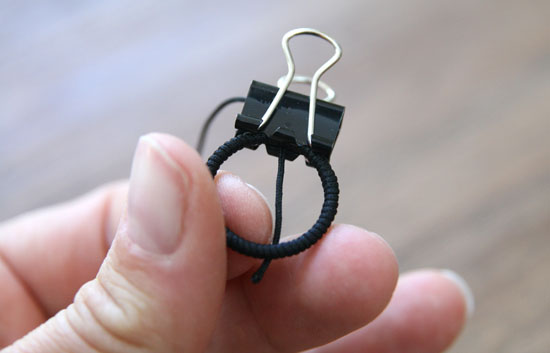
Secure it by clipping a small binder clip over it and let it dry for about 15 minutes. You can prep all your rings this way, and by the time you are done with the last one, the first one should be dry enough to work with.
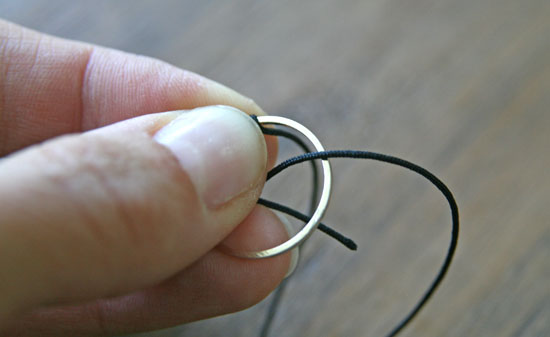
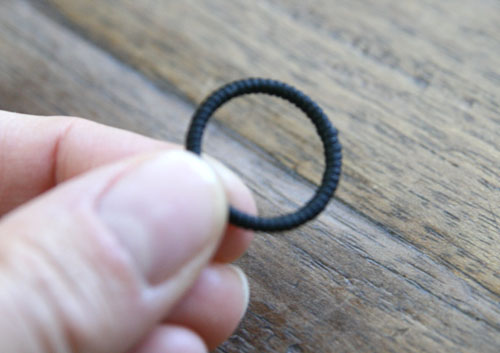
Now, wrap the cord around the ring, keeping it tight and each coil snug against the previous one. You don’t want to see any metal through the wrapping.
In order to keep the right tension, you’ll need to hold the parts you’ve already wrapped tightly while you wrap more.
Stop wrapping with about a quarter of an inch or so left to go.
Now, place more jewelry glue on the exposed metal, and then continue wrapping until you have covered the ring. Don’t worry about the long ends of the cord just yet. Secure this section with your binder clip and let it dry.
You’ll do this for each ring in each different color cord. Once they’ve dried (I let mine sit overnight just to be certain), you can clip the cords close to the ring. I chose a side I wanted to be the “back” and clipped them both on that side, so the edges wouldn’t show. Although if you’ve glued enough, the edges will sort of blend together with the ring.
Sorry for the blurry photo!
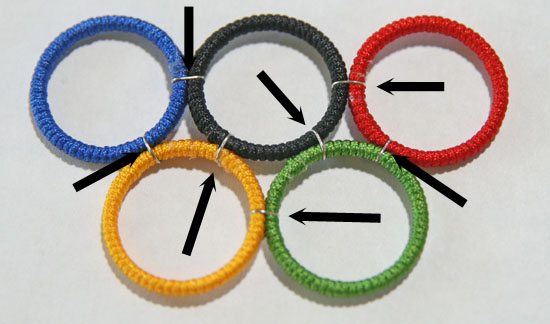
Once you have all your rings, it’s time to lay them out in the correct pattern. Check online and look at images to get your order correct. Then, you are going to start wiring them together.
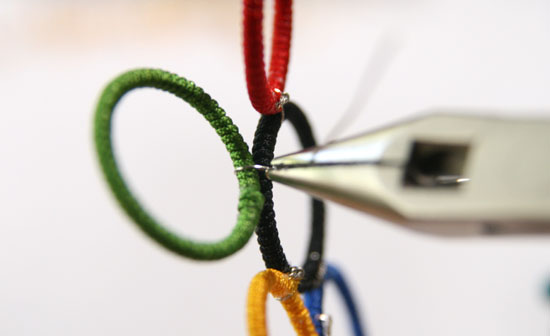
Cut a small length of wire, about 3″ long, and place it over one of the connections between rings.
Turn to the back, and twist the two wires together, like twist ties. You can use your fingers, or if you have needle nose pliers, those work well, too.
You’ll twist until the connected wires are about 1/4″ long, and then snip the wires off. Fold them under and towards the rings so that they don’t stick out, but keep them hidden in the back.
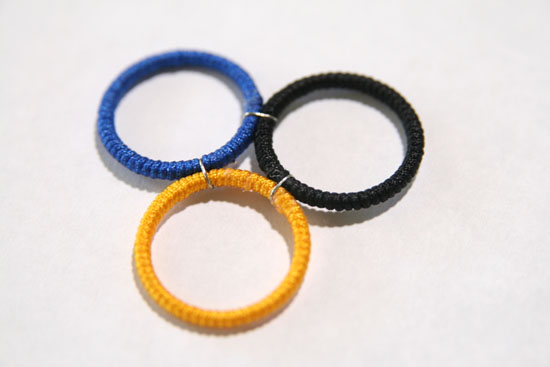
Once you get a few together, it’ll look like this:
Make sure you are wiring them tightly together so that they keep their shape.
You’ll want to make attachments at all these points:

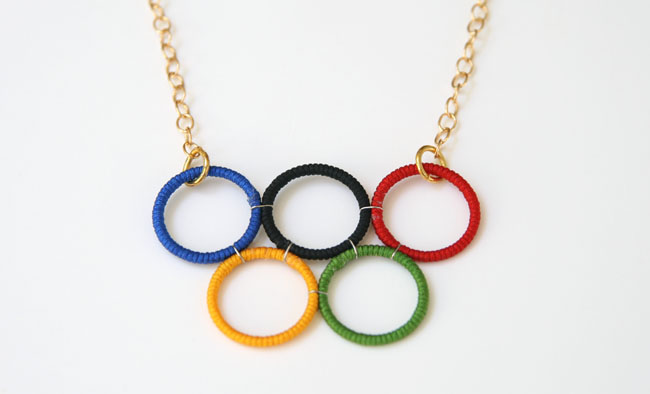
When you’re done, it’ll look like this:
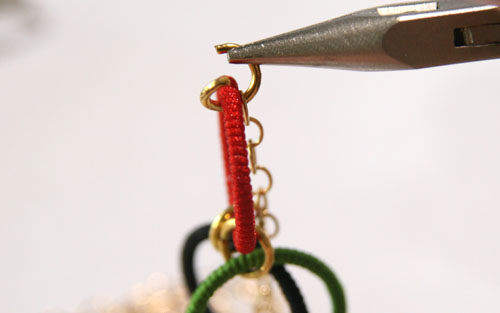
Then, you just need to attach the chain with the jump rings to the blue and red circles.
Attach your clasp, and your necklace is done!